PREPARATION
88
CAUTION: The following section describes the necessary steps to pre-
pare the rammer for use. If after reading this section, you are unsure
about how to perform any of the steps please call (800) 232-1195 M-F
8-5 CST for customer service. Failure to perform these steps properly
can damage the unit or shorten its life.
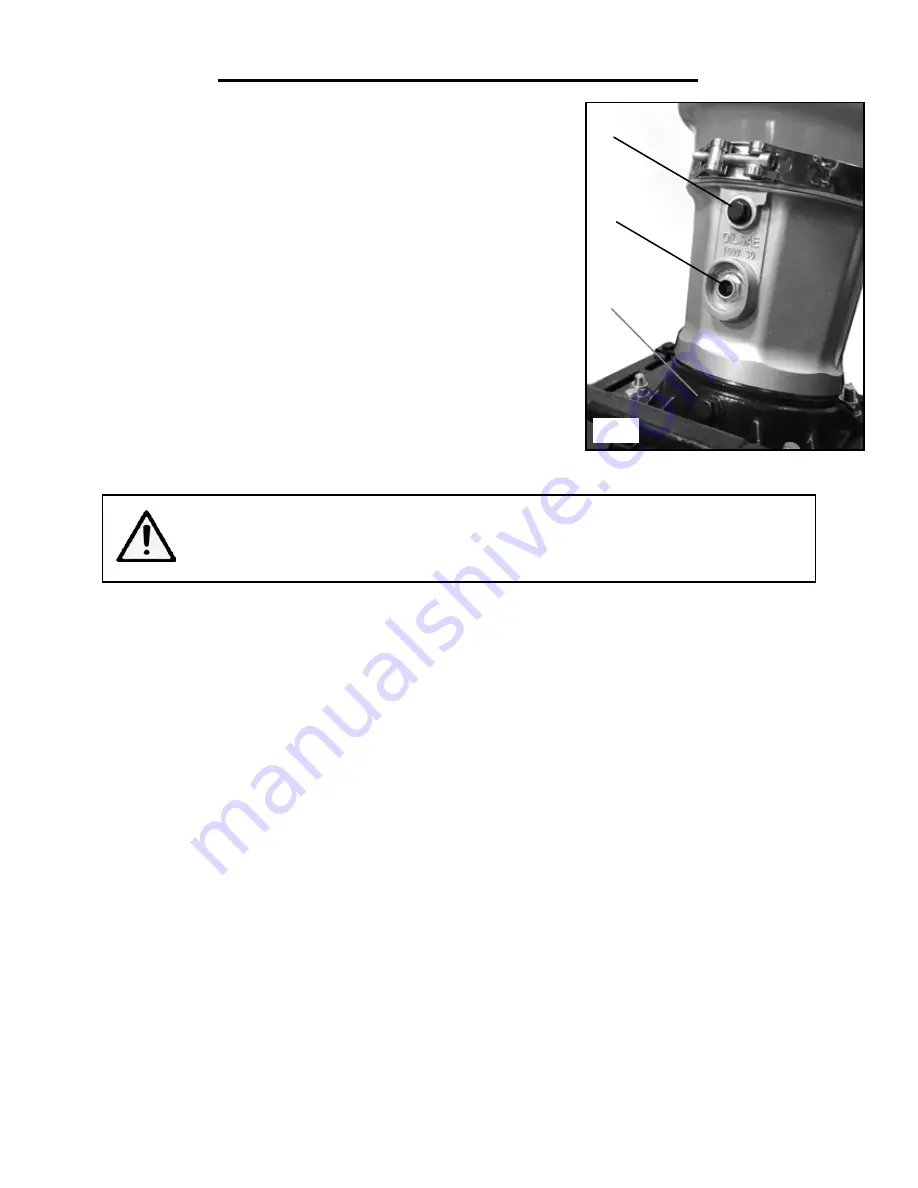
STEP 1 - CHECK THE OIL IN THE ALUMINUM CYLINDER
The tamping rammer’s aluminum cylinder has been shipped with oil.
We recommend checking the oil levels before each operation by look-
ing through the oil gauge window (Fig. 1 - 2). Capacity of the aluminum
cylinder oil reservoir is 37 fl. ounces.
Check the oil level through the small window found at the base of the
aluminum cylinder (Fig. 1 - 2). If oil is not visible through the oil gauge
window, add 10W-30 SE, SF or higher grade oil into the oil opening
(Fig. 1 - A). To drain the oil, use the oil drain plug at the base of the alu-
minum cylinder (Fig. 1 - 3). Cylinder oil should be changed after the first
50 hours of operation and then every 200 hours after that.
WARNING:
This tamping rammer may emit highly flammable and explosive gasoline
vapors, which can cause severe burns or even death if ignited. A nearby open flame can
lead to explosion even if not directly in contact with gasoline.
STEP 2 - CHECK THE OIL IN THE ENGINE
The tamping rammer’s engine is shipped without oil. User must add the proper amount of oil before operating
the unit for the first time. The oil capacity of the engine crankcase is 11.8 fl. oz. For general use, we recommend
10W-30 engine oil. To add oil, follow these steps:
1. Make sure the tamping rammer is on a level surface. Tilting the rammer to assist in filling will cause oil to flow
into the engine areas and will cause damage. It is best to use the assistance of a funnel.
2. There are two orange oil plugs on either side of the engine’s base. Both of these lead into the same reservoir
and either can be used to fill the engine with oil.
3. Add oil slowly, being careful not to overfill the unit. Fill the crank case to the upper fill line (Fig. 2A) so the oil
lands about halfway up the dipstick threads (Fig. 2B).
4. To check the oil level, wipe the dipstick with a clean rag. Insert the dipstick into the oil fill opening without
screwing it in. Remove the dipstick to check the oil mark. It should land within the two lines in Fig. 2B (desired
oil range).
5. Slowly add more oil and repeat step 4 until the oil mark reaches to the top of the dipstick, or halfway up the
threads of the oil fill (Fig. 2). Do not overfill the crankcase. It’s best practice to fill the crankcase and then let it
sit for a few minute to let the oil settle. Then, once the oil settles, there will be room for the rest of the 11.8 fluid
ounces. Repeat as many times as necessary.
6. Check for oil leaks and firmly tighten the dipstick.
1
2
3
Fig. 1


