background image

To fill the fuel tank

1. Clean the area around the fuel tank cap.
2. Shake the container and make sure that the fuel is

fully mixed. 

3. Fill the fuel tank.
4. Tighten the fuel tank cap carefully.
5. Move the product 3 m (10 ft) or more away from the

refueling area and fuel source before starting.

CAUTION: Contamination in the tanks

causes malfunction. Clean the fuel tank 

regularly and replace the fuel 

filter


one


time a year or more.

Before you operate the product

• Examine the work area to make sure that you know

the type of terrain. Examine the slope of the ground

and if there are obstacles such as stones, branches

and ditches.

• Do an overhaul inspection of the product.
• Do the safety inspections, maintenance and

servicing that are given in this manual.

• Make sure that all covers, trimmer guard and

trimmer head correctly attached and not damaged or

cracked. Replace if they are exposed to impact or

cracked.

WARNING: Do not use the product without a

guard or a guard that is defective.

To 

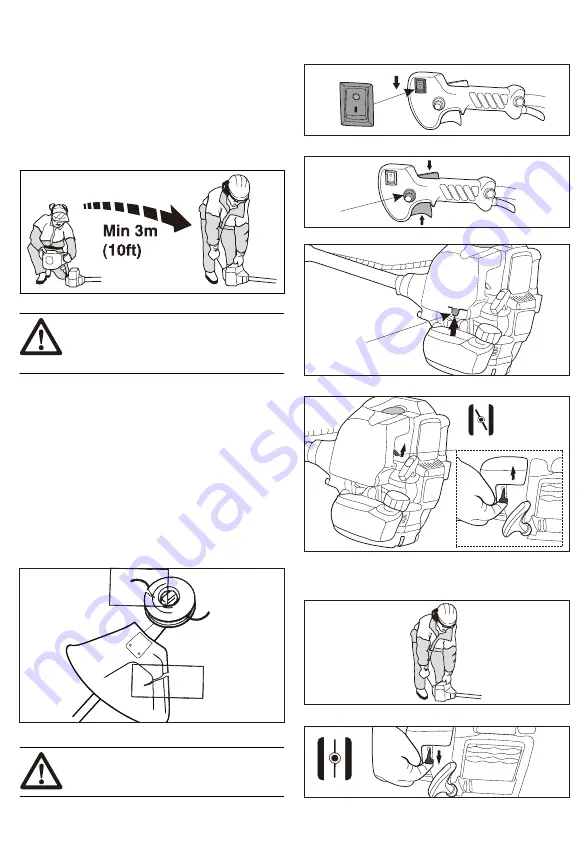
start

 a cold engine 

3

. Push the air 

primer


bulb


6

-

10


times

 .

4

. Move the choke control up into choke 

on

 position.

Primer Bulb


1

.

Open the engine (I-open/o-stop ) 

5

.

 Pull the starter rope until the engine warm up .

6

.

 Push the choke control down into the choke off  .

   Warm up ( Engine start / Try to start ) .

14

   Pull Max 6 times .

2

.

Hold


the


trigger


and


trigger


lockout


press


the


lock


button

 .  


lock


button


Содержание WS-ST42G

Страница 1: ...WS ST42G...

Страница 2: ...with a trimmer head to cut grass Do not use the product for other tasks than grass trimming and grass clearing Note National or local regulations may regulate the use Comply to given regulations Prod...

Страница 3: ...ry Maximum speed of the output shaft 50FT 15 m 50FT 15 m Keep a minimum of 15 m distance to persons and animals during operation of the product Hex Wrench Screwdriver Wrench Spacer Catcher Allen Key T...

Страница 4: ...operate with this engine unit are the cutting attachments that we recommend Never allow children to use or be in the vicinity of the product As the product is equipped with a spring loaded start stop...

Страница 5: ...lead to circulatory damage or nerve damage in people who have impaired circulation Contact your doctor if you experience symptoms of overexposure to vibration These symptoms include numbness loss of f...

Страница 6: ...product with defective safety components The product s safety equipment must be inspected and maintained as described in this section If your product fails any of these checks contact Wemars service t...

Страница 7: ...e stop position and make sure that the engine stops O stop To do a check of the cutting attachment guard WARNING Do not use a cutting attachment without an approved and correctly attached cutting atta...

Страница 8: ...care when handling fuel Bear in mind the risk o re explosion and inhaling fumes Observe caution when handling fuel and make sure there is adequate ventilation Fuel and fuel fumes are highly in ammabl...

Страница 9: ...disc aligns with the related hole in the gear housing 5 Put the locking allen key in the hole to lock the shaft To assemble the U handle 2 Install the u handle and tighten the screws 1 Install the gra...

Страница 10: ...iece shaft 1 Remove the shaft A cap 3 Align the tab of the cutting attachment A with the arrow of the coupling B B 2 Turn the knob to loosen the coupling Knob A A To assemble the 3T blade head Drive d...

Страница 11: ...ate faces out 5 Make sure soft side is down the shoulder strap 4 Make sure you back looks like this 6 Make sure the board is on the right side of your body 7 Wearing the harness Front Right 4 Carefull...

Страница 12: ...s G Buckle Hook 2 Loosen the hook screw and move it to the best position B B Hook screw 3 Emergency Release Pull the red tag G the buckle will breaks away 3 Maintain balance and reduce burden on hands...

Страница 13: ...unning condition which can damage the engine We recommend a higher octane rating when you do work at continuous high speed Two stroke oil CAUTION Unsatisfactory oil quality and or incorrect oil fuel r...

Страница 14: ...acles such as stones branches and ditches Do an overhaul inspection of the product Do the safety inspections maintenance and servicing that are given in this manual Make sure that all covers trimmer g...

Страница 15: ...can cause damage to the product To stop the engine Stop the engine o stop I open To start a warm engine 2 Push the air primer bulb 6 10 times Primer Bulb 1 Open the engine I open o stop 3 Pull the sta...

Страница 16: ...rottle when you cut grass near objects To cut the grass 1 Make sure that the trimmer line is parallel to the ground when you cut the grass 2 Do not push the trimmer head to the ground This can cause d...

Страница 17: ...for leaks X Clean the cooling system X Examine the starter and the starter rope for damages X Examine the vibration damping elements for damages and cracks X Clean the external parts of the spark plug...

Страница 18: ...sk of unwanted material on the spark plug electrodes obey these instructions a Make sure that the idle speed is correctly adjusted b Make sure that the fuel mixture is correct c Make sure that the air...

Страница 19: ...19 25 1 28mm 9T Spool for grass trimmer line Engine idling speed WS ST42G 42 7cc 2 255 Fuel tank capacity 1200Ml...

Страница 20: ...ll with correct fuel Spark plug The spark plug is dirty or wet Make sure that the spark plug is dry and clean The spark plug electrode gap is incorrect Clean the spark plug Make sure that the electro...

Страница 21: ...X 15CM 6 Click 10 20 9 21...

Отзывы: