background image

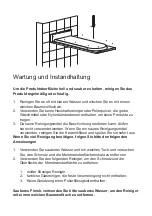
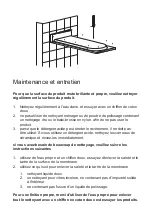
Maintenance and maintenance

To keep the product surface bright and clean and bright, please often or 

regular cleaning product surface.

1.  often clean with clear water, with soft cotton cloth is wiped dry products 

can.

2.  do not use household cleanser or polishing powder contain the coarse 

wash adjust or nylon brush broom, so as not to wear products.

3.  because the acidic detergent can erosion coating, it shall not be used. If  

using acidic detergent washed a ceramic tile, ceramic tile to immediatly to 

ceramic tile and appliance sufficiently washed.

if you need a lot of cleaning, please follow the following

1.  use clean water and soft cloth, try to remove the dirt and membrane 

surface scale

2.  use the following any a cleaner to remove the dirt and membrane surface 

scale

1.  mild liquid cleaner

2.  a colorless glass cleaner, do not have the solid impurity inside.

3.  dose not contain the wear of polished liquid role.

Clean finish, please use clean water to remove all the cleaner with soft 

cotton cloth is wiped dry products can.

Содержание DIVIDO WZ00091

Страница 1: ...91 Divido shower head INSTRUCTION MANUAL Divido fejzuhany TELEPÍTÉSI UTASÍTÁS Divido Duschkopf BEDIENUNGSANLEITUNG Tête de douche Divido MANUEL D INSTRUCTION Duș tavan Divido INSTRUCȚIUNI DE MONTARE EN HU DE FR RO ...

Страница 2: ...xperience Suggest using pressure 3 0 bar quartile use hydraulic quartile 1 0 bar Take the waterfall suggest using pressure 5 0 bar quartile use hydraulic quartile 3 0 bar Product installation height parameters In order to keep you safe and convenient when you install the head shower the shower should leave the ceilling at least 20 cm above the above parameters is only for reference 20 cm EN ...

Страница 3: ...en the back cover first Make the first screw loose took the card cover then picked up the back cover Twist screw interface into the pipes tight Measure screw end to wall distance Ensure that distance is form 15mm to 18 mm exit the screw and cut the part no need Screw the tape on water stops and screw down the water supply tube Open the water supply valve flush piping system 128 17 5 39 5 80 G 1 2 ...

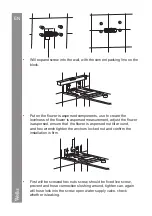
Страница 4: ...ement adjust the flower is aspersed ensure that the flower is aspersed not tilt around and hex wrench tighten the anchors locked nut and confirm the installation is firm First will be screwed hex nuts screw should be fixed live screw prevent and hose connection sloshing around tighten can again will hose lock into the screw open water supply valve check whether is leaking EN ...

Страница 5: ...ot be used If using acidic detergent washed a ceramic tile ceramic tile to immediatly to ceramic tile and appliance sufficiently washed if you need a lot of cleaning please follow the following 1 use clean water and soft cloth try to remove the dirt and membrane surface scale 2 use the following any a cleaner to remove the dirt and membrane surface scale 1 mild liquid cleaner 2 a colorless glass c...

Страница 6: ...asználatának követelménye Minimum 1 bar ajánlott 3 bar maximum 5 bar Termék telepítési magasság paraméterek A biztonsága és kényelme érdekében a fejzuhany telepítésekor a zuhanynak legalább 20 cm re kell lennie a plafontól a fenti paraméterek csupán tájékoztató jellegűek 20 cm HU ...

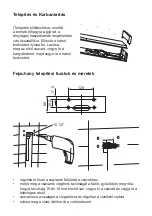
Страница 7: ...tsa meg az első csavart vegye le a kártyafedelet majd vegye le a hátsó burkolatot rögzítse erősen a csavarok felületét a csövekhez mérje meg a csavarok végének távolságát a faltól győződjön meg róla hogy a távolság 15 és 18 mm között van vegye ki a csavart és vágja le a felesleges részt csavarozza a szalagot a vízgátlókra és rögzítse a vízellátó csövet nyissa meg a vizet öblítse át a csőrendszert ...

Страница 8: ...e győződjön meg róla hogy a fej nincs elbillenve imbuszkulccsal rögzítse a hatszögletű csavarokat és győződjön meg róla hogy a rögzítés elég erős először a hatszögletű csavarokat csavarja be figyeljen arra hogy ne károsítsa a csövet alaposan húzza meg a csavarokat engedje meg a víz ellátását ellenőrizze hogy van e szivárgás HU ...

Страница 9: ...empét a savas vegyszer használata után azonnal mossa le a felületet és a terméket is ha gyakran szükséges a tisztítás az alábbi eljárást alkalmazza 1 használjon vizet és puha ruhát a szennyeződések és a membrán felületén található vízkő eltávolítására 2 a szennyeződések és a membránfelület vízkövének eltávolításához az alábbi tisztítókat használja 1 kíméletes folyékony tisztítószer 2 szennyeződést...

Страница 10: ...uscherlebnis Verwenden Sie einen Druck von 3 0 bar Nehmen Sie den Wasserfallvorschlag mit einem Druck von 5 0 bar Quartile verwenden Sie ein hydraulisches Quartil von 3 0 bar Parameter für die Installationshöhe des Produkts Damit Sie sich bei der Installation der Kopfbrause sicher und bequem befinden sollte die Dusche mindestens 20 cm von der Dusche entfernt sein Oberhalb der oben genannten Parame...

Страница 11: ...e die Kartenabdeckung und dann die hintere Abdeckung Schrauben Sie die Schraubverbindung fest in die Rohre Messen Sie den Abstand zwischen Schraubenende und Wand Stellen Sie sicher dass der Abstand zwischen 15 mm und 18 mm liegt verlassen Sie die Schraube und schneiden Sie das Teil nicht mehr ab Schrauben Sie das Band an den Wasseranschlägen an und schrauben Sie den Wasserversorgungsschlauch fest ...

Страница 12: ...sie gerade und nicht geneigt ist und ziehen Sie die Muttern mit dem Schraubenschlüssel fest und stellen Sie sicher dass die Installation fest ist Schrauben Sie zuerst die Sechskantmutter fest Sie sollte sofort befestigt werden um zu verhindern dass die Verbindung flexibel ist Ziehen Sie dann so fest wie möglich an Öffnen Sie das Wasserzufuhrventil um zu prüfen ob das Produkt undicht ist ...

Страница 13: ...n saures Reinigungsmittel verwenden reinigen Sie die Keramikfliese und spülen Sie sie sofort aus Wenn Sie viel Reinigung benötigen folgen Sie bitte den folgenden Anweisungen 1 Verwenden Sie sauberes Wasser und ein weiches Tuch und versuchen Sie den Schmutz und die Membranoberflächenskala zu entfernen 2 Verwenden Sie den folgenden Reiniger um den Schmutz und die Oberfläche der Membranoberfläche zu ...

Страница 14: ...us suggérons d utiliser une pression de 3 0 bars ou d utiliser un quartile hydraulique de 1 0 bar Pour l effet cascade utilisez une pression de 5 0 bar en quartile et utilisez un quartile hydraulique de 3 0 bar Paramètres de hauteur d installation du produit Afin de vous garder en sécurité lors de l installation de la tête de douche celle ci doit laisser un écart d au moins 20cm avec le plafond le...

Страница 15: ...rrez la première vis prenez le couvercle de la carte puis prenez le couvercle du dos Tourner l interface vis dans les tuyaux serré Mesurez la distance entre l extrémité de la vis et le mur Assurez vous que la distance est comprise entre 15 et 18 mm sortez la vis et coupez la partie de la pièce inutilisée Visser le ruban sur les arrêts d eau et visser le tube d alimentation en eau Ouvrir la vanne d...

Страница 16: ... assurez vous qu elle soit droite et pas inclinée et utilisez la clé pour resserer les écrous et vérifier que l installation est solide Vissez d abord la vis à écrous hexagonaux elle devrait être fixée immédiatement pour empêcher que la connexion soit flexible puis serrer autant que possible ouvrez la vanne d alimentation en eau pour vérifier si le produit fuit ...

Страница 17: ...ez un détergent acide nettoyez les carreaux de céramique et rincez les immédiatement si vous avez besoin de beaucoup de nettoyage veuillez suivre les instructions suivantes 1 utilisez de l eau propre et un chiffon doux essayez d enlever la saleté et le tartre de la surface de la membrane 2 utilisez ce qui suit pour enlever la saleté et le tartre de la membrane 1 nettoyant liquide doux 2 un nettoya...

Страница 18: ...rivind utilizarea produsului Presiune minimum 1 bar recomandat 3 bar maximum 5 bar Parametri înălțime de montare produs Pentru siguranță și confort la montarea capului de duș acesta trebuie să fie la cel puțin 20 cm de tavan parametrii de mai sus sunt specificați doar cu caracter informativ ...

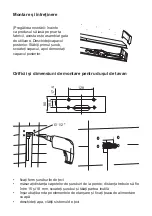
Страница 19: ... utilizare Deschideți capacul posterior Slăbiți primul șurub scoateți capacul apoi demontați capacul posterior fixați ferm șuruburile de țevi măsurați distanța capetelor de șuruburi de la perete distanța trebuie să fie între 15 și 18 mm scoateți șurubul și tăiați partea inutilă înșurubați banda pe elementele de etanșare și fixați țeava de alimentare cu apă deschideți apa clătiți sistemul de țevi ...

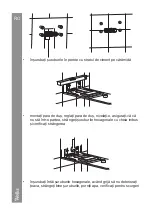
Страница 20: ... duș reglați para de duș nivelați o asigurați vă că nu stă într o partea strângeți șuruburile hexagonale cu cheia imbus și verificați strângerea înșurubați întâi șuruburile hexagonale având grijă să nu deteriorați țeava strângeți bine șuruburile porniți apa verificați pentru scurgeri ...

Страница 21: ...esia faianța cu agenți acizi spălați produsul cu apă imediat după utilizarea acestora dacă este necesară curățarea frecventă aplicați procedura de mai jos 1 folosiți apă și o lavetă moale pentru îndepărtarea murdăriei și a calcarului de pe membrană 2 pentru îndepărtarea murdăriei și a calcarului de pe membrană folosiți agenții de curățare de mai jos 1 detergent lichid moale 2 soluție incoloră cura...

Страница 22: ...6 0 0 m m 1 5 5 m m 27 5 mm ...

Страница 23: ......

Страница 24: ......

Отзывы: