background image


- 8 - 


1.5. Machine Assembling Guide: 

This series welder is small, light and portable. They will be more convenient if place 

them on the trolleys. Ensure the location where to place the welder is even. 


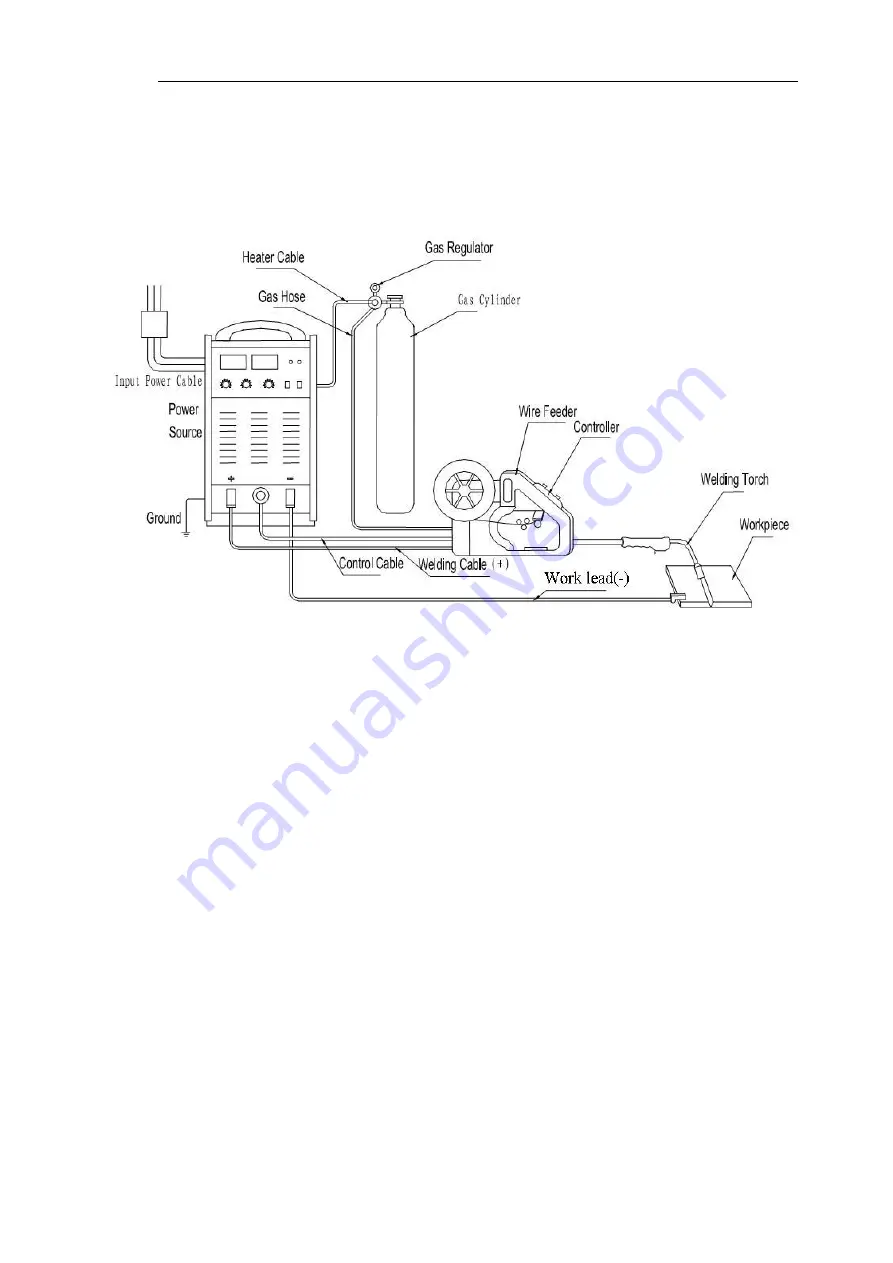
Figure 4: Connection Chart for MIG-E Series 


Preparation prior to operation procedure: 

(1)


Connect the welder’s terminal plug (-) to the work piece by work lead. 

(2)


Connect the welder’s terminal plug (+) to the wire feeder by welding cable. 

(3)


Connect the welder’s control cable socket to the wire feeder by control cable. 

(4)


Connect feeder’s gas hose to the regulator. 

(5)


Connect the regulator’s heater cable to the welder’s “gas heater power “cable socket. 

(on the rear


panel). 

(6)


Connect  the  welder’s  power  cable  to  the  disconnection  switchboard,  while  grounds 

the lead safely. 

(7)


Reset the circuit breaker on the welder’s rear panel. 


Содержание WM250FI

Страница 1: ...ty in mind However your overall safety can be increased by proper installation and thoughtful operation in your part DO NOT INSTALL OPERATE OR REPAIR THIS EQUIPMENT WITHOUT READING THIS MANUAL AND THE SAFETY PRECAUTIONS CONTAINED THROUGHOUT And most importantly think before you act and be careful C V A N U G R A H D U T A N I A G A Jln Arief Rahman Hakim 51 Komplek Ruko 21 Klampis Blok D 1 Telp 03...

Страница 2: ... 6 Error Code 16 Appendix A EMC Suggestion for installation and use of welder 17 Appendix B Feedback Form 19 This operating manual can be fit for MIG FI including WM250FI 350FI 500FI series welding machines The technical data are measured with power supply 3 phase 380V the data will be changed when you use different voltage or frequency ...

Страница 3: ...ormer rectified and filtered by HF rectifier then output DC power suitable for welding After this process the welder s dynamically responsive speed has been greatly increased so the welder size and weight are reduced noticeably Power source enjoys good anti fluctuating ability and high quality performance MIG E Series Volt Ampere Curve as shown in Figure 2 Figure 2 MIG FI Series Volt Ampere Curve ...

Страница 4: ...factor 0 95 Rated duty cycle 60 Open load voltage V 51 72 81 Welding current range A 40 250 60 350 60 500 Welding voltage range V 14 30 15 40 15 50 Wire diameter mm 0 8 1 0 0 8 1 2 1 0 1 6 Wire feeding type Wire pushing CO2 gas flow rate L min 10 20 15 25 15 25 Protection degree IP21S Insulation degree H B Dimensions mm3 501 235 495 Weight Kg 20 26 28 Table 1 Parameter Specification ...

Страница 5: ...J1 2XG1 2XJ2 2XG2 2XJ3 2XJ4 2XG3 2XG4 2 10V 22V 22V V RA1 Display Board Front panel YKH T1 1 2 Re ar pa ne l BE1 M1 QN1 RA3 GQ1 3X5 3 3X5 1 1X2 1 1X3 1 1X2 3 3X1 2 3X1 3 3X1 1 3X4 5 3X4 6 RB1 RB2 R2 C6 C7 R3 C10 6 5 4 3 2 1 7 3X3 8 3X3 7 3X3 6 3X3 2 3 3X3 4 5 3X3 1 7 3 4 5 6 7 10 8 9 Q1 A4 IGB T pr otection board Q2 A2 A3 X1 X2 RD2 3X2 C2 C3 C4 C5 C8 2 3 C9 yellow blue red V 3X4 3 Power charging b...

Страница 6: ...ngth changes as well as startling arc self adjustability and stable welding process Less spatter high deposit efficiency Less weld distortion good weld formation High success rate of arc starting due to stronger pulse strike Reducing molten ball while stopping arc Reducing labor intensity while welding long weld by using auto lock function Stable wire feeding due to consistent output of power circ...

Страница 7: ...essories Environments with adverse conditions do not include places where electrically conductive parts in the near vicinity of the operator which can cause increased hazard have been insulated 1 2 Installation Location Be sure to locate the welder according to the following guidelines In areas free from moisture and dust Ambient temperature between 0 degrees C to 40 degrees C In areas free from o...

Страница 8: ...standard sine wave effective value 380V 10 frequency 50Hz Unbalance degree of 3 phase volt must be no more than 5 Power supply Table 3 Power supply connection Note The size of fuse and breaker in the table are for reference only Model WM250FI WM350FI WM500FI Power supply 3 phase AC 380V Min capacity Power network 12KVA 26KVA 45KVA Generator 16KVA 34KVA 60KVA Input volt protection Fuse 20A 30A 50A ...

Страница 9: ... terminal plug to the work piece by work lead 2 Connect the welder s terminal plug to the wire feeder by welding cable 3 Connect the welder s control cable socket to the wire feeder by control cable 4 Connect feeder s gas hose to the regulator 5 Connect the regulator s heater cable to the welder s gas heater power cable socket on the rear panel 6 Connect the welder s power cable to the disconnecti...

Страница 10: ...on on the front panel of the welder When the torch switch is pulled the feeder start to feed wire and CO2 will blow out of the nozzle therefore it can be used for welding Operators can select parameters from table listed below Be sure to turn off the valve of gas bottle and unplug the power cord while stop welding Welding current A Welding voltage V Suitable wire mm 60 80 17 18 Ф1 0 80 130 18 21 Ф...

Страница 11: ... 1 Output Amp meter Display relative feeding speed while in open load and display practical value of current while in welding 2 Output volt meter Display preset value of volt while in open load and display practical value while in welding 3 Crater filler voltage regulation knob Adjusting crater filer voltage value in 4 step mode 4 Crater filler Current regulation knob Adjusting crater filler curre...

Страница 12: ...filling situation which was preset by stop arc knobs on the front panel The welder will stop welding when release the switch This mode is suitable for welding long weld 7 Gas Test button Press this button the gas flow will keep for 30s while it will stop the gas if press it during the 30s 8 Wire Test button This button function is the same as torch switch Press this button the wire will feeding re...

Страница 13: ...r on Use switch on the disconnected switchboard or switchbox customers prepare by them to start or stop welding machine avoiding using the circuit breaker 2 Input power cable The mixed colored wire must be firmly grounded the rest wires connect to 3 phase power 380V 50Hz respectively 3 Cooling fan Cool down the heat components in the welding machine 4 Gas Heater power cable socket Connect to CO2 r...

Страница 14: ...t and choose the sub menu parameter Press 2 step 4 step button to increase the parameters valve Press gas test button to reduce the parameter valve When in P08 press gas test or 2 step 4 step will restore the factory setting The sub menu parameters value will be saved automatically if there is none operation in 10s The illustration of sub menu parameters is as chart below Code Parameter Valve Rang...

Страница 15: ...l protection acts At this point let the machine runs under open load for a few minutes and it will be automatically recover Under high temperature if work with large current for long period welder may shut down automatically due to circuit breaker trips Cut off the power supply to the electricity switchboard on frame and wait for 5 minutes to turn on the circuit breaker on the power source fist th...

Страница 16: ...firmly Check if the welding cables are connected correctly and firmly Check if gas regulator is in good situation and gas flows out normally WARNING Have a qualified electrician do the maintenance and trouble shooting work Turn the input power off using the disconnect switch at the fuse box before working inside the machine Don t open up case uninstructed the max volt inside machine is 600V Never ...

Страница 17: ... cable is broken or controller is damaged 2 Control board is damaged 3 Conductive wire connected the rectifier is broken 1 Change control cable or controller 2 Replace 3 Reconnect the broken wires 05 Instable arc welding more spatter 1 Incorrect welding parameters 2 Contact tip is worn out severely 1 Fine tune parameters 2 Replace 06 CO2 gas regulator can t heat 1 CO2 regulator is damaged 2 Heater...

Страница 18: ...rent value E19 Over heat protection Welding machine is too hot or the thermal switch is broken Wait several minutes or replace with new thermal switch E24 Communication is abnormal Display board has fault Replace the display board E34 Given is abnormal No given signal Check the control circuit E35 Wire feeding motor has fault Wire feeder motor control cable has fault or display board is damaged Ch...

Страница 19: ...sessment of potential electromagnetic problems in the surrounding area The following shall be taken into account 1 Other supply cables control cables signaling and telephone cables above below and adjacent to the arc welding equipment 2 Radio and television transmitters and receivers 3 Computer and other control equipment 4 Safety critical equipment for example guarding of industrial equipment 5 T...

Страница 20: ...nd adjacent to it should be considered However metallic components bonded to the word piece will increase the risk that the operator could receive an electric shock by touching these metallic components and the electrode at the same time The operator should be insulated from all such bonded metallic components 5 Earthling of the work piece Where the work piece is nor bonded to earth for electrical...

Страница 21: ...Name of Company Address Contact person Title Telephone No Fax No Email Address Company s filed of business Comments Thank you for taking the time to share your feedback Your comments and suggestions will help us to serve you better ...

Отзывы: