Weinmann WM 24042 Скачать руководство пользователя страница 60

60

Consignes de sécurité

FR

L'utilisation d'articles d'autres marques peut être à l'origine de 
dysfonctionnements et compromettre l'usage de l'appareil. Il est possible 
en outre que les exigences de biocompatibilité ne soient pas satisfaites. 
Veuillez noter que nous déclinons toute responsabilité et n'accordons 
aucune garantie lorsque ni les accessoires conseillés dans le mode 
d'emploi, ni des pièces de rechange originales ne sont utilisés. 

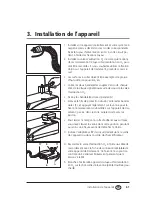
Comme la liaison risque d'être perturbée pendant le réglage des 
paramètres (durée de démarrage progressif, niveau de réglage de 
l'humidificateur, pression thérapeutique, par exemple) sur l'appareil de 
traitement, déconnectez le cordon de raccordement de l'appareil 
pendant cette opération.

Содержание WM 24042

Страница 1: ...O2 Zuschaltventil Oxygen valve Valve d adduction d oxygène WM 24042 Gerätebeschreibung und Gebrauchsanweisung Description and operating instructions Description et mode d emploi de l appareil ...

Страница 2: ...Deutsch 3 English 28 Français 52 ...

Страница 3: ...Übersicht 3 DE Deutsch Übersicht 4 12 16 17 14 13 7 15 5 8 11 9 10 1 3 6 2 Zubehör ...

Страница 4: ...gsschlauch 4 O2 Zuschaltventil 5 Klettstreifen 6 Anschlussbuchse 7 Verschlussstopfen 8 O2 Ausgang 9 Leuchtdiode 10 Verbindungsleitung 11 O2 Eingang Zubehör 12 Doppelschlauch 13 Faltenschlauch 14 Muffe Faltenschlauch 15 Adapter klarsichtig 16 Muffe Adapter 17 Adapter grau ...

Страница 5: ...n am Gerät 5 DE Besondere Kennzeichnungen am Gerät Gerät O2 Eingang O2 Ausgang Geräteschild Gerät nicht über Hausmüll entsorgen Schutzklasse B Schutzklasse II Schutzisolierung Baujahr 02 Druck max 1 5 bar 1500 hPa Geräteschild ...

Страница 6: ...r Anleitung In dieser Gebrauchsanweisung werden die Sicherheitshinweise folgendermaßen gekenn zeichnet Warnung Warnt vor Verletzungsgefahr und möglichen Sachschäden Vorsicht Warnt vor Sachschäden und möglicherweise falschen Therapieergebnissen Hinweis Enthält nützliche Tipps ...

Страница 7: ...m Gebrauch 14 5 Hygienische Aufbereitung 15 5 1 Fristen 15 5 2 Reinigung Desinfektion 15 5 3 Patientenwechsel 18 6 Funktionskontrolle 19 6 1 Fristen 19 6 2 Durchführung 19 7 Störungen und deren Beseitigung 20 8 Wartung 21 8 1 Fristen 21 8 2 Doppelschlauch wechseln 21 8 3 Entsorgung 22 9 Lieferumfang 23 9 1 Serienmäßiger Lieferumfang 23 9 2 Ersatzteile 23 9 3 Zubehör 23 10 Technische Daten 24 11 Ga...

Страница 8: ...s kann in Verbindung mit einem Sau erstoffkonzentrator einer Sauerstoffflasche mit Druckmin derer oder Flüssigsauerstoff verwendet werden Sie können das Ventil mit folgenden Geräten verwenden CPAP Geräte SOMNOsmart 2 SOMNOset SOMNObalance e SOMNOsoft 2 e nCPAP Geräte SOMNOcomfort SOMNOcomfort 2 e CPAP 20 e SOMNOsoft BiLevel Geräte SOMNOvent S SOMNOvent ST SOMNOvent auto S SOMNOvent auto ST CS Gerä...

Страница 9: ...äßen Zustand ab Ist das Therapiegerät eingeschaltet öffnet sich das innenlie gende Magnetventil Dies wird durch eine grüne Leuchtdiode angezeigt Wenn das Therapiegerät ausgeschaltet ist oder nicht ordnungsgemäß arbeitet schließt sich das Ventil Die Kontrollleuchte erlischt Wird der ordnungsgemäße Zustand wiederhergestellt öffnet das Ventil wieder ...

Страница 10: ...en entfernt ist Die maximale Einspeisungsmenge von 4 l min darf nicht überschritten werden Bei einer höheren Einspeisung kann es zu einer Sauerstoffanrei cherung im Therapiegerät kommen Eine Sauerstofftherapie kann bei falscher Anwendung Dosierung zu Ne benwirkungen führen Deshalb dürfen Sie das Gerät nur nach Verord nung des Arztes der Ärztin betreiben Stellen Sie sicher dass immer der vom Arzt v...

Страница 11: ...Sie dass in diesen Fällen jeglicher Anspruch auf Garantie und Haftung erlischt wenn weder das in der Gebrauchsanweisung empfohlene Zube hör noch Originalersatzteile verwendet werden Da es während der Einstellung von Therapieparametern am Therapiege rät z B Softstartzeit Anfeuchterstufe Therapiedruck zu Störungen der Kommunikation kommen kann sollte dabei der Stecker der Verbin dungsleitung zum The...

Страница 12: ...ie die harten Streifen Gegenstücke dar auf Ziehen Sie die Schutzfolie auf der Rückseite der harten Streifen ab 1 und drücken Sie das Ventil fest an dem von Ihnen gewählten Standort 2 auf das Therapiege rät z B wie abgebildet im rechten hinteren Bereich Um dem Kleber Zeit zu lassen sich mit den Oberflächen zu verbinden sollten Sie das Ventil mindestens eine Stunde dort belassen bevor Sie die Klettv...

Страница 13: ...temluftanfeuchtung verwenden Sie den Befeuch ter für Ihr Therapiegerät erhältlichen Befeuchter Eine zusätzliche Anfeuchtung des Sauerstoffs mit Sprudler Anfeuchtern ist zulässig aber nicht notwendig Die Verwendung von Verneblern ist nicht zulässig Als Zubehör ist ein Schlauchsystem mit innenliegendem Einleitungsschlauch erhältlich Sie können das Schlauchsystem mit folgenden Geräten verwenden CPAP ...

Страница 14: ... des Gerätes Während des Betriebs ist keine Bedienung erforderlich 4 3 Nach dem Gebrauch Bitte beachten Sie folgende Reihenfolge beim Abschalten der Geräte 1 Schalten Sie die O2 Zufuhr ab indem Sie den Sauerstoffkonzentrator ausschalten bzw das Flaschenventil Flaschensauerstoff oder bei Flüssigsauerstoff den Flowregler schließen 2 Schalten Sie Ihr Therapiegerät aus 3 Reinigen Sie die Maske und das...

Страница 15: ...n siehe 8 2 Doppelschlauch wechseln auf Seite 21 5 2 Reinigung Desinfektion Reinigung des Gehäuses Achtung Vor der Reinigung die Verbindungsleitung aus der Anschlussbuchse 6 des Therapiegerätes ziehen Drü cken Sie dazu leicht auf den kleinen Hebel auf der Unter seite des Steckers Es darf kein Wasser oder Desinfektionsflüssigkeit in das Gehäuse gelangen Stellen Sie das Ventil niemals in Wasser Wisc...

Страница 16: ...warmem Wasser nach 6 Schütteln Sie das Schlauchsystem gründlich aus 7 Hängen Sie das Schlauchsystem auf und lassen Sie es gut abtropfen um zu verhindern dass Feuchtigkeit in Ihr Therapiegerät eindringt 8 Trocknen Sie das Schlauchsystem vollständig mit Hilfe des Therapiegerätes Die Vorge hensweise entnehmen Sie der Gebrauchsanleitung Ihres Therapiegerätes Desinfektion des Gehäuses Gehäuse Anschluss...

Страница 17: ... Sie den Doppelschlauch rückstandsfrei mit et was Desinfektionsmittel in warmem Wasser 3 Spülen Sie den Doppelschlauch nach der Desinfektion gründlich mit destilliertem Wasser 4 Lassen Sie die Teile vollständig trocknen Faltenschlauch und Adapter desinfizieren 1 Gehen Sie wie unter Reinigung des Schlauchsystems beschrieben vor 2 Spülen Sie nach der Desinfektion gründlich mit destilliertem Wasser D...

Страница 18: ...rsichtigen Adapter Nach der Desinfektion Trocknen Sie das montierte Schlauchsystem vollständig mit Hilfe des Therapiegerätes Die Vorgehensweise entnehmen Sie der Gebrauchsanleitung Ihres Therapiegerätes 5 3 Patientenwechsel Bei Patientenwechsel ist der O2 Einleitungsschlauch bzw das Schlauchsystem auszutau schen und das O2 Zuschaltventil äußerlich durch eine Wischdesinfektion zu reinigen Dazu soll...

Страница 19: ...rapiegerät und danach Ihre O2 Versorgung ein Nach dem Ein schalten des Therapiegerätes öffnet sich das Ventil mit einem leisen Klack dies wird durch die grüne Kontrollleuchte 9 angezeigt Nun können Sie an der Flowanzeige Ihres Sauerstoffsystems den verordneten Flow einstellen Ist dies nicht möglich überprüfen Sie zunächst die Funktion Ihres Sauerstoffsystems ist z B die Flasche leer sind evtl Schl...

Страница 20: ...ng Fehlerursache Fehlerbeseitigung Betriebsanzeige leuchtet nicht oder nur manchmal obwohl das Therapiegerät ordnungsgemäß arbeitet Keine Spannungsversorgung vorhanden Verbindungsleitung 10 auf festen Sitz prüfen Maske undicht Kopfhaube so einstellen dass die Maske dicht sitzt Evtl defekte Maske austauschen Der verordnete Flow wird nicht erreicht Schläuche geknickt Alle Schlauchverbindungen kontro...

Страница 21: ...Doppelschlauches vom grauen Adapter ab Ziehen Sie dann den Schlauch aus dem klarsichtigen Adapter heraus 4 Lösen Sie den langen Teil des Doppelschlauches aus dem klarsichtigen Adapter 5 Entsorgen Sie den alten Doppelschlauch 6 Stecken Sie den kurzen Teil des neuen Doppelschlau ches durch den klarsichtigen Adapter und Schieben Sie den ihn dann so weit wie möglich auf den grauen Adapter 7 Schieben S...

Страница 22: ...achgerechte Entsor gung des Gerätes wenden Sie sich an einen zugelassenen zertifizierten Elektro nikschrottverwerter Dessen Adresse erfragen Sie bei Ihrer Ihrem Umweltbeauftragten oder Ihrer Stadtverwaltung Die Geräteverpackung Papp karton und Einlagen können Sie als Altpapier entsorgen ...

Страница 23: ...estellnummer Sauerstoffzuschaltventil Grundgerät WM 24102 O2 Einleitungsschlauch WM 24015 6 x Schlauchhalter WM 24268 Klettstreifen zur Befestigung WM 24687 Gebrauchsanweisung WM 16792 Teile Bestellnummer O2 Einleitungsschlauch WM 24015 Klettstreifen zur Befestigung WM 24687 Teile Bestellnummer Schlauchsystem für Sauerstoffzuschaltventil bestehend aus Faltenschlauch 1830 mm Doppelschlauch Adapter ...

Страница 24: ...ktrischer Anschluss 7 15 V DC Stromaufnahme in Betrieb Bereitschaft 96 0 mA 8 5 mA Klassifikation nach EN 60601 1 Schutzart gegen elektr Schlag Schutzgrad gegen elektr Schlag Schutzklasse II Typ B Elektromagnetische Verträglichkeit EMV nach EN 60601 1 2 Funkentstörung Funkstörfestigkeit EN 55011 IEC 1000 4 Teil 2 bis 6 Teil 11 max zulässiger Flow 4 l min O2 min erforderlicher O2 Vordruck am Ventil...

Страница 25: ...ersonen in das Gerät zu Reparaturzwecken höherer Gewalt wie z B Blitzschlag usw Transportschaden aufgrund unsachgemäßer Verpackung bei Rücksendungen nicht durchgeführter Wartung Betriebsbedingter Abnutzung und üblichem Verschleiß Dazu zählen beispielhaft folgende Komponenten Filter Batterien und Akkus Artikel für den Einmalgebrauch usw Nichtverwendung von Originalersatzteilen Weinmann haftet nicht...

Страница 26: ...rung Hiermit erklärt die Weinmann Geräte für Medizin GmbH Co KG dass das Produkt den einschlägigen Bestimmungen der Richtlinie 93 42 EWG für Medizinprodukte entspricht Den vollständigen Text der Konformitätserklärung finden Sie unter www weinmann de ...

Страница 27: ...Stichwortverzeichnis A Anfeuchtung 13 Aufstellung 12 D Desinfektion 10 15 18 E Ersatzteile 11 23 F Funktionskontrolle 19 G Garantie 25 K Kennzeichnungen 5 R Reinigung 10 15 S Sicherheitshinweise 10 Störungen 11 20 Z Zubehör 11 23 ...

Страница 28: ...28 Overview EN English Overview 4 12 16 17 14 13 7 15 5 8 11 9 10 1 3 6 2 Accessory ...

Страница 29: ...se 3 O2 supply hose 4 Oxygen valve 5 Velcro strips 6 Socket 7 Plug 8 O2 outlet 9 LED 10 Connecting cable 11 O2 inlet Accessory 12 Double hose 13 Corrguated hose 14 Sleeve for corrugated hose 15 Adapter transparent 16 Sleeve for adapter 17 Adapter grey ...

Страница 30: ...ecial marks on the device Unit Unit inlet Unit outlet Rating plate Do not dispose of the unit in domestic waste Protection class B Protection class II protective insulation Year of manufacture O2 pressure max 1 5 bar 1500 hPa Rating plate ...

Страница 31: ...rmation in these instructions Safety information is marked as follows in these instructions for use Warning Warns of a risk of injury and potential material damage Caution Warns of material damage and potentially false therapy results Note Contains useful tips ...

Страница 32: ...r use 38 5 Hygienic preparation 39 5 1 Intervals 39 5 2 Cleaning and disinfection 39 5 3 Changing patients 41 6 Performance check 42 6 1 Intervals 42 6 2 Method 42 7 Troubleshooting 43 8 Maintenance 44 8 1 Intervals 44 8 2 Changing the double hose 44 8 3 Waste disposal 45 9 Supply Schedule 46 9 1 Standard supply schedule 46 9 2 Spare parts 46 9 3 Accessory 46 10 Technical specifications 47 11 Warr...

Страница 33: ...ed to gether with an oxygen concentrator an oxygen cylinder with a pressure reducing valve or liquid oxygen You can use the valve with the following devices CPAP devices SOMNOsmart 2 SOMNOset SOMNObalance e SOMNOsoft 2 e nCPAP devices SOMNOcomfort SOMNOcomfort 2 e CPAP 20 e SOMNOsoft BiLevel devices SOMNOvent S SOMNOvent ST SOMNOvent auto S SOMNOvent auto ST CS devices SOMNOvent CR The valve opens...

Страница 34: ...ter constantly to ensure it is working correctly If the therapy device is switched on the internal solenoid valve opens This is indicated by a green LED If the therapy device is switched off or does not work prop erly the valve closes The control lamp goes out Once the device is working properly again the valve opens again ...

Страница 35: ... prescribed by a doctor Always ensure that the fl ow prescribed by the physician is applied maximum 4 l min Always follow the safety instructions in the instruction manual supplied with your oxygen system Have repairs carried out only by the manufacturer Weinmann or refer to your dealers for repairs Please follow section 5 Hygienic preparation on page 39 to prevent infection or bacterial contamina...

Страница 36: ...nderneath the oxygen valve Attach the hard strips to them Remove the protective film from the back of the hard strips 1 and press the valve firmly on to the desired position 2 on the therapy device e g as shown at the back on the right Leave the valve there for at least one hour before open ing the Velcro fastening to allow the adhesive time to bind with the surfaces 3 Insert the adapter 17 of the...

Страница 37: ...idify respiratory air use the humidifier obtain able for your therapy device Additional humification of the oxygen with a bubble humidifier is allowed but is not necessary The use of an atomizer is not permitted A hose system with an internal O2 supply hose is available as an accessory You can use the hose system with the following devices CPAP devices SOMNOsmart 2 SOMNOset nCPAP devices SOMNOcomf...

Страница 38: ... device and swit ches it off again 4 2 Using the device No action is required when the device is in operation 4 3 After use Please switch off the devices in the following sequence 1 Switch off the oxygen supply by switching off the oxygen concentrator or the cylinder valve bottled oxygen or the flow controller liquid oxygen 2 Switch off your therapy device 3 Clean the mask and the exhalation syste...

Страница 39: ...g Never place the valve in water Use a soft damp cloth to wipe the housing including con necting sockets and the connecting cable The valve must be completely dry before use Clean the tube system The tube system WM 23737 may be cleaned in warm water with a temperature of up to 70 C Do not allow any water to enter the double tube Proceed as follows 1 Detach the tube system from the device and from ...

Страница 40: ...e g household or disposable gloves during disinfection procedures Observe the instructions for the disinfectant used No disinfectant may penetrate the double tube To disinfect proceed as follows Remove double tube 1 Release both sleeves from the adapters 2 Pull the double tube out of the creased tube 3 Take the short piece of the double tube off the gray adapter Then take the tube out of the trans...

Страница 41: ...he two ends of the tube must lie smoothly next to one another 4 Insert the free end of the double tube in the creased tube 5 Push the sleeve of the creased tube onto the transparent adapter After disinfecting Dry the assembled tube system completely with the aid of the therapy device The proce dure can be found in the instructions for use for your therapy device 5 3 Changing patients To prepare th...

Страница 42: ...erapy device and then your oxygen supply When the therapy device is switched on the valve opens with a slight click this is indicated by the green indi cator lamp 9 You can now set the prescribed fl ow on the fl owmeter of your oxygen system If this is not possible first check the function of your oxygen system For exam ple Is the cylinder empty Are any of the hoses kinked 4 Switch the device off ...

Страница 43: ...ht up or only sometimes although the therapy device is working properly The prescribed fl ow of max 4 l min is not reached No power Check that connecting cable 10 is securely attached Mask leaks Adjust the head cover so that the mask is sealed Replace mask if defective The prescribed fl ow is not reached Hoses are bent Check hose connections Excessive resistance in the hose system output pressure of...

Страница 44: ...ter part of the double tube off the grey adapter Then pull the tube out of the transparent adapter 4 Remove the long part of the double tube from the transparent adapter 5 Dispose of the old double tube 6 Push the short part of the new double tube through the transparent adapter then push it as far as possible onto the grey adapter 7 Push the sleeve onto the grey adapter again 8 Press the long par...

Страница 45: ...it properly please contact a licensed and certified electronic waste disposal merchant Names and addresses can be obtained from your Envi ronmental Officer or municipal authorities The unit packaging cardboard box and inserts can be disposed of as waste paper ...

Страница 46: ... 20 e SOMNOsoft 2 e Part Order No Oxygen valve Basic unit WM 24102 O2 supply hose WM 24015 6 hose holders WM 24268 Velcro strips for fastening WM 24687 Instruction manual WM 16792 Part Order No O2 supply hose WM 24015 Velcro strips for fastening WM 24687 Part Order No Hose system for oxygen valve consisting of Corrugated hose 1830 mm Double hose Adapter transparent Adapter gray Pressure connector ...

Страница 47: ... 7 15 V DC Current consumption In operation Standby 96 0 mA 8 5 mA Classification in compliance with EN 60601 1 Protection type for electrical shock Protection type for electrical shock Protection class II Type B Electromagnetic compatibility EMC in compliance with EN 60601 1 2 Radio interference suppression Radio interference immunity EN 55011 IEC 1000 4 Part 2 6 and 11 Max permissible fl ow 4 l ...

Страница 48: ... device repair Acts of God e g lightning strikes etc Transport damage as a result of improper packaging of returned items Lack of maintenance Operational and normal wear and tear which includes for example the following components Filters Batteries recheargable batteries Articles for one time usage etc Failure to use original spare parts Weinmann is not liable for consequential harm caused by a de...

Страница 49: ...Weinmann Geräte für Medizin GmbH Co KG declares herewith that the product com plies fully with the respective regulations of the Medical Device Directive 93 42 EEC The unabridged text of the Declaration of Conformity can be found on our website at www weinmann de ...

Страница 50: ...ex A Accessories 35 46 C Cleaning 35 39 D Disinfection 35 39 41 F Faults 35 43 H Humidification 37 P Performance check 42 S Safety instructions 35 Set up 36 Spare parts 35 46 Special marks on the device 30 W Warranty 48 ...

Страница 51: ......

Страница 52: ...52 Vue d ensemble FR Français Vue d ensemble 4 12 16 17 14 13 7 15 5 8 11 9 10 1 3 6 2 Accessoire ...

Страница 53: ...d adduction d oxygène 5 Bande de montage 6 Fiche de connexion 7 Bouchon de fermeture 8 Sortie O2 9 Diode lumineuse 10 Câble de raccordement 11 Entrée O2 Accessoire 12 Double tube 13 Tube à soufflets 14 Manchon de tube à soufflets 15 Adaptateur transparent 16 Manchon d adaptateur 17 Adaptateur gris ...

Страница 54: ... appareil Appareil Entrée O2 Sortie de l appareil Plaque signalétique Ne pas éliminer l appareil avec les ordures ménagères Classe de protection B Classe de protection II isolation de protection Année de construction Pressure O2 max 1 5 bar 1500 hPa Plaque signalétique ...

Страница 55: ...s consignes de sécurité figurant dans ce mode d emploi se présentent comme suit Attention Met en garde lorsqu il existe un risque de blessures ou de dommages matériels Prudence Met en garde lorsqu il existe un risque de dommages matériels et d obtention de ré sultats erronés Remarque Contient des conseils utiles ...

Страница 56: ... Après l emploi 63 5 Préparation hygiénique 64 5 1 Intervalles 64 5 2 Nettoyage Désinfection 64 5 3 Changement de patient 67 6 Contrôle de fonctionnement 68 6 1 Intervalles 68 6 2 Procédure 68 7 Pannes et leur élimination 69 8 Entretien 70 8 1 Intervalles 70 8 2 Remplacement du double tube 70 8 3 Élimination 71 9 Étendue de la fourniture 72 9 1 Fourniture de série 72 9 2 Pièces de rechange 72 9 3 ...

Страница 57: ...ne défaillance de l ali mentation en oxygène ne constitue aucun danger La valve d adduction d oxygène permet d envoyer de fa çon sûre jusqu à 4 l d oxygène O2 par minute dans le masque durant le traitement Elle peut être utilisée en combinaison avec un concentrateur d oxygène une bou teille d oxygène avec manodétendeur ou de l oxygène liquide Vous pouvez utiliser la vanne d injection avec les appa...

Страница 58: ... un risque d incendie dû à l oxygène 1 2 Description du fonctionnement La vanne est raccordée à l appareil de traitement par connexion électrique et dépend tou jours du fonctionnement correct de celui ci Si l appareil de traitement est mis sous tension l électrovanne interne s ouvre Cet état est indiqué par une diode lumineuse verte Lorsque l appareil de traitement est mis hors tension ou ne fonct...

Страница 59: ... oxygène ait été éliminé en aérant à fond Le débit d alimentation ne doit pas dépasser la valeur maximale de 4 l min Si le débit est plus élevé de l oxygène risque de s accumuler dans l appareil de traitement Une oxygénothérapie mal conduite ou mal dosée peut avoir des effets secondaires Utilisez donc toujours l appareil en vous conformant strictement aux prescriptions de votre médecin Assurez vou...

Страница 60: ...ous déclinons toute responsabilité et n accordons aucune garantie lorsque ni les accessoires conseillés dans le mode d emploi ni des pièces de rechange originales ne sont utilisés Comme la liaison risque d être perturbée pendant le réglage des paramètres durée de démarrage progressif niveau de réglage de l humidificateur pression thérapeutique par exemple sur l appareil de traitement déconnectez l...

Страница 61: ...2 Fixez y les bandelettes dures pendants Enlevez le film de protection situé à l arrière des bandes dures 1 et appuyez légèrement sur la vanne pour la fixer à l emplacement souhaité 2 sur l appareil de trai tement par ex dans la zone arrière droite comme illustré Pour laisser le temps à la colle d adhérer aux surfaces vous devez laisser la vanne dans cette position pendant au moins une heure avant...

Страница 62: ...tilisez l humidificateur proposé pour votre appareil de traitement Une humidi fication supplémentaire de l oxygène est possible mais n est pas forcément nécessaire L utilisation de nébuliseurs est formellement interdite Le tuyau d alimentation en O2 intégré à l intérieur du cir cuit patient est également disponible comme accessoire Vous pouvez utiliser le circuit patient avec les appareils suivant...

Страница 63: ...tion de l appareil Pendant le fonctionnement aucune manipulation n est nécessaire 4 3 Après l emploi Veuillez respecter l ordre suivant lors de la déconnexion des appareils 1 Déconnectez l alimentation en O2 en arrêtant le concentrateur d oxygène ou en fermant la vanne de la bouteille oxygène en bouteille ou encore le régulateur de débit dans le cas d oxygène liquide 2 Mettez votre appareil de tra...

Страница 64: ...irez le câ ble de raccordement de la prise 6 de l appareil de traite ment Pour ce faire appuyez légèrement sur le petit levier situé sous la fiche Ne laissez pas pénétrer de liquide désinfectant ou d eau dans le boîtier Ne plongez jamais la vanne dans l eau Essuyez le boîtier y compris les douilles de connexion et le câble de raccordement avec un chiffon doux et humide Avant sa mise en service la ...

Страница 65: ...cet appareil Désinfection du boîtier Désinfectez le boîtier les douilles de connexion et le câble de raccordement en les essuyant avec une solution désinfectante À cet effet nous vous recommandons TERRALIN Désinfection du circuit patient Nous conseillons le désinfectant GIGASEPT FF Nous conseillons d utiliser TERRALIN Il est indiqué de porter des gants appropriés gants de ménage gants à usage uniq...

Страница 66: ...u 1 Insérez l élément court du double tuyau dans l adapta teur transparent et glissez le le plus loin possible sur l adaptateur gris 2 Glissez à nouveau le manchon sur l adaptateur gris 3 Enfoncez l élément long du double tuyau dans la rainu re de l adaptateur transparent Les deux extrémités du tuyau doivent reposer à plat l une à côté de l autre 4 Insérez l extrémité libre du double tuyau dans le...

Страница 67: ...5 3 Changement de patient Dans le cas d un changement de patient le tuyau d alimentation en O2 ou le circuit patient doivent être remplacés et la vanne d adduction O2 doit être nettoyée en l essuyant avec une solution désinfectante ...

Страница 68: ...ous tension et ensuite l alimentation en O2 Après le branchement de l appareil la vanne s ouvre en faisant un léger clac et le voyant témoin vert 9 s éclaire simultanément Vous avez maintenant la possibilité de régler le débit prescrit sur l appareil à oxygène Si cela n est pas possible veuillez vérifier tout d abord le bon fonctionnement de votre appareil à oxygène la bouteille est peut être vide...

Страница 69: ...llume pas ou seulement parfois alors que l appareil de traitement fonctionne correctement Pas d alimentation électrique Vérifier si le câble de raccordement 10 est correctement enfiché Fuites au niveau du masque Régler le harnais de maintien afin que le masque soit positionné de manière étanche Le cas échéant remplacer le masque défectueux Le débit prescrit n est pas atteint Tuyaux coudés Contrôler t...

Страница 70: ...teur gris l élément court du double tuyau Tirez ensuite le tuyau hors de l adaptateur transparent 4 Dégagez de l adaptateur transparent l élément long du tuyau jumelé 5 Eliminez le vieux double tuyau 6 Insérez l élément court du double tuyau neuf dans l adaptateur transparent et glissez le le plus loin possi ble sur l adaptateur gris 7 Glissez à nouveau le manchon sur l adaptateur gris 8 Enfoncez ...

Страница 71: ...s les règles de l art adressez vous à une entreprise d élimination des déchets agréée et certifiée Des adresses vous seront communiquées par le responsable des questions d environnement ou par les services municipaux L emballage de l appa reil carton et éléments de séparation peut être recyclé avec les vieux papiers ...

Страница 72: ...s de référence Valve d adduction O2 Appareil de base WM 24102 Tuyau d alimentation en O2 WM 24015 6 x fixations tuyau WM 24268 Bandes Velcro pour fixation WM 24687 Mode d emploi WM 16792 Pièces Numéros de référence Tuyau d alimentation en O2 WM 24015 Bandes Velcro pour fixation WM 24687 Pièces Numéros de référence Circuit patient pour valve d adduction O2 comprenant Tube à souffl ets 1830 mm Doubl...

Страница 73: ...ent électrique 7 15 V DC Consommation électrique en fonctionnement veille 96 0 mA 8 5 mA Classification selon 60601 1 Type de protection contre les chocs électriques Degré de protection contre les chocs électriques Classe de protection II Type B Compatibilité électromagnétique CEM selon EN 60601 1 2 Antiparisage Insensibilité aux parasites EN 55011 IEC 1000 4 Parties 2 à 6 et 11 Débit max autorisé...

Страница 74: ...a force majeure comme par ex le tonnerre etc les dommages de transport résultant d un emballage non conforme lors du retour à l expéditeur le non respect des délais de maintenance la détérioration par suite de la durée d utilisation du produit et l usure normale ainsi que les éléments dits consommables comme par ex les filtres les piles ou accus les articles à usage unique etc la non utilisation d...

Страница 75: ...ür Medizin GmbH Co KG déclare par la présente que le produit est conforme aux dispositions respectives de la Directive européenne 93 42 CEE re lative aux dispositifs médicaux Le texte intégral de la déclaration de conformité est dispo nible sur Internet à l adresse suivante www weinmann de ...

Страница 76: ...0 C Consignes de sécurité 59 Contrôle de fonctionnement 68 D Désinfection 59 64 67 F Funktionskontrolle 68 G Garantie 74 H Humidification 62 I Installation 61 N Nettoyage 59 64 P Pannes 69 Pièces de rechange 60 72 R Repères particuliers sur l appareil 54 ...

Страница 77: ......

Страница 78: ......

Страница 79: ......

Страница 80: ...sweg 40 D 22525 Hamburg T 49 0 40 5 47 02 0 F 49 0 40 5 47 02 461 E info weinmann de www weinmann de Center for Production Logistics Service Weinmann Geräte für Medizin GmbH Co KG Siebenstücken 14 D 24558 Henstedt Ulzburg T 49 0 4193 88 91 0 F 49 0 4193 88 91 450 WM 16792h 07 10 ...

Отзывы: