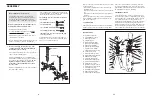
WeiderPro 445 WEEVBE3295.0 Скачать руководство пользователя страница 8

8

13

6.

Lubricate an M10 x 70mm Bolt (18). Attach the
Leg Lever (4) to the Front Leg (8) with the Bolt
and an M10 Nylon Locknut (19). 

Do not over-

tighten the Nylon Locknut; the Leg Lever
must be able to pivot easily.

7.

Identify the Right and Left Backrest Frames (5,
42) by the position of the adjustment tubes, and
orient them as shown. Tap two 25.4mm Square
Inner Caps (12) into the ends of each Backrest
Frame. Tap a 25mm x 50mm Inner Cap (36) into
the bottom of each adjustment tube.

Orient the Backrest (6) with the wide end on the
side shown. Attach the Backrest to the Right and
Left Backrest Frames (5, 42) with four M6 x
38mm Bolts (16) and four M6 Washers (25). 

Do

not tighten the Bolts yet.
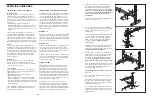
8.

Lubricate the M10 x 175mm Bolt (17). Attach the
Backrest Frames (5, 42) to the Bench Frame (2)
with the Bolt, two M10 Washers (24), and an M10
Nylon Locknut (19).

Do not overtighten the

Nylon Locknut; the Backrest (6) must be able
to pivot easily.

Secure the Backrest (6) to the Bench Frame (2)
by inserting the Adjustment Pin (32) through the
tube in the Bench Frame and a set of holes in the
adjustment tubes. 

Make sure that the

Adjustment Pin is completely inserted
through both adjustment tubes.

Tighten the four M6 x 38mm Bolts (16) used in
step 7.

8

Lubricate

19

18

6

5

12

12

42

25

25

25

36

25

16

16

16

6

5

42

7

6

Wide

End

8

4

17

32

24

24

19

2

Tube

6

8

45

43 33

3

Hole

Hole

STORING THE WEIGHT BENCH

To store your weight bench, remove the M10 x 57mm
Adjustment Knob (33) and the Ring Pin (43) from the
Crossbar (3). Lift the Front Leg (8) as far as it will go.
Reinsert the Ring Pin into the bracket on the
Crossbar; the Ring Pin will prevent the bench from
unfolding. 

Note: The Backrest (6) must be adjusted

to one of the incline positions (see ADJUSTING
THE BACKREST, on page 11). 

CAUTION:

To fold the weight

bench, the holes in the Stabilisers (45) must
be at least 50 cm (20 in.) from the wall.

Adjustment

Tubes

Adjustment

Tubes

45

Содержание 445 WEEVBE3295.0

Страница 1: ...RT LIST and the EXPLODED DRAWING on pages 18 and 19 08457 089 009 www iconeurope com Visit our website at Model No WEEVBE3295 0 Serial No __________________ Write the serial number in the space above...

Страница 2: ...G DECAL PLACEMENT 19 2 WARNING DECAL PLACEMENT 2 IMPORTANT PRECAUTIONS 3 BEFORE YOU BEGIN 4 PART IDENTIFICATION CHART 5 ASSEMBLY 6 ADJUSTMENTS 11 EXERCISE GUIDELINES 14 PART LIST 18 EXPLODED DRAWING 1...

Страница 3: ...the weight rests to balance the bench 17 Always remove the curl post from the front leg before performing leg curl or leg exten sion exercises 18 If you feel pain or dizziness whilst exercis ing stop...

Страница 4: ...pely figure dramatic mus cle size and strength or a healthier cardiovascular system the WEIDER PRO 445 will help you to achieve the specific results you want For your benefit read this manual carefull...

Страница 5: ...thesis below each part refers to the key number of the part from the PART LIST on page 18 of this manual Important Some parts may have been pre assembled for shipping purposes If you cannot find a par...

Страница 6: ...mus Dorsi mid back T Spinae Erectors lower back U Gluteus Medius hip V Gluteus Maximus buttocks W Hamstring back of leg X Gastrocnemius back of calf O P Q R S T U V X W N M J G F H I K E C D B A L A B...

Страница 7: ...y major muscle group emphasizing areas that you want to develop most To give balance and variety to your workouts vary the exercises from session to session Schedule your workouts for the time of day...

Страница 8: ...ertighten the Nylon Locknut the Backrest 6 must be able to pivot easily Secure the Backrest 6 to the Bench Frame 2 by inserting the Adjustment Pin 32 through the tube in the Bench Frame and a set of h...

Страница 9: ...1 to the right Upright Base 7 in the same manner Note Always set both Uprights at the same height 2 15 15 22 22 4 8 22 9 9 9 9 10 10 28 50 1 1 47 48 49 Tab 31 34 34 11 Wide End 9 ADJUSTING THE UPRIGHT...

Страница 10: ...oles in the adjustment tubes and the Bench Frame 2 To use the Backrest 6 in an incline position lift the Backrest and insert the Adjustment Pin 32 through one of the bottom two sets of holes in the ad...

Отзывы: