


13
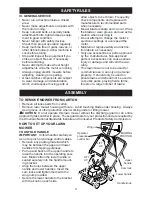
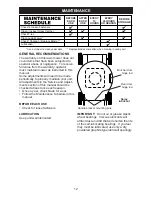
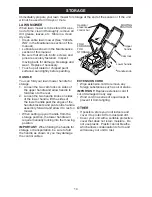
Blade
nut
Square washer
Insulator
washer
Blade
Trailing
edge
LAWN MOWER
Always observe safety rules when per-
forming any main te nance.
IMPORTANT: Always unplug electric mow-
ers before servicing, cleaning or removing
material from lawn mower.
TIRES
• Keep tires free of gasoline, oil, or insect
control chemi cals which can harm rub-
ber.
• Avoid stumps, stones, deep ruts, sharp
objects and other hazards that may
cause tire damage.
BLADE CARE
For best results, blade must be kept sharp.
Re place a bent or dam aged blade.
CAUTION:
Use only a replacement
blade approved by the manufacturer of
your mower. Using a blade not approved
by the manufacturer of your mower is
hazardous, could damage your mower and
void your warranty.
TO REMOVE BLADE
1. Use a wood block between blade and
mower hous ing to prevent blade from
turning when re mov ing blade nut.
NOTE: Protect your hands with gloves
and/or wrap blade with heavy cloth.
2. Remove blade nut by turning counter-
clockwise.
3. Remove blade and attaching hardware
(nut, square wash er, insulator wash er).
TO REPLACE BLADE
1. Be sure the trailing edge of blade (op-
posite sharp edge) is up toward the
motor.
2. Install the square washer and insulated
washer; secure with blade nut.
3. Use block of wood between blade and
lawn mower housing and tighten the
blade nut, turning clockwise.
• The recommended tightening torque is
35-40 ft. lbs.
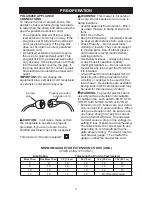
TO SHARPEN BLADE
NOTE: We do not recommend sharp en ing
blade. An un bal anced blade will cause
eventual damage to lawn mower or motor.
CLEANING
WARNING: To reduce the risk of
electric shock, do not expose the mower
to water.
IMPORTANT: For best performance, keep
mower housing free of grass build-up and
trash. Clean the underside of your mower
after each use.
• Clean the underside of your lawn mower
by scraping to remove buildup of grass
and trash.
• Clean motor cover often to keep trash
from accumulating.
• Keep fi nished surfaces and wheels free
of all gasoline, oil, etc.
GRASS CATCHER
Grass catcher may be hosed with water
but must be dry when used.
CAUTION: Under nor mal usage, the
catch er material is subject to de te ri o ra tion
and wear and should therefore be checked
to ensure compliance with origi nal
manufacturer specifi cations.
MAINTENANCE


