background image

MTD LLC, P.O. BOX 361131 CLEVELAND, OHIO 44136-0019

Printed In USA


WARNING

READ AND FOLLOW ALL SAFETY RULES AND INSTRUCTIONS IN THIS MANUAL 

BEFORE ATTEMPTING TO OPERATE THIS MACHINE.  

FAILURE TO COMPLY WITH THESE INSTRUCTIONS MAY RESULT IN PERSONAL INJURY.

O

peratOr

s

 M

anual

Twin Rear Bagger — Model No. 19A70043OEM 

(January 20, 2015)

Form No. 769-10572

Содержание 19A70043OEM

Страница 1: ...NG READ AND FOLLOW ALL SAFETY RULES AND INSTRUCTIONS IN THIS MANUAL BEFORE ATTEMPTING TO OPERATE THIS MACHINE FAILURE TO COMPLY WITH THESE INSTRUCTIONS MAY RESULT IN PERSONAL INJURY Operator s Manual Twin Rear Bagger Model No 19A70043OEM January 20 2015 Form No 769 10572 ...

Страница 2: ...aler or contact us directly MTD s Customer Support telephone numbers website address and mailing address can be found on this page We want to ensure your complete satisfaction at all times Throughout this manual all references to right and left side of the machine are observed from the operating position Thank You Customer Support Please do NOT return the machine to the retailer or dealer without ...

Страница 3: ...rn off blade s place transmission in neutral set parking brake stop engine and remove key before dismounting 11 Your machine is designed to cut normal residential grass of a height no more than 10 Do not attempt to mow through unusually tall dry grass e g pasture or piles of dry leaves Dry grass or leaves may contact the engine exhaust and or build up on the mower deck presenting a potential fire ...

Страница 4: ...t mow near drop offs ditches or embankments The mower could suddenly turn over if a wheel is over the edge of a cliff ditch or if an edge caves in 3 Do not try to stabilize the machine by putting your foot on the ground 4 Do not use a grass catcher on steep slopes 5 Do not mow on wet grass Reduced traction could cause sliding General Service 1 Before cleaning repairing or inspecting make certain t...

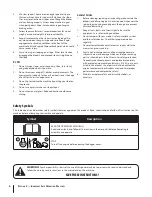
Страница 5: ...t gauge up or down until the left corner touches the slope See Figure 1 and Figure 2 5 If there is a gap below the gauge the slope is too steep for safe operation See Figure 2 above 1 0 d a s h e d l i n e Slope Gauge Figure 2 Figure 1 10 Slope 10 Slope WARNING Slopes are a major factor related to tip over and roll over accidents which can result in severe injury or death Do not operate machine on...

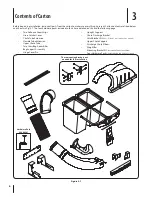
Страница 6: ...ass Catcher Cover Chute Tube Extension Flexible Tube Extension Upper Chute Tube Two Grass Bag Assemblies Bag Support Assembly Hinge Cover Pin Upright Support Chute Discharge Bracket Hitch Bracket Kit 5 Pcs 2 side 1 cross mount 2 wt mounts Upper Chute Support Discharge Chute Elbow Weight Bar Mounting Bracket Kit Not needed for this installation Four Hardware Packs Detailed below and on the next pag...

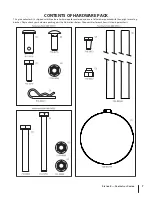
Страница 7: ...his grass collector kit is shipped with three loose hardware packs enclosed and one set of hardware packed with the upright mounting bracket Please check your hardware packs against the illustrations below The quantities for each item is listed in parenthesis ...

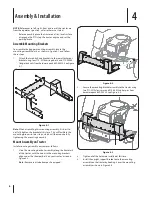
Страница 8: ...e Mounting Brackets To assemble the bagger mounting assembly locate the mounting assembly parts as shown in Figure 4 1 and follow these steps 1 Attach the two hitch side brackets to the rear attachment bracket using four 710 0276 carriage bolts and 712 04063 flange lock nuts from hardware pack 689 00320 See Figure 4 1 Figure 4 1 Note When assembling this mounting assembly it is best to not fully t...

Страница 9: ... the screen under the lip as in Figure 4 8 Figure 4 7 5 Secure the upright support bracket to the mounting assembly in the mounting hole available for the deck size this bagger is being installed on See Figure 4 4 for the proper mounting location Use a 710 0376 hex bolt and 712 04063 flange lock nut from hardware pack 689 00320 54 inch Deck 50 inch Deck Figure 4 4 6 Install and secure the hanger a...

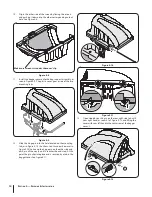
Страница 10: ...ponding cutout hole See Figure 4 8 Make sure screen sits under the cover s lip Figure 4 8 11 Install the bagger cover onto the bag support assembly as seen in Figure 4 9 The plastic cover goes inside of the two mounting tabs Figure 4 9 12 Slide the hinge pin into the hole located on the mounting tab as in Figure 4 10 Use the cut out window See inset in Figure 4 10 to line up the hinge pin on the o...

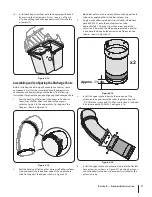
Страница 11: ...n Figure 4 17 positioning it over the wide adhesive rubber strip previously installed on the extension tube 14 Install both bag assemblies onto the bag support brackets by inserting the front edge in first as seen in 1 of Figure 4 13 and setting the back edge down until it fits into the assembly 2 1 2 Figure 4 13 Assembling and Configuring the Discharge Chute Before installing the discharge chute ...

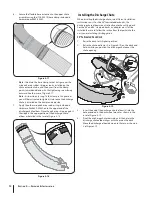
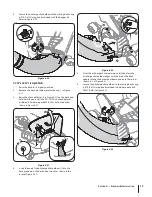
Страница 12: ...til the hole in the discharge chute elbow aligns with the pin on the deck Move the discharge elbow down onto that pin as shown in 3 of Figure 4 19 6 Secure the flexible hose extension to the upper chute assembly using the 726 05019 hose clamp included in hardware pack 689 00342 Figure 4 17 Note Orientate the hose clamp so that it aligns over the wide adhesive rubber strip previously installed on t...

Страница 13: ... the discharge chute elbow to the cutting deck using a 720 04122 wing knob included with the bagger kit Refer to Figure 4 20 Figure 4 20 On 50 and 54 Stamped Decks 1 Raise the deck to its highest position 2 Remove the deck pin rubber protective cap 1 in Figure 4 21 3 Raise the chute deflector 2 in Figure 4 21 on the deck and hold it while you install the 731 10133 chute adapter 3 included in hardw...

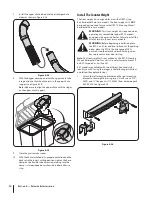
Страница 14: ...or use with all RZT S Steering Wheel Residential Zero turn models WARNING This front weight kit is required when operating any compatible lap bar RZT L models equipped with a grass collector Failure to install this kit may result in serious injury or death WARNING Before beginning installation place the RZT L on a firm and level surface set the parking brake place the PTO in the disengaged OFF pos...

Страница 15: ...056 screw and 712 04063 flange nut from hardware pack 689 00325 on the left side Repeat on the right side Do not fully tighten at this time See Figure 4 27 Figure 4 27 3 Visually center the weight bar assembly on the tractor and tighten the hardware installed in step 2 to secure the brackets to the front axle ...

Страница 16: ... your left hand in the center rear of the bagger cover 2 1 2 Figure 5 1 2 Do not remove the chute tube assembly from the tractor 3 Remove the grass bags by lifting these up 1 and moving the bags away from the bag support assembly 2 See Figure 5 2 1 2 Figure 5 2 4 Empty the grass clippings at a proper disposal site use the handle at the bottom of each grass bag Holding the bag firmly empty the cont...

Страница 17: ...This page intentionally left blank ...

Страница 18: ...18 Parts List 6 12 4 1 23 24 19 6 21 25 26 27 17 17 28 12 22 18 31 5 9 8 13 15 2 20 32 12 30 29 7 3 14 16 5 10 12 11 ...

Страница 19: ...lug 14 720 04122 Wing Knob 15 631 05103 Discharge Chute Elbow 16 783 06168 0637 Universal Mounting Bracket 17 689 00204A RZT Mounting Assembly Incl Ref No 16 17 30 31 18 914 04023 Cotter Pin 080 x 1 5625 Internal 19 719 04271A RZT Bagger Weight 20 710 3013 Hex Screw 1 4 20 x 50 21 731 06611 Bagger Chute Adapter 7 In 22 712 04065 Flange Lock Nut 3 8 16 23 721 04388 Adhesive Strip 24 735 05020 Wide ...

Страница 20: ...plitter pumps valves and cylinders have a separate one year warranty b Routine maintenance items such as lubricants filters blade sharpening tune ups brake adjustments clutch adjustments deck adjustments and normal deterioration of the exterior finish due to use or exposure c Service completed by someone other than an authorized service dealer d MTD does not extend any warranty for products sold o...

Отзывы: