Webb 1938185001 Скачать руководство пользователя страница 9

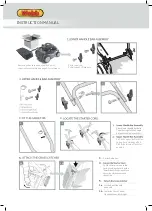
Push the red primer three times.

Note: If 

n

times, ex

v

r ke lever with one 

one positiv

e

r,  ou 

ke

the motor.

W

  k

ke

keep it 


W

A

B

The grass catcher attaches easily by
lifting the mower’s Rear Flap
with one hand 

(fig. 9)

 and slide the 

Grass Catcher into position 

(fig. 10). 

For best results adjut the cutting height
of your mower to suit your mower
conditions. Do not try to remove too
much grass in one pass.

Adjustment of the cutting height is made
centrally. Turn off the mower and 
take the weight of the mower by lifting.
Take hold of the Cut Height Adjustment
Lever, positioned on the mower’s right-
hand rear wheel. 

Move the lever outwards to release it 
from its locating notch. Move the lever
towards the fornt of the machine to
increase the cutting height and towards
the rear to reduce the cutting height. 
Return the lever to the locating notch to 
set the desired cutting height.
Make sure the handle fits snugly and 
securely into its serrated holder 

(fig 11).  

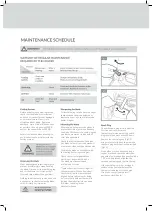
Cut grass is damp. Regular cleaing after 
each use will ensure better functioning
of the mower and reduce the risk of
corrosion or seizure.

Having finishing mowing, allow the 
engine to cool then remove accumulated
grass clippings from and around the
engine with a brush. Clean the grass
collection bag annually with a brush or
gentle spray of water to allow to dry.

Clean the underneath of the deck regularly
- Disconnect the spark plug cap and tilt
the mower backwards. Remove cut grass
with a scraper and a brush. 

Do not use a pressure washer or hot
water to clean the mower. Dry off the
machine before storing by leaving it
running for a few minutes on a flat, clean
surface to prevent corrosion or seizure.

Start your mower (see: starting the
engine). Keep hold of the Safety (OPC)
Lever (releasing the Safety (OPC)  Lever
will stop the engine to avoid accidents)

(fig 12)

. To power the mower forward

Store your mower in a dry, well-
ventilated area, away fomr flames, 
sparks or heat sources. Disconnect the 
spark plug cap. Avoid storing beneath a

tarpaulin or similar cover as it may cause
condensation resulting in corrosion.

Thoroughly cleaning the 

mower. Run the engine outdoorsuntil the 
fuel tannk is empty or empty fuel using  a 
fuel suction pump. Dispose of discarded 
fuel safely and responsibly. Run the 
engine until the remaining fuel is consumed. 

Remove the spark plug from the engine. 
Pour a tablespoon of engine oil into the
cylinder. Gently pull the starter rope 
several times to distribute the oil to 
pretect the cylinder over winter. 
Replace and tighten the spark plug.

move the Drive Lever up and forward 

(fig. 13)

. The Mower can be pushed with

the drive disengaged for more precise
handling. After mowing and emptying
the Grass Catcher ensure the engine it
not running and turned off. 

Ensure the fuel tank is empty. Run the 
engine until any remaining fuel is 
consumed. Allow the engine to cool.  

How to cut for best results

For best results cut your lawn in 
alternative directions switching 
direction each time you cut. Cut your 
lawn at an equal and same height. 
Slightly overlap your cutting lines.

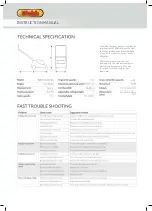
Содержание 1938185001

Страница 1: ...lar attention to the safety instructions The manufacturer reserves the right to change the product speci cation and livery according to continues product improvements v en Original Instructions 46cm 1...

Страница 2: ...l use only Commercial copying redistribution hiring or lending is prohibited No part of this publication may be stored in a retrieval system or transmitted in any other form or means without written p...

Страница 3: ...Assembly Guidelines Basic Maintenance Warranty For Spares or Support of your Webb product please contact us Tel 01793 333212 Mon Fri 8 00am to 5 30pm Excl Bank Holidays Email customerservice webblawn...

Страница 4: ...ease read understand this manual paying particular attention to the safety instructions before use The manufacturer reserves the right to change the product speci cation and livery according to contin...

Страница 5: ...Brake OPC Lever Drive Lever FuelTankCap Air Filter 2 4 5 6 7 8 9 10 1 Exhaust Height Adjustment Lever 11...

Страница 6: ...ge 2 for reference Attach lower handle bar bolts Take the weight of the handle bar and fit the lower bolt first 3 5 4 5 5a 5b TIES Fit the Cable ties Pull the starter cord upto the spring Holding the...

Страница 7: ...o not screw back in place remove the dipstick again and check the level The oil level must be between the min and max marks on the dipsick fig 3 Replace the dipstick and screw into place Petrol is hig...

Страница 8: ...Push the red primer three times Note If n times ex v r ke lever with one one positiv e r ou ke the motor W k ke keep it W A B INSTRUCTION MANUAL...

Страница 9: ...sure washer or hot water to clean the mower Dry off the machine before storing by leaving it running for a few minutes on a flat clean surface to prevent corrosion or seizure Start your mower see star...

Страница 10: ...ecommend you avoid mowing when it is raining after nightfall or in poor light conditions Do not transport the mower in a vehicle if there is any petrol in the tank Be aware that the machine s exhaust...

Страница 11: ...fixing bolt very firmly with a wrench while holding the blade firmly in one hand NB wear suitable gloves Rotate clockwise Check the correct alignment and matching of pads with the blade The blade must...

Страница 12: ...ver towards the handlebars Conversely if the transmission cable is not tight enough the transmission will function poorly and lack power In its transmission engaged position fig 18 the mower s brake l...

Страница 13: ...22 23 1 2 3 4...

Страница 14: ...B reserves the right to change the design and configuration of any of its products without notice or obligation Therefore please treat the text and images in this manual as being for illustrative purp...

Страница 15: ...Outdoors Directive The conformity assessment procedure followed was in accordance with EN ISO 5395 1 2013 EN ISO 5395 2 2013 A2 2017 EN ISO 14982 2009 Notified Body T V S D Product Service GmbH Addres...

Страница 16: ...Notes...

Страница 17: ...Notes...

Страница 18: ...using the following pages or at www webbgardenpower co uk By registering your machine you agree to maintain the machine in accordance with the service schedules speci ed in this manual and services du...

Страница 19: ...cords Fluids lubricants Spark plugs Blades Lawnmowers Brushcutters Cutter bars Hedgecutters Drive clutch cable surfaces Nylon Lines Line Trimmers Carburettor cleaning Bearings Bushes Electric cable Gr...

Страница 20: ...the owner s responsibility to ensure that their Webb machine is maintained at speci c intervals Any approved Webb service dealer can undertake a service which are specialised in our products and will...

Страница 21: ...actions have been completed PLEASE ENSURE THE SERVICE BOOK IS AVAILABLE FOR THE DEALER DURING SERVICE WORK 1st Service This must be stamped by an approved service dealer to qualify for a free second...

Страница 22: ...Service Record 48 Months Date Date Date Date Date Date Date Date 72 Months 96 Months 120 Months 60 Months 84 Months 108 Months 132 Months INSTRUCTION MANUAL...

Страница 23: ...regarding our products services o ers or just opinions which may be used for marketing research or analysis purposes If you wish to be contacted by any of the following methods please tick the relevan...

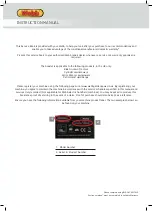
Страница 24: ...Webb Lawnmowers Murdock Road Dorcan Swindon Wiltshire SN3 5HY...

Отзывы: