


Before starting your mower
inspect it carefully to ensure that
there are no loose parts and that it
is in good working order.
Be sure of your footing.
Always walk, never run, when
operating the lawnmower.
Keep hands, feet and
clothing away from the
mower’s moving parts and
always wear appropriate footwear
(avoid sandals or open shoes).
Never put your hands or feet
underneath the chassis of the
lawnmower while the engine is
running.
Clear the area to be mowed of any
stones, sticks, wire and debris
before beginning. Always ensure
that you mow a safe distance away
(over 14 metres) from adults,
children and animals.
Always use fresh premium unleaded
petrol that is not more than 4-6 weeks
old. Fill the tank using a funnel, but
never completely. Clean up
any overflow or splashes
before starting.
Do not smoke when filling
the fuel tank, using the
machine,or when petrol is in the
immediate area. Never use or store
the mower near a naked flame.
Turn off the engine and disconnect
the spark plug cap before cleaning,
transporting, or making adjustments.
Never leave the mower unattended.
Never open the fuel filler cap, or fill
the tank, if the engine is still hot
after use. Please ensure that you
securely tighten the petrol cap
after filling.
Mow across the face of slopes,
not up & down, and avoid mowing on
very steep slopes. We recommend
you avoid mowing when it is
raining, after nightfall or in
poor light conditions.
Do not transport the
mower in a vehicle if there
is any petrol in the tank.
Be aware that the machine’s
exhaust area and other parts
of the lawnmower get very
hot during and right after use.
Turn off the engine before
emptying the grass-catcher and
before clearing any grass caught
in the rear flap where the catcher fits.
Store fuel and oil in a cool
well-ventilated place, away
from direct sunlight and gas
cylinders or hot water heater systems
It is recommended that you wear
ear protectors, safety goggles and
safety boots when using the
lawnmower.
All servicing and repair work under
warranty must be carried out by an
Authorised Dealer, otherise the
1+1-Year warrany may be void.
To inspect the underside of your
mower, only tilt the lawnmower
to your right, or back, when standing
behind it (this is the side where the
exhaust is near the ground) otherwise
oil may leak into inappropriate areas
of the engine. Never tilt the lawnmower
when the engine is running.
Do not operate the machine by
pulling it towards you as you risk
pulling it onto your feet. Instead,
always push and walk behind your
lawnmower.
Do not fill the tank, or start
the lawnmower indoors, or in a
poorly ventilated area, as exhaust
gases contain poisonous substances
and petrol fumes are flammable
and dangerous.
Do not alter engine governing
settings or over-rev the engine, as
excessive speed is dangerous and
can reduce engine life.
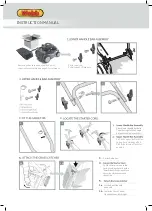
Holding the blade firmly in one hand, use
a spanner or socket to loosen the blade
screw & rotate anti-clockwise.
Wear appropriate protective gloves to
prevent possible injury when handling
the blade. Disconnect the spark plug cap
and tilt the mower on its side with air
filter and carburettor side uppermost.
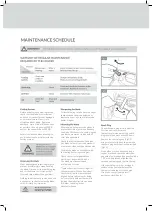
Before and after each mowing session,
check that the blade, its attachment
bolts and drive shaft are not damaged
or excessively worn. Never try to
straighten a bent blade. Replace a
damaged, worn or bent blade as soon
as possible. Use only genuine WEBB
parts or those approved by WEBB.
Wear appropriate protective gloves to
prevent possible injury when handling
the blade. Disconnect the spark plug cap
and tilt the mower on its side with air
filter side uppermost.
Check that all components (the blade,
key, blade holder, screws and washers)
are present, clean and in good condition.
Tighten the screws connecting all of
the components. Make a final visual
check that all parts are present and
aligned before tightening the fixing
bolt very firmly with a wrench while
holding the blade firmly in one hand
(NB wear suitable gloves).
Rotate clockwise
Check the correct alignment and
matching of pads with the blade.
The blade must be positioned
precisely on its stand.
Position the blade on its support with
the cooling fins facing the engine.
For best mowing results, have the edges
sharpened and the blade balanced at
least once a year by a specialist service
dealer or agent.
Excessive vibration when mowing is a
good indication of a problem with the
cutting system.
Check the spark plug initially after the
first five hours of mower use.
Thereafter, maintenance of the spark
plug should take place every 25 hours.
Remove the spark plug cap
(Fig.15)
using a rotary motion and then remove
the spark plug with the wrench provided
(Fig.16).
If the spark plug is worn or damaged,
replace with a new spark plug of the
same or suitable type for the engine.
If in doubt, contact your point of
purchase or local dealer.
Clean off any carbon deposits using a
copper brush and check the electrode
gap with a feeler gauge (the gap should be
≈ 0.7 mm). Replace and tighten the
serviced spark plug and replace the cap.
The spark plug cap must be
is made to remove the blade
Содержание 1938185001
Страница 13: ...22 23 1 2 3 4...
Страница 16: ...Notes...
Страница 17: ...Notes...
Страница 24: ...Webb Lawnmowers Murdock Road Dorcan Swindon Wiltshire SN3 5HY...