background image

Camera Management 

Digital Video Recorder(DVR) 

User Manual 


Issue V1.0 (2018-06-04) 


25 


Camera Management 

Camera management mainly involves analog cameras and network cameras. Analog 
cameras can be directly connected to input channels of the DVR. When analog cameras 
are insufficient, the DVR automatically searches for and adds network cameras in the 
same Local Area Network (LAN).   

Camera management includes camera add or delete, picture parameter, encode 
parameter, video loss, motion detection, privacy area, camera tamper, and setup OSD. 

Operation Description 

Click 

Camera

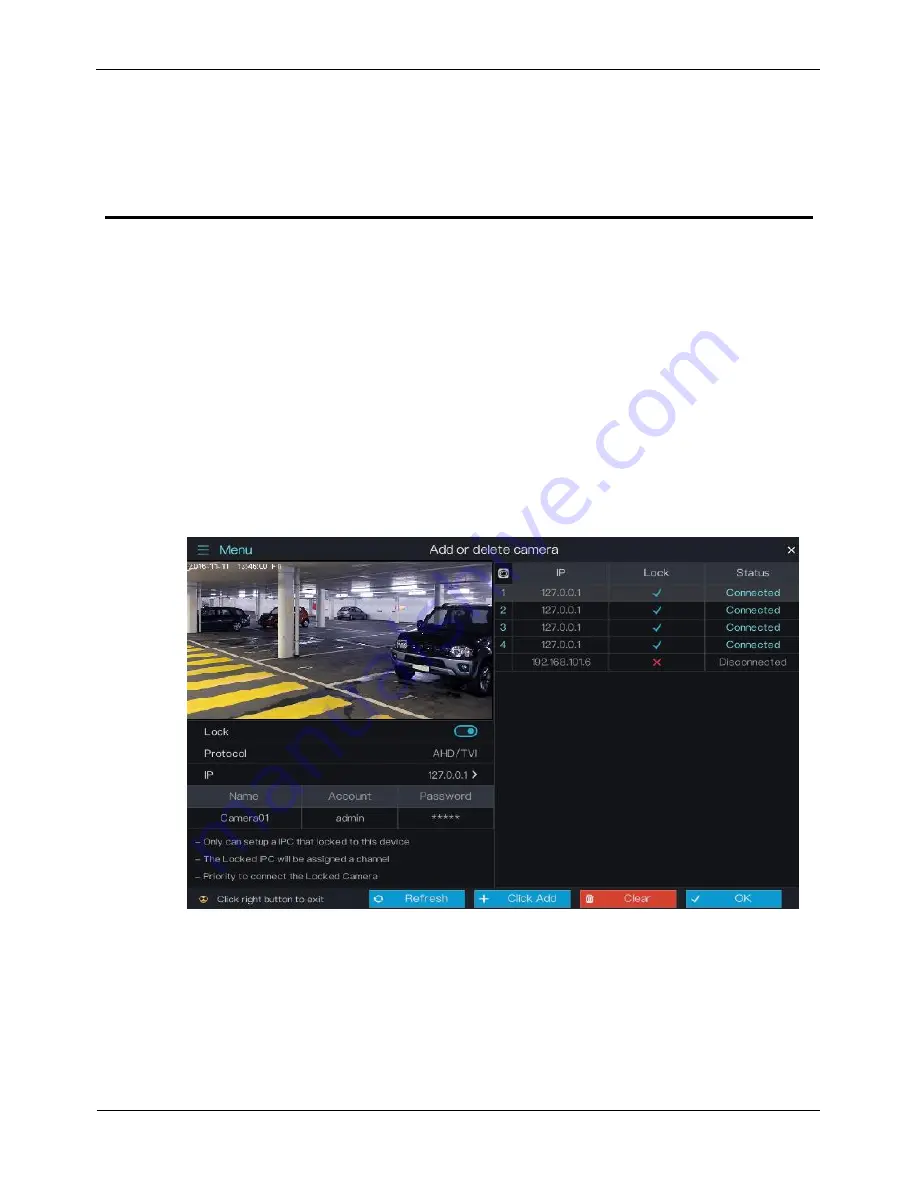
 in the main menu to access the camera management screen, as shown in 

Figure 5-1. 

Figure 5-1


Camera management screen 


Содержание 0E-HD4C1TB

Страница 1: ...Digital Video Recorder DVR User Manual 0E HD4C1TB 0E HD8C2TB 0E HD16C2TB If you have any questions please call W Box Tech Support 1 833 574 9124 for assistance E mail tech wboxsupport com...

Страница 2: ......

Страница 3: ...mbols whose meanings are described accordingly Symbol Description It alerts you to fatal dangers which if not avoided may cause deaths or severe injuries It alerts you to moderate dangers which if not...

Страница 4: ...loads intensive shakes and soaking to prevent damages during transportation and storage The warranty does not cover any device damage that is caused during secondary packaging and transportation afte...

Страница 5: ...logy information that is not accurate enough or product function and operation description that is slightly inconsistent with the actual product The manufacturer will update this manual according to p...

Страница 6: ...ction 8 3 1 Front panel 8 3 2 Rear panel 8 3 3 Startup 10 3 4 Powering off the Device 11 3 5 Logging In to the System 11 3 6 Changing the Password 12 3 7 Adding Cameras 13 4 Quick Navigation 15 4 1 PT...

Страница 7: ...41 6 2 Network 42 6 2 1 Ipv4 42 6 2 2 Port 44 6 2 3 UPNP 45 6 2 4 SMTP 46 6 2 5 DDNS 47 6 2 6 Blacklist 48 6 3 Record 50 6 4 Output 51 6 5 Alarm Manager 54 6 5 1 Surveillance 54 6 5 2 Alarm in 55 6 6...

Страница 8: ...eo Playback 70 9 4 Alarm Search 72 9 5 DVR Setting 74 9 5 1 Viewing basic information 75 9 5 2 Network management 76 9 5 2 1 IPv4 76 9 5 2 2 Port 77 9 5 2 3 DDNS 78 9 5 2 4 SMTP 79 9 5 3 Device manage...

Страница 9: ...D TVI CVI Mixed Input 16ch 1080P AHD TVI CVI 4ch 1080P AHD CVI Network 8ch 1080P AHD CVI Network 16ch 1080P AHD CVI Network 4ch 1080P TVI CVI Network 8ch 1080P TVI CVI Network 16ch 1080P TVI C VI Netw...

Страница 10: ...S 16ch BNC AHD TVI CVI C VBS Video Output 1ch VGA 1ch HDMI 1ch CVBS Audio Input 4ch RCA 8ch RCA 6ch RCA Audio Output 1ch RCA Alarm Input N A 4ch Alarm Output N A 1ch Network Interface 1 RJ45 10M 100M...

Страница 11: ...or data may be lost The maximum capacity of a single hard disk cannot exceed 6 TB 2 2 Hard Disk Recommendation Seagate or Western Digital hard disks which are highly stable and inexpensive are recomme...

Страница 12: ...pacity Bit Rate Video Count Approximate Video Storage Duration 1 6TB D1 1 5Mbps 4 85 days 1 6TB 720p 3Mbps 4 47 days 1 6TB 1080p 4 5Mbps 4 28 days 2 6TB D1 1 5Mbps 8 85 days 2 6TB 720p 3Mbps 8 47 days...

Страница 13: ...ion included in the accessory package route the fixing screw through the silicone cushion and install it to the screw holes as shown in Figure 2 2 Figure 2 2 Installing the hard disk fixing screw Step...

Страница 14: ...rting the hard disk Step 4 Turn the device over and fasten two hard disk fixing screws as shown in Figure 2 4 Figure 2 4 Fixing the hard disk Step 5 Install the other hard disk according to Step 2 Ste...

Страница 15: ...Recorder DVR User Manual 2 Hard Disk Issue V1 0 2018 06 04 7 Figure 2 5 Inserting the cable Step 6 Put on the upper cover and fasten the fixing screws as shown in Figure 2 6 Figure 2 6 Put on the upp...

Страница 16: ...OWER Power indicator When DVR is operating the Power indicator is steady on When DVR is shut down the PWR indicator is turned off 2 ALARM Alarm indicator This indicator flashes when alarm is transmitt...

Страница 17: ...of 0E HD8C2TB Figure 3 3 shows the rear panel of 0E HD16C2TB and the interfaces on it Figure 3 4 Rear panel of 0E HD16C2TB Table 3 2 shows the description of rear panel Table 3 2 Elements of the real...

Страница 18: ...DVR ensure that the DVR is connected to a power supply When the DVR is connected to a power supply it starts automatically upon the initial power on Ensure that a power supply is connected to the DVR...

Страница 19: ...The hard disk is formatted but the file system is inconsistent with the file system supported by the DVR Format the hard disk The hard disk is damaged 3 4 Powering off the Device Click the main menu...

Страница 20: ...rd 1 Scan the QR code and send the QR code to your seller 2 Click Send Password to you E mail A password retrieval email will be sent to your email address for details see 6 2 4 Step 6 Then you can re...

Страница 21: ...d and confirmation password Step 2 Click OK The real time video screen is displayed 3 7 Adding Cameras This DVR can be connected to both analog cameras and network cameras The DVR gives preference to...

Страница 22: ...3 Operation Instruction Digital Video Recorder DVR User Manual 14 Issue V1 0 2018 06 04 Figure 3 8 DVR topology End Switch Remote monitor...

Страница 23: ...VR floating menu bar a quick main menu is displayed The quick main menu provides Playback Search Picture Grid Event System Setting Exit System and Shutdown as shown in Figure 4 1 Figure 4 1 Quick main...

Страница 24: ...on After this button is clicked the audio setting screen is displayed where you can choose the channel and adjust the volume Video signal button After this button is clicked the video signal setting s...

Страница 25: ...Z control 4 1 1 PTZ The PTZ control and function settings are applicable only to high speed dome PTZ cameras and cameras externally connected to PTZs The function in the PTZ control screen is describe...

Страница 26: ...as with Motorized zoom lenses Step 3 Select a type of protocol from the drop down list box Step 4 Set an address Step 5 Select a baud rate from the drop down list box Step 6 Click OK to save P T Z set...

Страница 27: ...ton to rotate the position of camera Click or to set the camera speed Click or to zoom the lens in or out Click or to adjust the focal length Click or to adjust the aperture 4 1 2 UTC The UTC control...

Страница 28: ...tom of the playback screen is described as follows Slow play Fast forward Pause Backup After this button is clicked the video backup starts This function is available after a USB flash drive is connec...

Страница 29: ...ndicates that a USB flash drive is inserted into the DVR indicates that no USB flash drive is inserted into the DVR 4 3 Search Search refers to searching for a video by date and time Operation Descrip...

Страница 30: ...1 Click a camera in the camera list on the left side of the search screen The video view of the selected camera is displayed in the play window Step 2 Select a date in the calendar on the right side o...

Страница 31: ...r example if you select 7 it indicates that the selected time range is 07 00 00 08 00 00 Videos in this time range are displayed as 12 thumbnails at an interval of 5 minutes in the window on the right...

Страница 32: ...Digital Video Recorder DVR User Manual Quick Navigation 24 Issue V1 0 2018 06 04 Figure 4 12 DVR main menu End...

Страница 33: ...DVR When analog cameras are insufficient the DVR automatically searches for and adds network cameras in the same Local Area Network LAN Camera management includes camera add or delete picture paramete...

Страница 34: ...the IP address 127 0 0 1 When channels of the DVR are insufficient for the access of analog cameras they automatically occupy the channels of network cameras If all channels of the DVR are bound to ca...

Страница 35: ...ess saturation contrast and sharpness You can set picture parameters for each channel based on scenarios Operation Description Click Picture Param next to Camera in the main menu or click Menu in the...

Страница 36: ...tep 3 Set the camera brightness contrast saturation and sharpness Step 4 Click OK to save picture parameter settings or click Copy to all then click OK to apply the parameter settings to cameras of al...

Страница 37: ...Video Step 3 Set Resolution Quality Frame rate Bitrate and Bitrate type Step 4 Click OK to save encode parameter settings or click Copy to all then click OK to apply the parameter settings to cameras...

Страница 38: ...6 04 Figure 5 5 Encode Parameter screen Operation Steps Step 1 Enable video loss Click next to Start video loss to enable video loss Step 2 Set arming time Click on the right of Processing method to a...

Страница 39: ...release mouse to select the arming time within 0 00 24 00 from Monday to Sunday NOTE When you select time by dragging the cursor the cursor cannot be moved out of the time area Otherwise no time can b...

Страница 40: ...Figure 5 7 Trigger channel screen 2 Select the trigger channel of current channel 3 Click OK to save trigger channel settings or click Cancel to cancel the settings Step 5 Set Processing method 1 Clic...

Страница 41: ...s or click Cancel to cancel the settings Step 6 Click OK to save video loss settings or click Copy to all then click OK to apply the video loss settings to cameras of all channels End 5 5 Motion Detec...

Страница 42: ...and drag the left mouse button to draw a motion detection area Step 4 Select a value from the drop down list next to Sensitivity Step 5 Click next to Processing method to access processing method scre...

Страница 43: ...en as shown in Figure 5 10 Figure 5 10 PrivacyArea screen Operation Steps Step 1 Select a camera in the camera list on the left side of the Privacy area screen Step 2 In the video window hold down and...

Страница 44: ...a list on the left side of the camera tamper screen Step 2 Click next to Start camera tamper to enable camera tamper Step 3 Click next to Processing method to access processing method screen For detai...

Страница 45: ...he left side of the OSD setting screen Step 2 Click next to Time to enable or disenable OSD time setting Step 3 Click next to Channel to enable or disenable OSD channel setting Step 4 Click OK to save...

Страница 46: ...output alarms manager disk privacy manager advanced setting and App for the system in System Setting Figure 6 1 shows the system setting screen Figure 6 1 System setting screen 6 1 Basic The system a...

Страница 47: ...setting screen Step 2 Enter Device name for selected device Step 3 Select a proper resolution from the Display drop down list based on the adopted monitor Step 4 Select a required language from the L...

Страница 48: ...ynchronization Time synchronization is enabled by default Time is synchronized with the PC time Step 5 After Sync Time is disabled you can manually set the system time Click Date and scroll the mouse...

Страница 49: ...list Step 3 Click OK to save settings or click Cancel to cancel settings End 6 1 4 DST When the DST start time arrives the device time automatically goes forward one hour When the DST end time arrives...

Страница 50: ...ep 3 Select start time end time offset time from the drop down list respectively Step 4 Click OK to save settings or click Cancel to cancel settings End 6 2 Network 6 2 1 Ipv4 IPv4 is the IP protocol...

Страница 51: ...o IP Netmask and Gateway to set the parameters as required Step 3 Click next to Obtain DNS Automatically to enable or disable the function of automatically getting a DNS address The function is enable...

Страница 52: ...2018 06 04 Figure 6 7 Network check screen Step 5 Click OK to save IPv4 network settings or click Cancel to cancel settings End 6 2 2 Port Operation Steps Step 1 On the System setting screen choose Ne...

Страница 53: ...tep 3 Click OK to save settings or click Cancel to cancel settings Data Port1 used as RTSP port Data Port2 used as video control port After Ports is set and saved please click OK and Reboot the port i...

Страница 54: ...ck OK to save settings or click Cancel to cancel settings After UPNP button is enabled System perform port mapping automatically If UPNP is set OFF you need to forward the ports by manually on router...

Страница 55: ...verification code is received that shows the E mail is set successfully Step 6 Set E mail for retrieve the password the message Mail has been sent please check is displayed Open the mail Step 7 if the...

Страница 56: ...he Protocol drop down list Step 4 Click OK to save DDNS network settings or click Cancel to cancel settings An external network can access an address specified in the DDNS settings to access the DVR E...

Страница 57: ...is disabled by default Step 3 Select a required value from the rule type drop down list Step 4 Click Add the set the black and white list IP segment screen is displayed as show in Figure 6 13 Figure 6...

Страница 58: ...e name in the list Only one rule type is available and the last rule type set is efficient End 6 3 Record Operation Steps Step 1 On the System setting screen choose Record to access the record screen...

Страница 59: ...06 04 51 6 4 Output Operation Steps Step 1 On the System setting screen choose Output to access the output setting screen as shown in Figure 6 15 Figure 6 15 Output setting screen Step 2 Click next t...

Страница 60: ...l interval drop down list 3 Set layout Click to choose layout 4 Select dwell channel Click the video window and select a channel from the channel list to set the dwell channel 5 Click OK to save dwell...

Страница 61: ...7 CVBS output settings screen 2 Set the display offset Press and hold the left mouse button and drag the value bar to set the left up right down display offset of the CVBS monitor 3 Set the display co...

Страница 62: ...ightness contrast chroma saturation of the CVBS monitor 5 Click OK to save CVBS output settings or click Cancel to cancel settings 6 5 Alarm Manager The system allows you to set alarm surveillance and...

Страница 63: ...Enable to enable the surveillance function Step 3 Select alarm duration from the drop down list Step 4 Click OK to save surveillance settings or click Cancel to cancel settings End 6 5 2 Alarm in Oper...

Страница 64: ...tions Step 4 Select Alarm type from the drop down list NC Closed alarm circuit NO Opened alarm circuit Step 5 Set name Step 6 Set Processing method For details please see Step 2 Step 5 Step 7 Click OK...

Страница 65: ...gement screen Step 2 You can view the total capacity used capacity and SN of a disk on the disk management screen End 6 6 2 Clearing Disk Data Click Clear in the lower part of the disk management scre...

Страница 66: ...User manager Operation Steps Step 1 On the System setting screen choose Privilege manager User manager to access the user management screen as shown in Figure 6 22 Figure 6 22 User manager screen Ste...

Страница 67: ...r and number The password should be 6 32 3 Select a Group from the drop down list box 4 Select the operation privileges in the list of the add user screen 5 Click OK The user is set successfully The d...

Страница 68: ...ation screen Step 2 Enter the correct old password new password and confirm password and click Modify The password is modified successfully The password should include at least two kinds of letter cha...

Страница 69: ...able password to enable or disable the function The function is enabled by default Step 3 Click OK to save enable password settings or click Cancel to cancel settings End 6 9 Advanced setting Operatio...

Страница 70: ...eboot the DVR or Shutdown the DVR if you need Step 5 Click OK to save enable password settings or click Cancel to cancel settings End 6 10 App You can use application software that supports QR code sc...

Страница 71: ...ile phone App screen QR codes are described as follows iOS QR code used by iOS based devices to download the App client Android QR code used by Android based devices to download the App client UUID QR...

Страница 72: ...ter in the main menu to access the Log Center screen as shown in Figure 7 1 Figure 7 1 Log Center screen Step 2 Select an object whose logs need to be queried on the left side of the Log Center screen...

Страница 73: ...Log Center Digital Video Recorder DVR User Manual Issue V1 0 2018 06 04 65 Figure 7 2 Log play screen Step 6 Click Export log to export logs to USB storage End...

Страница 74: ...ent Center screen Step 2 Select a camera or all cameras on the left side of the Event Center screen Step 3 Select the event type below Event in the lower right part of the Event Center screen All even...

Страница 75: ...Figure 8 2 Alarm video play screen End 8 2 Timeline The system allows you to set the timeline to play alarm videos presented by time on each day of a week Operation Steps Step 1 Choose Alarm Timeline...

Страница 76: ...8 06 04 Figure 8 3 Timeline screen Step 2 Select the alarm time to view the alarm records on that day Step 3 Double click an alarm picture to play the alarm video End 8 3 Clear alarm When the buzzer b...

Страница 77: ...DVR is 192 168 0 121 when network interface 1 is used and is 92 168 0 121 when network interface 2 is used To access the DVR enter the corresponding IP address in the address bar of your web browser...

Страница 78: ...ace you can select an online camera in the left Cameras pane and view the corresponding live video Click Live Video The Live Video interface appears as shown in Figure 9 2 Figure 9 2 Live Video interf...

Страница 79: ...ptured on that day Step 4 Display videos After a camera and date are selected video information is displayed below the video pane The time scale above the file axis shows the different time points of...

Страница 80: ...to normal speed Speed Double decreasing speed play when you click the button A minimum of 1 4X can be configured Split screen Click button to switch the 1 screen and 4 screens Zoom in Click button to...

Страница 81: ...ue V1 0 2018 06 04 73 Figure 9 5 Alarm Search interface Step 2 Click at the top right conner set the channel type start time and end time as shown in Figure 9 6 Figure 9 6 Channel alarm Step 3 Click O...

Страница 82: ...Retrieval result Click to select the page of alarm list shows the rows shown in every page The system alarm retrieval is same as channel alarm 9 5 DVR Setting Click DVR Setup in the navigation bar at...

Страница 83: ...9 8 DVR Setting interface 9 5 1 Viewing basic information You can view time time zone DST Daylight saving time and device language in basic interface Operation Steps Step 1 On the System Setting scree...

Страница 84: ...guage to view these basic information End 9 5 2 Network management You can set IPv4 port DDNS SMTP in network management interface 9 5 2 1 IPv4 IPv4 is the IP protocol that uses an address length of 3...

Страница 85: ...xes next to IP Netmask and Gateway to set the parameters as required Step 3 Click next to Obtain DNS Automatically to enable or disable the function of automatically getting a DNS address The function...

Страница 86: ...ort1 and Data port2 respectively Step 3 Click Apply to save settings Data Port1 used as RTSP port Data Port2 used as video control port After Ports is set and saved please click OK and Reboot the port...

Страница 87: ...by default Step 3 Select a required value from the Protocol drop down list Step 4 Set Domain name Account and Password Step 5 Click Apply to save DDNS network settings An external network can access...

Страница 88: ...t manually Step 4 Set sender E mail user name and password manually Step 5 Set E mail for receive alarm the message Step 6 Set E mail for retrieve the password the message Step 7 Click Apply to save s...

Страница 89: ...management operations Buttons Button description How to operate Reboot 1 Click the message Are you sure to restart is displayed 2 Click OK and the NVR reboot Upgrade 1 Click and select an upgrade pack...

Страница 90: ...vice is rebooting please login later is displayed 3 NVR reboot and enter to login interface Close 1 Click the message Confirm closed is displayed 2 Click OK the message The device has been closed is d...

Страница 91: ...tton of alarm events to enable or disable the events The alarm events include push message alarm message E mail push buzzer alarm out and channel record 3 Click Apply to save the setting or Click Copy...

Страница 92: ...om Monday to Sunday NOTE When you select time by dragging the cursor the cursor cannot be moved out of the time area Otherwise no time can be selected Method 3 Click in the schedule page to select the...

Страница 93: ...ep 3 Set the record policy Please refer to 9 6 Step 7 Set time plan Step 4 Click Apply to save the setting End 9 8 User You can add modify and delete a user and privilege in user manager interface 9 8...

Страница 94: ...order DVR User Manual Web Access 86 Issue V1 0 2018 06 04 Figure 9 18 Privilege management interface Step 2 Add a user 1 Click in privilege management interface to access the add user interface as sho...

Страница 95: ...nd confirm password 3 Select a group from the drop down list 4 Check the privilege 5 Click OK to save the setting or Click cancel to cancel the setting NOTE Click to view the privilege of super admini...

Страница 96: ...Step 2 Enter the old password and set the new password and confirm password Step 3 Click Apply the password is modified successfully the system return to the login interface End 9 8 3 Local You can s...

Страница 97: ...Video Recorder DVR User Manual Issue V1 0 2018 06 04 89 Figure 9 21 Download configuration interface Step 2 Enter the image download path Step 3 Enter the record download path Step 4 Click Apply to sa...

Страница 98: ...screen display incomplete information or is skewed Use the following methods below to fix the problem Method 1 Use the automatic adjustment function of the monitor Method 2 Click Adjust on the login s...

Отзывы: