background image

please do not return this product to the store. 

Call Us Directly! Our Trained Technicians Will Answer Your Questions and/or Ship Any Parts You May Need

You can reach us Toll Free at 

1-888-827-3667

 for Consumer Assistance or online at 

www.wayne-dalton.com

19

26

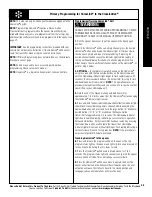
programming wireless keyless 

entry (If Included)

Tools Needed:

None

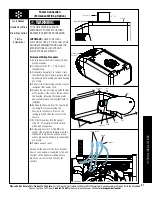
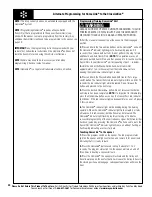
DuRING PROGRAMMING THE GARAGE 
DOOR MAy OPERATE. KEEP PEOPLE AND 
OBjECTS CLEAR OF THE MOVING DOOR 
TO PREVENT DOOR DAMAGE OR 
POSSIBLE PERSONAL INjuRy.

note: 

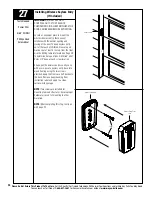
To simplify installation, 

program the wireless keyless entry to the 

opener before mounting to the wall.

note:

 Before programming ensure garage 

door is in the “down” position.

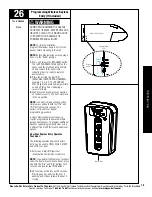
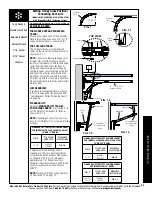
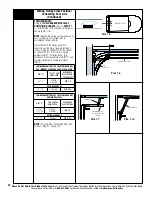
1. 

Press and release the PROGRAM button.   

  The red PROGRAM STATuS light on the  

  opener and the overhead lamp will turn  

  on and remain lit for one minute, 

  indicating that it is ready to learn the 

  keyless entry.

2.

 Press the desired five digit PIN 

  (PERSONAL IDENTIFICATION NuMBER),  

  example 1-2-3-4-5. The PROGRAM    

  STATuS light and overhead lamp will turn

  on and off three times indicating a 

  successful learn.

3.

 Wait five seconds and press any button  

  on the keyless entry.  The door will move  

  to the up position.

note:

 If an error is made entering codes, 

simply press and hold both the “7/8” and 

“9/0” buttons for two seconds. The 

keyless entry will reset. Repeat 

programming procedure.

A single wireless keyless entry device 

may be programmed to operate multiple 

garage door openers. To program additional 

openers, repeat programming steps using 

a different five digit PIN for each additional 

opener.

how your keyless entry operates 

your door:

The following explains how your Keyless 

Entry can be used to OPEN, CLOSE, START, 

and STOP your door.

1. 

Enter your 5-digit PIN (personal 

  identification number); door will move.

note:

 If you inadvertently enter an incorrect

code, the door will not move To Reset, press

and hold the “7/8” and “9/0” buttons for 2

seconds and reenter your PIN number.

2. 

unit remains active for next 25 seconds.

  Pressing any key, will stop the door if

  opening, and stop or reverse the door if

  closing.

warnIng

FORCE 

ADJ.

ST

ATUS

SW

PROGRAM

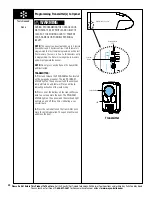
Program Status 

LED

Program 

Button

Right Side Of Opener

Keyless Entry

PRE

-OPERA

TION

Содержание 3018

Страница 1: ...close attention to all warnings and notes This manual MUST be attached to the wall in close proximity to the garage door Copyright 2006 Wayne Dalton Corp Part No 326568 NEW 6 6 2006 For residential se...

Страница 2: ...olts Hairpin Cotter 1 4 Plastic Insert Locking Nut 2 1 4 20 x 5 8 Self Drilling Screws 2 1 4 x 1 1 2 Lag Screws Infrared Safety Sensors 1 Sender 1 Receiver 2 Safety Sensor Brackets Wired Safety Sensor...

Страница 3: ...proceed to your Classicdrive installation manual for instructions on how to install the Classicdrive garage door opener If the operation of the door does not meet these requirements adjust the spring...

Страница 4: ...door it should stay in position If spring tension pulls the door further open or door weight pulls it down your door is not properly adjusted Door Test Two When properly installed a door should remain...

Страница 5: ...cally reverse when obstructed in down direction and return to fully open position The door will stop when obstructed in the up direction See Adjustment 2 on page 31 8 Infrared Safety Sensors Wired inf...

Страница 6: ...ng the opener or door 8 Install opener on a properly balanced and operating garage door Have a qualified service person make adjustments repairs to cables spring assemblies and other hardware before i...

Страница 7: ...t rail assembly NOTE Note position of oval head and flat head carriage bolts NOTE The rails will have to be adjusted later so only finger tighten the bolts The bolts will have to be tightened after th...

Страница 8: ...asher nuts Ensure the chain is on the sprocket of the opener and finger tighten the nuts equally For Belt place nylon shoulder bushings tension springs As shown on the U bolt and fasten with two 5 16...

Страница 9: ...ain tighten the U bolt lock washer nuts evenly against the front rail so the underside of the chain is approximately 5 8 above the rails For Belt tighten the U bolt lock washer nuts evenly until three...

Страница 10: ...ches of driver gear Rotate the motor spline to position driver gear so the nearest notch in driver gear is directly behind motor spline as illustrated Note Do not rotate more than 1 2 turn NOTE Place...

Страница 11: ...h Arc Point using a carpenter s level transfer and mark the highest point of travel onto the header wall and close the door Mount the front wall bracket with its lower edge approximately 1 2 1 above t...

Страница 12: ...ner and support it on a step ladder to attach the front end of the rail assembly to the wall bracket 9 Positioning Motor End of Opener Tools Needed 2 x 4 Board Non Metallic Step Ladder IMPORTANT To pr...

Страница 13: ...the center line previously marked on the top section of the garage door to ensure rail will be parallel with the direction of door travel Using perforated hangers cut to proper length hang opener end...

Страница 14: ...cket using two 1 4 20 x 2 carriage bolts and 1 4 locking nuts supplied on center line of door with middle hole in line with top rollers For metal doors mount door bracket using two 1 4 20 x 5 8 self d...

Страница 15: ...se a malfunction Wired Wall Station Wire the garage door opener wall station using bell wire connected to COM and P B screws as illustrated Locate push button adjacent to service entrance door at a mi...

Страница 16: ...ry important that both wall mounting brackets be mounted at the same height for proper alignment b Drill pilot holes using a 3 16 drill bit Using two 5 16 x 1 1 2 lag screws permanently mount the wall...

Страница 17: ...oor and do not staple through wire Note If wires must be lengthened or spliced into pre wired installation use wire nuts or other suitable connectors To Opener Wire to Opener 16 Connecting Wired Infra...

Страница 18: ...pe receptacle Excess power cord length must be routed and contained safely away from any moving parts As soon as power is applied to the opener the light on the opener will blink once to indicate a su...

Страница 19: ...ure until the door travels to a fully closed position At this point you will be able to activate the opener The trolley upper arm will move to the open position but will not move to the closed positio...

Страница 20: ...n Spring s see Setting Trolley Close Position Connecting Door Arm To Door on pages 25 26 If not complete this step Trolley must be at the factory preset fully closed position see illustration Verify p...

Страница 21: ...grip clevis as shown Connecting Upper and lower door arms Failure to use locking nut can result in arm releasing and possible resulting in property damage and or personal injury Align upper and lower...

Страница 22: ...4 turn more Repeat as necessary NOTE 1 4 turn equals 1 of door travel OPEN CLOSE MORE LESS MORE TRAVEL ADJUSTMENT Bottom Of Opener OPEN CLOSE MORE LESS MORE TRAVEL ADJUSTMENT Bottom Of Opener 23 Sett...

Страница 23: ...inch of additional travel For doors less than 7 feet high recommend decreasing factory preset travel by turning open limit screw 3 full turns clockwise ap proximately 1 foot of travel then make fine...

Страница 24: ...STEPS 24 AND 25 HAVE A QUALIFIED SERVICE PERSON MAKE NECESSARY ADJUSTMENTS REPAIRS OR SEVERE OR FATAL INJURY COULD RESULT FROM OPERATING THE DOOR Opener WARNING 24 Contact Obstruction Test Tools Need...

Страница 25: ...d lamp will turn on and off three times indicating a successful learn 3 Wait five seconds and press any button on the keyless entry The door will move to the up position NOTE If an error is made enter...

Страница 26: ...th the normal opening and closing of the door To keep keyless entry out of the reach of children measure and mark a spot at least 5 feet up from the floor Use the drilling template located on Page 39...

Страница 27: ...of hole 4 Pull or strip off remaining section of outer insulation from power cord 5 Remove lens by pressing up on both sides of the bottom of the lens at the junction of the housing releasing the lock...

Страница 28: ...GS MUST BE ADJUSTED PROPERLY Place the top bottom halves of the adjust able operator bracket flush against the inside of the top section as shown Adjust the top bottom halves out against the top and b...

Страница 29: ...nding on your setup you may have to cut straight arm to accomplish trolley settings If adjustment of the trolley position is required use the close travel adjustment screw located on the bottom of the...

Страница 30: ...m to accomplish trolley settings If adjustment of the trolley position is required use the close travel adjustment screw located on the bottom of the opener as shown in FIG 1 5 A 1 4 turn equals appro...

Страница 31: ...ader to trolley as shown in FIG 1 2 NOTE Depending on your setup you may have to cut straight arm to accomplish trolley settings If adjustment of the trolley position is required use the close travel...

Страница 32: ...1 4 turn equals approximately 1 of trolley travel turn clockwise to decrease distance DIM X and counter clockwise to increase distance DIM X NOTE Proceed with Connecting Door Arm To Door Step 21 on p...

Страница 33: ...SIGHT AND KEEP PEOPLE AND OBJECTS AWAY UNTIL IT IS COMPLETELY CLOSED TO PREVENT A SEVERE OR FATAL INJURY AVOID STANDING IN A OPEN DOOR WAY OR WALKING THROUGH THE DOORWAY WHILE THE DOOR IS MOVING NEVER...

Страница 34: ...a combination of two buttons pressed simultaneously can be programmed to activate a different door Only one button at a time can be programmed to activate a specific opener The transmitter LED will l...

Страница 35: ...ONAL To completely clear all channels on the HomeLink unit press and hold the two outside buttons on the HomeLink unit until the HomeLink indicator light begins to flash rapidly approx 20 seconds then...

Страница 36: ...ng steps 3 6 below 3 Hold the end of the Wayne Dalton hand held transmitter approximately 1 to 3 inches away from the HomeLink surface keeping the HomeLink indicator light in view 4 Press and hold the...

Страница 37: ...sition 2 Press the PROGRAM button three times The STATUS LED and the overhead lamp will flash on and off The blink rate which corresponds to the force setting will consist of 1 to 5 fast blinks follow...

Страница 38: ...er be in memory and will not operate the opener Note Do not press any button on the transmitter until instructed Transmitter 1 Press and release the PROGRAM button located on the garage door opener Th...

Страница 39: ...d result in severe or fatal injury 5 Failure of door opener to respond to transmitter or wireless keyless entry may be due to a weak or dead battery Press and hold the activation button on either the...

Страница 40: ...ep 23 Door stops and does not close fully Close limit not set properly Adjust close travel with screwdriver turn clockwise to desired setting 1 4 turn equals 1 of travel See Step 22 Door closes and th...

Страница 41: ...24527 Trolley Assembly Chain 1 18b 325687 Sprocket Coupling w Bushing Belt 1 2b 320697 Trolley Assembly Belt 1 19 252106 Sprocket Base Assembly 1 3 309960 Chain Latch Assembly 1 20 251228 5 16 18 x 2...

Страница 42: ...nsor Sliding Bracket 2 4 306364 Power Supply Cord 1 19 318873 Infrared Safety Sensors Pair 1 5 260570 Capacitor 1 2 H P 1 20 252092 Limit Assembly Includes Items 10 26 27 1 6 306486 Wiring Harness 1 2...

Страница 43: ...Sensors Allows independent door up down control and overhead light on off control Illuminated 10 digit numeric keypad which allows the operation of the garage door opener from outside by entering a pr...

Страница 44: ...above Limited Warranty does not cover normal wear or any damage beyond Manufacturer s control This Limited Warranty does not cover field replacement labor THIS LIMITED WARRANTY COVERS A CONSUMER PRODU...

Страница 45: ...3667 for Consumer Assistance or online at www wayne dalton com 39 Cut Out Template to Aid Installation 5 Button Keyless Entry Template Pre drill 5 64 pilot hole Call Us Directly Our Trained Technician...

Страница 46: ...accordance with the instructions may cause harmful interference to radio communications However there is no guarantee that interference will not occur in a particular installation If this equipment do...

Отзывы: