wattstopper WS-250 Скачать руководство пользователя страница 4

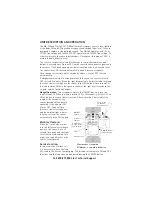
1.  Connect the existing wires in the wall box to the sensor flying leads. (See 

Wiring Directions at right).


•  Do not allow bare wire to show below connector. 


•  The ground wire must be 

tightly grounded 

for the unit to operate

 properly.

2.  Attach the sensor to the wall by mounting it in the wall box with the two 

mounting screws provided.

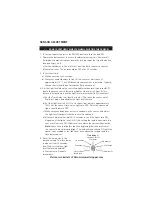
3.  Turn ON power at the circuit breaker.

4.  Test the sensor using the procedure in the Sensor Adjustments section. 


There is an initial warm-up period after installation.

 It may take up to a 

minute before the load turns ON due to a sensor warm-up period during 
initial power-up (this occurs during installation only). The load turns ON 
after the warm-up period ends if the sensor detects motion.


Rapid successive pressing of the ON/OFF button causes a delay in 
function.

 A single press of the button causes an immediate response. If the 

button is pressed again within 2 seconds, the switch ignores it. Wait at least 
two seconds between button presses.

5.  Install industry standard decorator wall switch cover plate (not included).

CAUTION

Turn the power OFF at the circuit breaker before installing the sensor.

INSTALLATION

WS

Wall Switch

Wall 

Junction Box

Call 800.879.8585 for Technical Support

Содержание WS-250

Страница 1: ...7VAC 60Hz Load Requirements 120VAC 60Hz 0 800W ballast tungsten 1 6 hp 277VAC 60Hz 0 1200W ballast WS 250 347 Voltage 347VAC 60Hz Load Requirements 0 1200W ballast Time Delay Adjustment 30 seconds 30 minutes Sensitivity Adjustment Minimum Maximum Light Level Adjustment 10 200 FC Installation Instructions ...

Страница 2: ... load remains ON until the space is vacant or the light level rises above the setpoint and the time delay expires Manual Operation The occupant can press the ON OFF button to turn the load ON and OFF When the load is turned OFF or ON manually it stays OFF or ON as long as the sensor detects motion After no motion is detected for the length of the time delay the sensor goes back to automatic operat...

Страница 3: ...le in the space in order to detect occupancy Obstructions such as furniture blocking the sensor s lens may prevent occupancy detection 15 4 6m 35 10 7m 4 0 1 2m 35 10 7m floor Opaque adhesive tape is supplied so that sections of the sensor s view can be masked This allows you to eliminate coverage in unwanted areas Since masking removes bands of coverage remember to take this into account when tro...

Страница 4: ...e up to a minute before the load turns ON due to a sensor warm up period during initial power up this occurs during installation only The load turns ON after the warm up period ends if the sensor detects motion Rapid successive pressing of the ON OFF button causes a delay in function A single press of the button causes an immediate response If the button is pressed again within 2 seconds the switc...

Страница 5: ... DIRECTIONS For normal installation of the WS 250 and WS 250 347 connect 1 LOAD to Red flying lead 2 LINE to Black flying lead 3 GROUND to Green Manual bi level lighting wiring Load Load Green Red Black to Line Neutral Visit our website for FAQs www wattstopper com ...

Страница 6: ... sensor out of Walk test mode and enables the light level feature b Set the Light level to 50 12 o clock position which is approximately 100fc Let the sensor time out so lights are OFF Enter the space and lights should remain OFF c Make sure your body does not cast a shadow on the sensor and adjust the light level trimpot clockwise in small increments d After each adjustment wait 5 10 seconds to s...

Страница 7: ... time delay is set to the desired delay and that there is no movement within the sensor s view for that time period To quickly test the unit for proper operation turn the time delay to minimum fully counterclockwise and move out of the sensor s view Load should turn OFF after 30 seconds If load still does not turn OFF call 800 879 8585 for technical support Sensing motion outside desired area Opaq...

Страница 8: ...RMATION WattStopper warranties its products to be free of defects in materials and workmanship for a period of five 5 years There are no obligations or liabilities on the part of WattStopper for consequential damages arising out of or in connection with the use or performance of this product or other indirect damages with respect to loss of property revenue or profit or cost of removal installatio...

Отзывы: