©
“WATEX” Ltd., Reg. Nr. 40003712811, Ganibu dambis 27 k-5, Riga, LV-1005; Contact information: tel. +371 67381989, e-mail:
[email protected], www.watex.eu
12
4.
FIRST START UP
At default for all WATEX CMS series devices, all key operating parameters are already installed
and programmed in the service center. The only thing you need to set up for the first start up is the
current time.
4.1.
Setting up the time
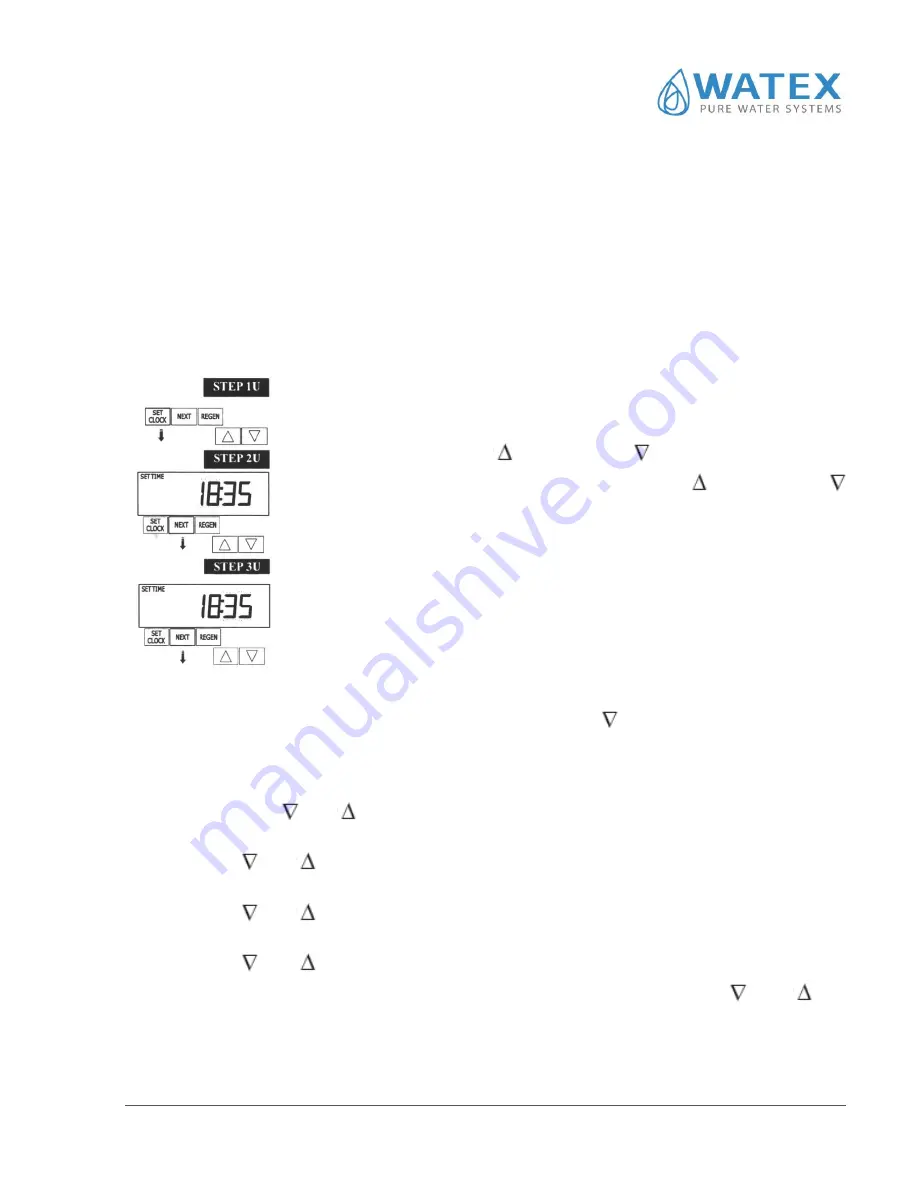
In case the time needs to be reset or if there has been a power failure, the correct time must be set.
This control valve must be set for both hours and minutes. All other information will be stored in the
memory, regardless of how long the power supply has been interrupted. To set
the time, follow these steps:
1.
Press button
“SET CLOCK”
;
2.
Using buttons
“UP”
and
“DOWN”
, set up the current hour;
3.
Press button
“NEXT”
and using buttons
“UP”
and
“DOWN”
,
set up the current minutes;
4.
Press button
“NEXT”
, to finish setting up the time and to return to the
default postion. In the display correct time can be visible and it does
not flash anymore..
4.2.
Regeneration cycle length and capacity set up
.
Press and hold simultaneously button
“NEXT”
and button down
for 3 seconds.
1)
On the top left corner, the word „softening” is flashing.
2)
Press
“NEXT”
and the first regeneration cycle‘’backwash’’ is shown and the cycle lenght.
With buttons
and
it is possible to change the cycle lenght.
3)
Press
“NEXT”
and the cycle ‘’brine’’ is shown as well as the cycle length in minutes. With
buttons
and
it is possible to change the cycle lenght.
4)
Press
“NEXT”
and the third cycle „rinse” is shown and the cycle length in minutesēs. With
buttons
and
it is possible to change the cycle lenght.
5)
Press
“NEXT”
and the fourth cycle „fill” is shown and the cycle length in minutesēs. With
buttons
and
it is possible to change the cycle lenght
6)
Press
“NEXT”
the equipment capacity in m3 is shown. With buttons
and
it is
possible to change the capacity. Press
“NEXT”
and the set-up data will be automatically
saved and further settings are shown. Further on press
“NEXT”
until the current time is
shown. After this is done setting up is done and the data is saved.


