Copyright 2004 Waterford Precision Cycles, Inc. - All Rights Reserved.
Page - 12
Fitting to a Stock Design
Step 1: Complete the basic rider assessment.
A. Starting crank length (advanced).
B. Starting handlebar width and type.
C. Establishing the proper starting stem dimensions.
D. Select an appropriate saddle.
E. Compute the starting seat angle and saddle height.
Step 2: Prepare the Fitmaster based on the starting fit:
A. Mount the appropriate crank and re-tighten the rear wheel. Be sure to have the proper chain
tension (advanced).
B. Mount the starting stem and handlebars based on the fit. An adjustable stem is particularly helpful.
C. Mount the rider’s choice of saddle or (if no saddle specified), a suitable saddle.
D. Install the rider’s pedals or pedals compatible withthe rider’s cycling shoes.
E. Loosen the front angle plate bolts on the Fitmaster. This allows the front plate to float on the base
as you make the other ajustments.
F. Loosen the top tube slider.
G. Set the seat angle based on catalog specifications. This means removing the bolt from the seat
angle plate and placing it in the hole corresponding to the desired seat angle. Securely tighten the
seat angle bolt.
H. Set the seat tube length to the value starting value. Then set the saddle height to the starting value
estimated by your initial calculations.
I. Set the head tube angle to the catalog specifications.
J. Set the top tube length and rise to match the target frame dimensions.
Step 3: Establish the rider’s leg position and pedal stroke.
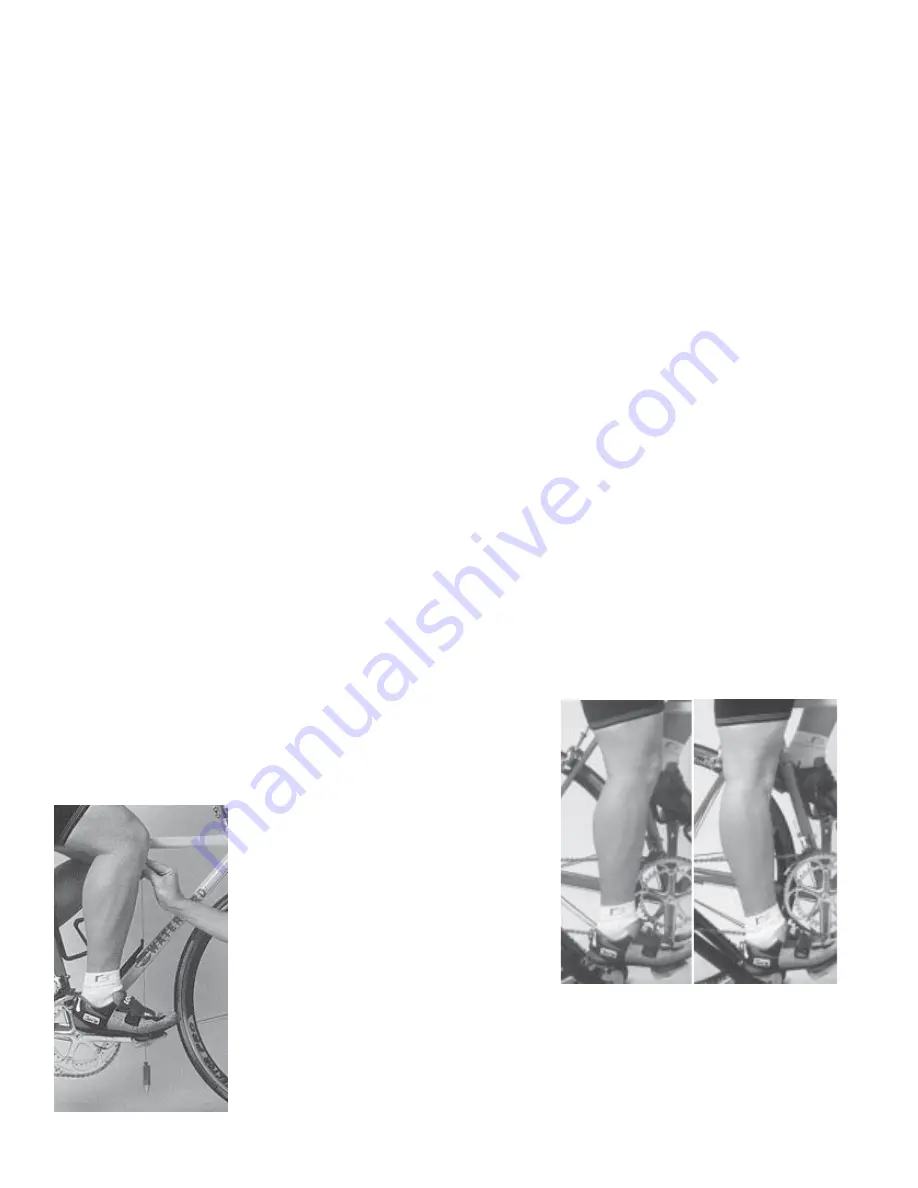
A. Determine the most appropriate saddle height. As shown in
the illustrations at right, the rider’s knee should be slightly bent
when at the bottom of the pedal stroke. Alternatively, when the
leg is fully straighten, the heel should extend about 3/4” below
the pedal.
E. Determine the most appropriate
saddle setback: A good starting point is
put the rider’s foot in the 3:00 position.
Then drop a plumb bob from the front of
the knee. The plumb bob should point to
the center of the pedal spindle.
If you need to make significant
(more than 2cm) setback adjustments,
you may need to recheckt the seatpost
height.
In extreme cases, the setback may indicate the need for a different size
frame.
Though similar to the process of fitting a rider to a custom frame, with a stock design, the goal is to
find the best stock design that fits the rider.


