Warrior Winches 80SPS12 Скачать руководство пользователя страница 6

6

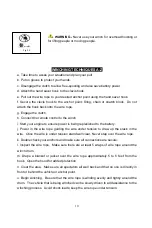
7.  Check for proper drum rotation.  Pull and turn the clutch knob to the “off” 

position (Free-spooling).  Pull out some cable from the drum, and then turn the 

clutch knob to the “In” position to engage the gears.  Press the cable out button 

on the power switch.  If the drum is turning and releasing more cable then your 

connections are accurate.  If the drum is turning and collecting more cable then 

reverse the leads on the motor.  Repeat and check rotation. 

SAFETY PRECAUTIONS  

WARNING

WARNING – DO NOT EXCEED RATED CAPACITY. 

WARNING – Intermittent use only. 

WARNING - Do not use winch in lifting or moving or persons. 

WARNING - A minimum of five wraps of cable around the drum 

barrel is necessary for pulling and holding the rated load. The 

cable clamp is not designed to hold the load without 5 wraps of 

cable around the barrel. 

WARNING - Keep yourself and others a safe distance to the 

side of the cable when under tension. 

WARNING – The wire rope may break before the motor stalls.  

For heavy loads at or near rated capacity, use a pulley 

block/snatch block to reduce the load on the wire rope. 

WARNING -Never step over a cable, or near a cable under load. 

WARNING - Don’t move the vehicle to pull a load (towing) on 

the winch cable.  This could result in cable breakage. 

WARNING-Disconnect the remote control and battery leads 

when not in use. 

Содержание 80SPS12

Страница 1: ...ELECTRICAL WINCH 80SPS12 80SPS24 Assembly Operating Instructions...

Страница 2: ...afely or improperly could result in property damage serious injury or death Throughout this manual you will find the following symbols for caution warning and danger Pay particular attention to the no...

Страница 3: ...the clevis hook pin 4 Roller Fairlead When using the winch at an angle the roller fairlead acts to guide the wire rope onto the drum and minimizes damage to the wire rope from abrasion on the winch m...

Страница 4: ...ds etc The mounting channel also has holes to accept your roller fairlead 12 Snatch Block If Your winch were supplied with a snatch block that used properly can double the pulling power of winch or ch...

Страница 5: ...enough clearance for the winch to be placed in the channel without obstruction 3 Assemble the winch to the Mounting Channel Part 800025 by first pulling and releasing the clutch knob to Off position F...

Страница 6: ...t use winch in lifting or moving or persons WARNING A minimum of five wraps of cable around the drum barrel is necessary for pulling and holding the rated load The cable clamp is not designed to hold...

Страница 7: ...urn off the winch and repeat the procedure until a few feet of cable is left Disconnect the remote control and finish spooling by hand by rotating the drum by hand with the clutch disengaged Keep hand...

Страница 8: ...attach to the frame or other load bearing part x The vehicle engine should be kept running during operation of the winch to minimize battery drain and maximize power and speed of the winch If the winc...

Страница 9: ...ould cause damage to the cable As shown in Fig 3 1 Do not winch from an acute angle as the wire rope will pile up on one side of the drum causing damage to wire rope and the winch Fig 3 2 Short pulls...

Страница 10: ...ed to the battery j Power in the wire rope guiding the wire under tension to draw up the slack in the wire Once the wire is under tension stand well clear Never step over the wire rope k Double check...

Страница 11: ...Make sure that any wire already on the drum has spooled tightly and neatly If not draw out the wire and re spool from the point where the rope is tight w Keep your hands clear of the winch drum and fa...

Страница 12: ...all the way into the connector Tighten nuts on all cable connections Replace Switch Assembly Check for voltage at armature port with Switch pressed If voltage is present replace motor Allow to drain...

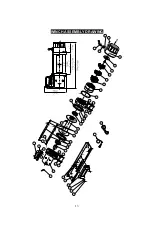
Страница 13: ...13 WINCH ASSEMBLY DRAWING OUT IN...

Страница 14: ...20 16 800013 8 Lock Washer 5 17 800014 1 End Bearing 18 800015 1 Gasket 19 800016 1 Gear Ring 20 800400 1 Gear Carrier Assembly Output 21 800500 1 Gear Carrier Assembly Intermediate 22 800600 1 Gear C...

Страница 15: ...6 L 8 3mm D x20m L Weight 69 7lbs 31 6 kgs 70 5lbs 32kgs S TYPE DUTY CYCLE Line speed and motor current First layer Line pull Line speed ft min m min Motor current Amps Max lb kN 12V DC 12V DC 0 21 3...

Страница 16: ...nd operating instructions before use Failure to comply with these instructions or any improper use of the equipment will terminate the warranty Please ensure you record the information below Distribut...

Страница 17: ......

Страница 18: ......

Страница 19: ......

Отзывы: