background image

21

GB

any fire insurance.

• 

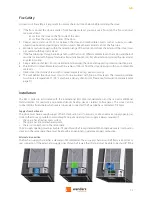
Have the flue gas outlet and the combustion air supply of the double-walled flue tube system checked for 

air-tightness every year. 

• 

Have the complete tube system checked every year; this includes the roof or wall ducts and the outlet just 

outside the wall. 

• 

Have the valves and/or flaps checked for their functioning.

• 

Have the sealing of doors and glass panes checked for wear and tear.

Safety

A WANDERS wood-burning stove gives you a comfortable and a safe source of heat in your home.

Fire safety starts with a proper installation and a properly working flue tube. Your installer must therefore comply 

with the installation instructions as listed on page 22 and further. To burn your stove safely, the following points 

are important:

1.  Burn your stove as much as possible with a closed door; it increases the output and is better for the environment. 

2.  Prevent small children or the infirm from getting too close to a burning stove and do not leave them alone in 

the room when the stove is burning. You could use a fire-screen. 

3.  Do not pour or put combustible liquids and materials in the stove, as it may damage the fireplace beyond 

repair. 

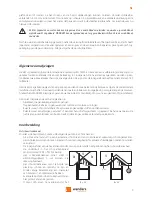
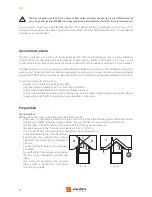
4.  If the floor around the fireplace is made of combustible material you must use a floor slab. The floor slab must 

have a minimum size of:


- 50 cm measured from the fireplace on the front side of the door:  


- 30 cm measured from the fireplace on all sides from the door:. 

5.  Do not place any combustible materials, such as curtains, wooden objects (cupboards, paintings) close to the 

fireplace or the flue tube. A minimum distance of 80 cm measured from the exterior of the stove and the flue 

tube is required. 

6.  Never cover the chimney breast or mantelpiece with combustible material (e.g. paper covering).

7.  Please bear in mind the points of the section on ‘the best way to burn your stove’, on page 19.

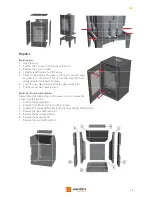
8.  Have your stove repaired only by a certified installer and with original parts.

Guarantee 

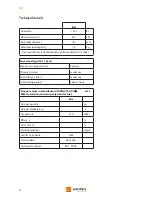
WANDERS Metaalproducten B.V. in Netterden, the Netherlands, gives a guarantee of five years after the purchase 

date of your wood-burning stove, provided that the fireplace is properly installed and used in accordance with the 

instructions in the manual.    

The guarantee includes all defects which can be reduced to flaws in material and construction, in which case you 

will receive the new parts free of charge. Labour costs or other expenses are not covered by the guarantee. You 

can send defect parts (shipping paid) to WANDERS Metaalproducten B.V., Amtweg 4, 7077 AL in Netterden [The 

Netherlands]. Before installing your stove you must check if there is any visible damage to the unit. If there is, do 

not accept the unit and contact your supplier. 

The guarantee does not include: the glass, failure due to improper use; non-compliance with the national 

regulations and enclosed installation and operating instructions; installation by an installer of dealer who is not 

acknowledged by WANDERS, negligence of the unit and change of owner. The guarantee is also disclaimed when 

a wrong fuel is used.

There is a guarantee period of one year for all cast iron and vermiculite parts, and the lacquer.

WANDERS disclaims responsibility for any cracks in stuccoed walls or discolouration of walls, ceilings and/or grates 

after burning the fireplace. Discolouration can be caused when dust particles burn in the convection cover. To 

minimize the chance of cracks in stucco and discolouration we refer to the advice given for decorative hearths. 

Your installer can give you more information.

Содержание Elm

Страница 1: ...15 INK 00 7086 NL GB FR DE Handleiding en installatievoorschriften 2 Users guide and installation manual 15 Mode d emploi et instructions d installation 28 Bedienungsanleitung und Installationsvorschr...

Страница 2: ...choorsteen en rookkanaal 7 Onderhoud 7 Klein onderhoud 7 Buiten gebruikstelling 7 Jaarlijks onderhoud 8 Veiligheid 8 Garantie 8 Algemene aanwijzingen 9 Voorbereiding 9 Het schoorsteenkanaal 9 Brandvei...

Страница 3: ...uiknamevanuwhoutkacheldezehandleidingzorgvuldigtelezenenvervolgensgoed te bewaren Uw installateur kan deze handleiding nodig hebben voor het jaarlijkse onderhoud van uw haard Wij wensen u veel warmte...

Страница 4: ...king van de Elm Houd bij de installatie ook rekening met de brandveiligheid Zie pagina 10 De houthaard is geschikt als bijverwarming en is geen vervanger voor bijvoorbeeld uw Cv installatie Aansteken...

Страница 5: ...de haard Eerste keer stoken Verkleuren van wanden plafonds en roosters Na het stoken van de haard kunnen wanden plafonds en roosters verkleuren Dit komt doordat stofdeeltjes verbranden in de convecti...

Страница 6: ...endement aanzienlijk Houtsoorten en opslag Alle soorten schoon gekapt en droog hout kunt u gebruiken als brandstof Harde houtsoorten zoals eik beuk en berk branden langzaam geven veel warmte af en vor...

Страница 7: ...maal 150 millimeter en of het kanaal schoon glad en lekdicht is Wat te doen bij schoorsteenbrand Bijschoorsteenbrandsluitu directdeafsluitklepindeschoorsteenenalle luchttoevoerkanalen Beldebrandweer N...

Страница 8: ...gordijnen houten voorwerpen kasten schilderijen vlakbij de kachel of het rookkanaal Houd minimaal een afstand van 80 centimeter aan vanaf de buitenzijde van de haard en het schoorsteenkanaal 6 Laat de...

Страница 9: ...rschriften Daarnaast gelden de nationale en lokale wet en regelgeving voor plaatsing en gebruik van houtkachels WANDERS biedt geen garantie wanneer de Elm onvolledig of onjuist is aangesloten of ge ns...

Страница 10: ...ang 8 De muur achter de kachel moet uit brandvrije materialen bestaan of ermee ge soleerd worden Het isolatiemateriaal dient een temperatuur van 700 graden Celsius te weerstaan en een dichtheid van 80...

Страница 11: ...aansluiting los 4 Monteer de rookgas aansluiting aan de achterzijde 5 Monteer de afdekplaat boven op de kachel 6 Verwijder de uitsparing uit de achterwand met een tang of door de plaat een aantal male...

Страница 12: ...zijde van de deur Verwijder de 2 glashouders Haal voorzichtig het glas uit de deur Controleer of het band in deur onbeschadigd is en vast zit Mocht dit niet zo zijn bevestig het band met hittebestendi...

Страница 13: ...nale warmte wordt verkregen bij een schoorsteentrek van 0 12 mBar Brandstof houtblokken 30 x 10 cm Maximale opleg hoeveelheid 2 stuks Primaire luchtklep gesloten Secundaire luchtopening maximaal Brand...

Страница 14: ...losse wol wol granulaat vilt lamellen mat matten verstikt platen schalen segmenten gevlochten overige matten verstikt matten verstikt matten verstikt g kromme 2 schilfers g kromme 1 schilfers g kromme...

Страница 15: ...age 19 The best way to burn your stove 19 Chimney and flu 20 Maintenance 20 Small maintenance 20 When the stove is not used 20 Yearly maintenance 20 Safety 21 Guarantee 21 General instructions 22 Prep...

Страница 16: ...y are of particular importance to the installer We advise you to read this manual thoroughly before using your new stove and to keep the manual in a handy place Your installer may need the manual for...

Страница 17: ...hich case we cannot give any guarantee about proper functioning of your Elm stove Please bear the fire safety in mind when installing the stove See also page 21 The wood burning stove is suitable as a...

Страница 18: ...ghting the stove for the first time Discolouration of walls ceilings and grates The walls ceilings and grates may show some discolouration after lighting your stove This is caused by the dust particle...

Страница 19: ...n split and dry Hardwood like Elm beech and birch burn slowly give off much heat and form charcoal easily Softer woods like spruce fir and poplar give more flames but less heat and less charcoal The b...

Страница 20: ...le of every chimney It helps when the wind near the chimney mouth draws the air from the chimney Fall wind may give the opposite effect and blow the air back into the chimney Relatively cold foggy air...

Страница 21: ...Never cover the chimney breast or mantelpiece with combustible material e g paper covering 7 Please bear in mind the points of the section on the best way to burn your stove on page 19 8 Have your sto...

Страница 22: ...incorrectly It is not allowed to place the stove in Arcades and corridors accessible to the public Stairwells except in buildings with no more than 2 dwellings Spaces where highly flammable or explosi...

Страница 23: ...ombustible material e g paper covering 8 The wall behind the stove must consist of or be insulated with fire proof materials The insulation material must resist a temperature of 700 C and have a densi...

Страница 24: ...the top of the furnace 6 Use pliers to remove the recess from the back panel or pry it back and forth a few times to loosen it 7 Put the back panel and top plate back in place Installing the Elm witho...

Страница 25: ...place it entirely 6 Put in the new glass beware of sharp edges on the glass 7 Put the various parts back in place Replacing the combustion chamber Please follow the below steps in their exact order to...

Страница 26: ...imum supply capacity 2 pieces Primary air valve maximum Secundairy air inlet maximum Fuel burning period about 1 hour Flue gas values in accordance with DIN4 705 DIN18895p art 2 With closed door and u...

Страница 27: ...76 99 02 03 04 05 06 07 08 09 10 11 12 13 18 99 20 30 40 50 60 70 80 90 100 110 120 130 180 mineral wool glass wool rock wool waste prod bands loose wool wool granule felt lamella mat stitched mats pl...

Страница 28: ...La fa on optimale de chauffer le po le 32 Chemin e et conduit de chemin e 33 Entretien 33 Petit entretien 33 Mise hors service 34 Entretien annuel 34 S curit 34 Garantie 34 Consignes g n rales 35 Pr p...

Страница 29: ...tallation et les caract ristiques techniques destin es notamment l installateur Nous vous recommandons de lire ce manuel attentivement avant la mise en service de votre po le bois et de bien le conser...

Страница 30: ...rsque les temp ratures ext rieures et int rieures sont rapproch es le tirage dans la chemin e est une affaire tr s d licate Au d but de l automne ou lors des derniers jours de l hiver vous pouvez am l...

Страница 31: ...s plafonds et des grilles Cela est d la combustion de poussi re dans l changeur thermique de la chemin e Ce processus est naturel et n engage pas la responsabilit deWANDERS Pourr duireaumaximumlechang...

Страница 32: ...cle avec des flammes sans fum e ou presque Le cr pitement du feu se fait alors entendre Le bois humide met un sifflement et produit beaucoup de fum es et une vue des flammes insignifiante Cela r duit...

Страница 33: ...e que certains probl mes se produisent tels que la p n tration des fum es dans la pi ce le d p t de suie sur la vitre ou une mauvaise combustion Avant l installation de votre appareil votre installate...

Страница 34: ...ne laissez les pas seuls dans la pi ce Eventuellement vous pouvez mettre en place un pare feu 3 Ne versez ou ne mettez pas des liquides ou des mat riaux combustibles dans le po le Ils risquent d endom...

Страница 35: ...e par l installateur accompagn es d une copie de la facture d achat indiquant la date d achat Les r parations ne donnent pas droit une prorogation de la dur e de garantie Les dommages cons quents sont...

Страница 36: ...tantes au feu 4 Si le tuyau d vacuation des gaz de fum e traverse un plafond et ou un toit faits en mati res combustibles les entourages environ 80 centim tres d un point de passage doivent tre recouv...

Страница 37: ...nt du po le Le Elm est un po le en bois lourd Le Elm p se selon les versions y compris 2 m tres de canaux de combustion au minimum 180 kilos Assurez vous que le mur ou le sol o vous allez effectuer le...

Страница 38: ...mballage 3 Placer le socle l endroit pr vu exactement sous la chemin e 4 Sortir le po le de son emballage puis enlevez la plaque sup rieure les panneaux lat raux et la paroi arri re Attention votre do...

Страница 39: ...nd d flecteur G 5 Retirer le panneau arri re droit E 6 Retirer le panneau arri re 7 Retirer le petit d flecteur H Donn es techniques Elm Verrou de la porte I II Ba Puissance nominale 8 0 kW Diam tre t...

Страница 40: ...s lev e no article no forme no emballage no C no kg m 10 11 12 13 01 02 03 04 05 06 07 08 09 10 99 01 02 10 11 20 21 99 10 12 14 16 72 74 76 99 02 03 04 05 06 07 08 09 10 11 12 13 18 99 20 30 40 50 60...

Страница 41: ...ale Art zu Heizen 45 Schornstein und Rauchkanal 46 Wartung 46 Kleine Wartung 46 Auser Gebrauchnahme 47 J hrliche Wartung 47 Brandschutz 47 Garantie 47 Allgemeine Anweisungen 48 Vorbereitung 48 Der Rau...

Страница 42: ...g Freue machen wird Dank seiner einzigartigen Form ist der Kamin von berall im Zimmer zu sehen Bei der Entwicklung dieses Holzofens haben wir besonders auf Gebrauchsfreundlichkeit Betriebssicherheit u...

Страница 43: ...Herbst oder Ende Winter anmachen Wenn die Au en und Raumtemperatur nicht viel verschieden sind ist ein guter Kaminabzug eine richtige Herausforderung Fr h im Herbst oder Ende des Winters k nnen Sie f...

Страница 44: ...icher Vorgang wof r WANDERS nicht verantwortlich ist Um Verf rbung zu minimalisieren verweisen wir Sie auf den Rat der von der Branche der Kamin fen gegeben wird Ihr Installateur kann Sie dabei berate...

Страница 45: ...Holz prasseln h ren Feuchtes Holz erzeugt ein zischendes Ger usch viel Rauch und eine kleine Flamme Die Freude am Heizen und die Nutzleistung werden stark beeintr chtigt Holzarten und Lagerung Alle Ar...

Страница 46: ...er ein anerkannter Schornsteinfeger den Schornsteinkanal ber die ganze L nge kontrollieren ob er mindestens einen Durchmesser von 150 Millimeter hat und ob der Kanal sauber glatt und dicht ist Schorns...

Страница 47: ...brennbarem Material ist benutzen Sie dann eine feuerfeste Bodenplatte Die Bodenplatte muss mindestens eine Gr e von an der Vorderseite der T r 50 cm ab Au enseite des Ofens an den Seiten der T r 30 c...

Страница 48: ...nen Rauchkanal mit mehreren fen angeschlossen werden Das Rohr des Rauchgasabzugs hat einen Durchmesser von 150 Millimeter DerOfendarfnurdurcheinenanerkanntenInstallateurundgem denuntenbeschriebenenIns...

Страница 49: ...riale die sich in einem Strahl von 100 Zentimeter der Ofent r befinden Nehmen Sie dazu feuerfeste Materiale 7 Bekleiden sie den Kamin nie mit brennbarem Material wie z B Tapete 8 Die Wand hinter dem K...

Страница 50: ...Platte sowie die R ckwand 2 L sen Sie den Rauchrohranschluss 3 Entfernen Sie die Abdeckplatte vom hinteren Anschluss 4 Befestigen Sie den Rauchrohranschluss an der R ckseite 5 Montieren Sie die Abdeck...

Страница 51: ...M6x20 Bolzen dienen 7 Befestigen Sie jetzt wieder die Seitenw nde die R ckwand und die Abdeckplatte am Ofen 8 Nun k nnen Sie Ihren Rauchgasabzug montieren Reparaturen Glas ersetzen 1 Die T r ffnen 2 d...

Страница 52: ...denplatte A 2 Entnehmen Sie die vorderen Platten links B und rechts C 3 Heben Sie die gro e Umlenkplatte G ein wenig an und entfernen Sie die Platte hinten rechts D 4 Entfernen Sie die gro e Umlenkpla...

Страница 53: ...al Holzscheite 30 x 10 cm Maximal einlegen 2 St ck Prim re Luftklappe Maximal Sekund re L ftungs nung Maximal Brennzeit Heizmaterial ungef hr 1 Stunde Rauchgaswerte gem DIN4705 DI N18895 Teil 2 Mit ge...

Страница 54: ...06 07 08 09 10 11 12 13 18 99 20 30 40 50 60 70 80 90 100 110 120 130 180 Mineralwolle Glaswolle Steinwolle Schlakke Bahnen Lose Wolle Wolle Granulat Filz Vern hte Lamellenmatte Matten Platten Schale...

Страница 55: ...0 451 00 618 00 175 50 81 50 162 50 81 00 1 2 1076 00 464 00 464 00 165 50 460 50 305 00 85 00 81 00 308 00 460 50 903 00 Maattekeningen Technical drawings Dessins techniques Technische Zeichnungen El...

Страница 56: ...56 162 50 464 00 464 00 305 00 460 50 81 00 81 43 1 1216 00 1042 70 448 00 464 00 162 22 996 20 464 00 380 50 822 70 451 00 220 00 Base L OND EL 0071 Base M OND EL 0072...

Страница 57: ...57 Onderdelen Parts Pi ces d tach e Ersatzteile...

Страница 58: ......

Страница 59: ...cover To minimize the chance of cracks in stucco and discolouration we refer to the advice given for decorative hearths Your installer can give you more information Any complaints will be dealt with a...

Страница 60: ...4 Fax 31 0 315 386 201 info wanders nl www wanders nl Wanders_fires www facebook com Wandersfiresstoves Type en zetfouten voorbehouden Wanders fires stoves is een onderdeel van de Wanders Groep 2015 W...

Отзывы: