background image

STEP 2

INSTALL

ENGLISH

07

INSTALL

ENGLISH

06

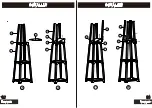
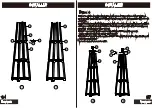
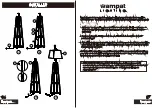
Assemble lampshade  :
Gently take out the shade metal frames (O) ,(P ) and fabric piece(Q) , fit the 
fabric piece (Q) on the metal frames(O) ,(P) with their own hook and loop 
fasteners as diagram to get a completed lampshade.

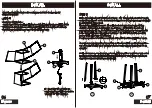
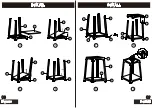
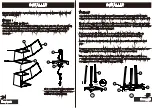
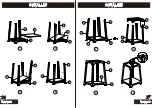
1.First of all, respectively install 3 pcs of pole 1 (G) (please pay attention the flat 
end is facing down)on the bottom supporting frame (E) with hexagon screws (D) 

by Allen key (C )  provided. 
Then put the MDF shelf board 1 (F) on the bottom supporting frame 1 (E) as 
diagram and holding a corner until the 4th pole 1 (G) inserts to the bottom 
supporting frame (E), lay the MDF shelf board 1 (F) flat, align the holes in the 4th 
pole 1 (G) and the bottom supporting frame 1 (E) and fix them with hexagon 
screws (D) by Allen key (C) provided.

Please make sure to follow above steps, or the MDF shelf board (F) won't go in.

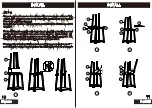
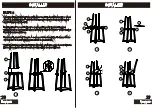
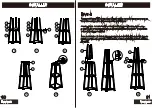
Gently place the supporting frame 2 (H) on the 4 pole 1(G) and make sure the 
top of pole 1 (G) is just hold the inside bracket of the supporting frame 2 (H) as 
diagram.  

Kindly reminder: during assembly, all screws (D) should not be set too tight at the 
beginning for facilitating subsequent overall assembly, after all the assembly is 
done, then tighten all hexagon screws (D).

STEP 1

G

E

Q

O

P

B

M

S

Fix the socket (B) with the top 
supporting frame (M) together by 
wing nut (S), then tighten it.

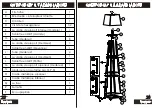
Carefully unpack all parts from the packaging and place them on a soft / 

flat/smooth surface.

1

2

G

E

C

D

Содержание PHANES W62P1302A

Страница 1: ...1b model 1 PC L I G H T I N G L I G H T I N G WAMPAT LIGHTING pursue the essence of life from the light source to the product and to the environment where the product is located We express the essence...

Страница 2: ...PAGE 01 19 L I G H T I N G ENGLISH PAGE 20 37 W62P1302A W62P1301B PHANES SERIES Fran ais DIRECTORY 01...

Страница 3: ...mouth Wash your hands after handling this product Warning Before you start Never attempt any work without shutting off the electricity until the work is done Go to the main fuse or circuit breaker box...

Страница 4: ...chain switch Allen key Hexagon screw The bottom supporting frame 1 MDF shelf board 1 Pole 1 The supporting frame 2 MDF shelf board 2 Pole 2 The supporting frame 3 MDF shelf board 3 The top supporting...

Страница 5: ...MDF shelf board 1 F flat align the holes in the 4th pole 1 G and the bottom supporting frame 1 E and fix them with hexagon screws D by Allen key C provided Please make sure to follow above steps or th...

Страница 6: ...INSTALL ENGLISH 08 G E F G E F G E F INSTALL ENGLISH 09 3 4 5 6 7 8 9 10 G F F E E D D G G G H H F E 85 110mm G E F...

Страница 7: ...f board 2 I on the supporting frame 2 H and holding a corner until the 4th pole 2 J inserts tothe top slot of the 4th pole 1 G as diagram lay the MDF shelf board 2 I flat align the holes in the 4th po...

Страница 8: ...e MDF shelf board 3 L on the supporting frame 3 K and holding a corner until the 4th pole 1 G inserts to the top slot of the 4th pole 2 J as diagram lay the MDF shelf board 3 L flat align the holes in...

Страница 9: ...INSTALL ENGLISH 14 INSTALL ENGLISH 15 G K J L G K J L 23 24 25 26 G K J L 85 110mm L G K J...

Страница 10: ...clamps R and clip it to the pole 1 G pole 2 J as diagram to secure the wire in place pull the remaining the cable out Put the fabric shade N on the socket B and lock it by ring Screw the bulb E26 Max...

Страница 11: ...the furnishing and as a result the furnishing may tip over onto thechild 3 Please contact us using the details shown for further advice AWARNING If any parts are missing or damaged do not return the d...

Страница 12: ...les mains soigneusement apr s avoir install manipul nettoy ou autrement touch ce produit AVERTISSEMENT Avant de commencer N essayez jamais d installer le produit sans couper le courant Veuillez vous...

Страница 13: ...Vis t te hexagonale Le cadre de support inf rieur Mod le 1 Tablette en MDF Grande Tube Mod le 1 Le cadre de support Mod le 2 Tablette en MDF Moyenne Tube Mod le 2 Le cadre de support Mod le 3 Tablette...

Страница 14: ...port inf rieur E comme sch ma Puis posez la tablette F plat fixez le quatri me tube G sur le cadre de support inf rieur E par des vis t te hexagonales D et la cl Allen C Veuillez suivre strictement le...

Страница 15: ...INSTALLER Fran ais 26 INSTALLER Fran ais 27 7 8 9 10 G F F E E D D G G G H H F E G E F G E F G E F 3 4 5 6 85 110mm G E F...

Страница 16: ...et soulevez une extr mit de la tablette afin que le quatri me tube J puisse s ins re dans le tube G comme sch ma Puis posez la tablette I plat fixez le quatri me tube J sur le tube inf rieur G par de...

Страница 17: ...port K et soulevez une extr mit de la tablette afin que le quatri me tube G puisse s ins re dans le tube J comme sch ma Posez la tablette L plat alignez les trous du tube G et du tube J fixez le quatr...

Страница 18: ...INSTALLER Fran ais 32 INSTALLER Fran ais 33 G K J L 23 24 85 110mm L G K J G K J L 25 26 G K J L...


Страница 19: ...ce qu il soit fix Attachez le fil A aux serre fils R et fixez le serre fils au tube G et tube J pour fixer le fil puis retirez le c ble restant Placez l abat jour N sur la douille B et verrouillez le...

Страница 20: ...ans du produit partir du jour de l achat 4 Cependant nous ne pouvons tre tenus responsables des dommages r sultant d un mauvaise manipulation d une utilisation incorrecte ou de l usure normale du pro...

Отзывы: