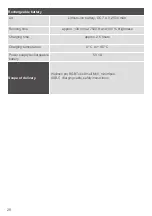
walser Walimex Pro RGB TUBE SMALL M10 Скачать руководство пользователя страница 27

26

3. 

Pull the USB-C plug of the charging cable (20) out of the connection socket (21) on the 

underside of the glowstick.

4.  Let the glowstick cool down completely.

5. 

If necessary, remove the glowstick from the tripod.

6.  Clean the glowstick and the mini tripod if necessary (see chapter 9).

7.  Stow the glowstick and accessories in the article packaging. 


NOTICE

NOTE - Always store the glowstick in a dry and dust-free place.
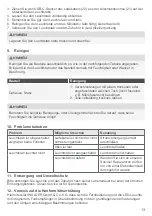
9. Cleaning


NOTICE

Only clean the components as indicated in the table below. Never allow the glowstick or the 

power supply unit to come into contact with moisture or water.

Component

Cleaning

Housing, tripod

1.  Remove dirt with a dry or damp soft cloth 

(non-fluffy, e.g. microfibre cloth). 

2.  Allow parts to dry completely.


NOTICE

Do not use any cleaning agents or solvents! Make sure that no moisture gets into the housing!

10. Troubleshooting

Problem

Possible causes

Remedy

Glowstick is switched on but 

shows no function

Charging cable is not 

plugged in or not plugged in 

correctly

Connect power supply 

correctly

Battery is empty

Charge glowstick

Glowstick is not lit

Glowstick is switched off

Switch on glowstick

Glowstick is defective

Please contact our service! 

Repairs may only be carried 

out by a qualified electrician

11.  Disposal and environmental protection

Please dispose of the luminaire and accessories at the end of their service life at one of the 

local disposal centres. This service is free of charge for you.

12.  Reference to the declaration of conformity

WALSER GmbH & Co. KG hereby declares that the remote control and the LED luminaire with 

integrated radio receiver are conform with the essential requirements and the other relevant 

provisions.

Содержание Walimex Pro RGB TUBE SMALL M10

Страница 1: ...Made in China WALSER GmbH Co KG Senefelderstrasse 23 86368 Gersthofen Germany info walser de www walser de...

Страница 2: ...Gebrauchsanleitung Instruction Manual RGB TUBE SMALL M10...

Страница 3: ...dem Ministativ montieren 10 6 2 Leuchtstab mit den Magneten befestigen 10 6 3 Leuchtstab aufladen 10 6 4 Leuchtstab ein bzw ausschalten 11 7 Leuchtstab betreiben und bedienen 11 7 1 Farbmodus H 0 360...

Страница 4: ...Attach the glowstick with the magnets 23 6 3 Charging the glowstick 23 6 4 Switching the glowstick on and off 24 7 Operating and operating the glowstick 24 7 1 Set colour mode H 0 360 on the glowstic...

Страница 5: ...igt und mit dem Ministativ auf jedem Tisch platziert werden Wir w nschen Ihnen viel Freude mit unserem Produkt Ihr Team von WALSER 1 Hinweise zum Verst ndnis dieser Gebrauchsanleitung 1 1 Kennzeichen...

Страница 6: ...en PC o geladen werden HINWEIS Der Leuchtstab eignet sich nicht als regul re Lichtquelle f r Wohnr ume B ros und ver gleichbare Anwendungen 3 Wichtige Sicherheitshinweise Lesen Sie diese Gebrauchsanle...

Страница 7: ...ung indem Sie das Ladekabel herauszie hen und nehmen Sie den Leuchtstab nicht wieder in Betrieb ffnen Sie den Leuchtstab nicht Reparieren Sie den Leuchtstab niemals selbst Lassen Sie den Leuchtstab au...

Страница 8: ...en geschlossenen R umen mit direkter Sonneneinstrahlung oder hohen Temperaturen Laden Sie die Leuchte nicht unbeaufsichtigt Verwenden Sie kein besch digtes Ladeger t oder Kabel zum Aufladen Entfernen...

Страница 9: ...5 7 6 8 4 bersicht ber Bestandteile und Bedienelemente 1 2 3 4 5 6 8 7 9 10 11 12 13 15 16 18 14 17 19 20 22 23 21 23...

Страница 10: ...9 Farb Modus HSI 10 Ladestand des Akkus 11 Farbe H in 12 Helligkeit in 13 Farbs ttigung S 14 Farbtemperatur Modus CCT 15 Akkuladesymbol 16 Farbtemperatur in K 17 Lichteffekt Modus MLM 18 Lichteffekta...

Страница 11: ...ehr wackelt 4 Pr fen Sie dass das Stativ sicher steht und nicht umfallen kann 6 2 Leuchtstab mit den Magneten befestigen Die starken Magneten in den beiden Enden des Leuchtstabs halten auf allen magne...

Страница 12: ...r eine bestimmte Lebensdauer hat Nach einer gewissen Zeit der Nutzung l sst die Leistung nach Dies ist jedoch ein normales Ph nomen 7 Leuchtstab betreiben und bedienen Sie bedienen den Leuchtstab manu...

Страница 13: ...lte Farbtemperatur wird in der mittleren Zeile des Displays 4 angezeigt 7 5 Lichteffekt 1 9 am Leuchtstab einstellen 1 Schalten Sie den Leuchtstab gem Kapitel 6 ein 2 Dr cken Sie die Taste M 5 so lang...

Страница 14: ...n lassen HINWEIS Benutzen Sie keinerlei Reinigungs oder L sungsmittel Achten Sie darauf dass keine Feuchtigkeit ins Geh use dringt 10 Probleme beheben Problem M gliche Ursachen Behebung Leuchtstab ist...

Страница 15: ...rbtemperatur 3 200 7 500 K bei Wei licht Farbwiedergabeindex CRI TLCI Ra 96 Magnetdesign Ja an beiden Enden Effekte Intervall Blitzlicht Dauerblitzlicht Monitorsimulation niedrige und hohe RGB Lichtst...

Страница 16: ...7 4 V 2500 mAh Laufzeit ca 130 min bei 7500 K und 100 Helligkeit Ladezeit ca 2 5 Std Ladetemperatur 0 C bis 45 C Stromversorgung Akku 5V 1A Lieferumfang Walimex pro RGB Tube Small M10 Ministativ USB...

Страница 17: ...ser Garantieversprechen WALSER ist bekannt f r seine hochwertige Verarbeitung beste Funktionalit t und einen kun dennahen Service Um unserem au ergew hnlichen Serviceniveau zus tzlichen Ausdruck zu ve...

Страница 18: ...d placed on any table with the mini tripod We wish you lots of fun with our product Your WALSER team 1 Notes on understanding these operating instructions 1 1 Markings and symbols on the unit This sym...

Страница 19: ...r similar NOTICE The glowstick is not suitable for use as a regular light source for living rooms offices and similar applications 3 Important safety instructions Read these instructions carefully bef...

Страница 20: ...isconnect the power supply by pulling out the charging cable and do not operate the glowstick again Do not open the glowstick Never repair the glowstick yourself Only have the glowstick repaired by a...

Страница 21: ...in small closed rooms with direct sunlight or high temperatures Do not leave the luminaire unattended when charging them Do not charge with a damaged charger or cable After charging has been completed...

Страница 22: ...5 7 6 21 4 Overview of components and controls 1 2 3 4 5 6 8 7 9 10 11 12 13 15 16 18 14 17 19 20 22 23 21 23...

Страница 23: ...lour mode HSI 10 Battery charge level 11 Colour H in 12 Brightness in 13 Colour saturation S 14 Colour temperature mode CCT 15 Battery charging symbol 16 Colour in K 17 Light effect mode MLM 18 Light...

Страница 24: ...onger wobble 4 Check that the tripod is secure and cannot fall over 6 2 Attach the glowstick with the magnets The strong magnets in both ends of the glowstick will stick to any magnetic metal surface...

Страница 25: ...life span After a certain period of use the performance decreases However this is a normal phenomenon 7 Operating and operating the glowstick You operate the glowstick manually using the elements in t...

Страница 26: ...ed The selected colour temperature is shown in the middle line of the display 4 7 5 Setting the lighting effect 1 9 on the glowstick 1 Switch on the glowstick as described in the chapter 6 2 Press the...

Страница 27: ...E Do not use any cleaning agents or solvents Make sure that no moisture gets into the housing 10 Troubleshooting Problem Possible causes Remedy Glowstick is switched on but shows no function Charging...

Страница 28: ...100 Colour temperature 3 200 7 500 K by white light Colour rendering index CRI TLCI Ra 96 Magnet design Yes at both ends Effects Interval flash continuous flash monitor simulation low and high RGB li...

Страница 29: ...h Running time approx 130 min at 7500 K and 100 brightness Charging time approx 2 5 hours Charging temperature 0 C to 45 C Power supply rechargeable battery 5V 1A Scope of delivery Walimex pro RGB Tub...

Страница 30: ...e WALSER is known for its high quality workmanship best functionality and customer oriented service To give additional expression to our exceptional level of service we provide a 2 year warranty for t...

Отзывы: