


36
37
• If the channel selection mode is not set, press the <Menu> button of the remo-
te control. Each time you press the <Menu> button on the remote control, you
switch between setting the brightness and the channel selection.
• The currently set channel is displayed and the channel selection is activated if
NO status LED on the remote-control display is displayed.
• Set the desired channel by pressing the plus <+> or minus < > buttons on the
remote control.
• Select channels from 1 to 4 and set the same channel as on the light stick.
•
Press the <Menu> key of the remote control again to confirm the channel selec
-
tion and return to the brightness adjustment settings menu (default setting).
• The lamp is now ready for remote control.
• The display of the remote control has an automatic switch off function. To
reactivate the display, please press the <ON/OFF> button briefly.
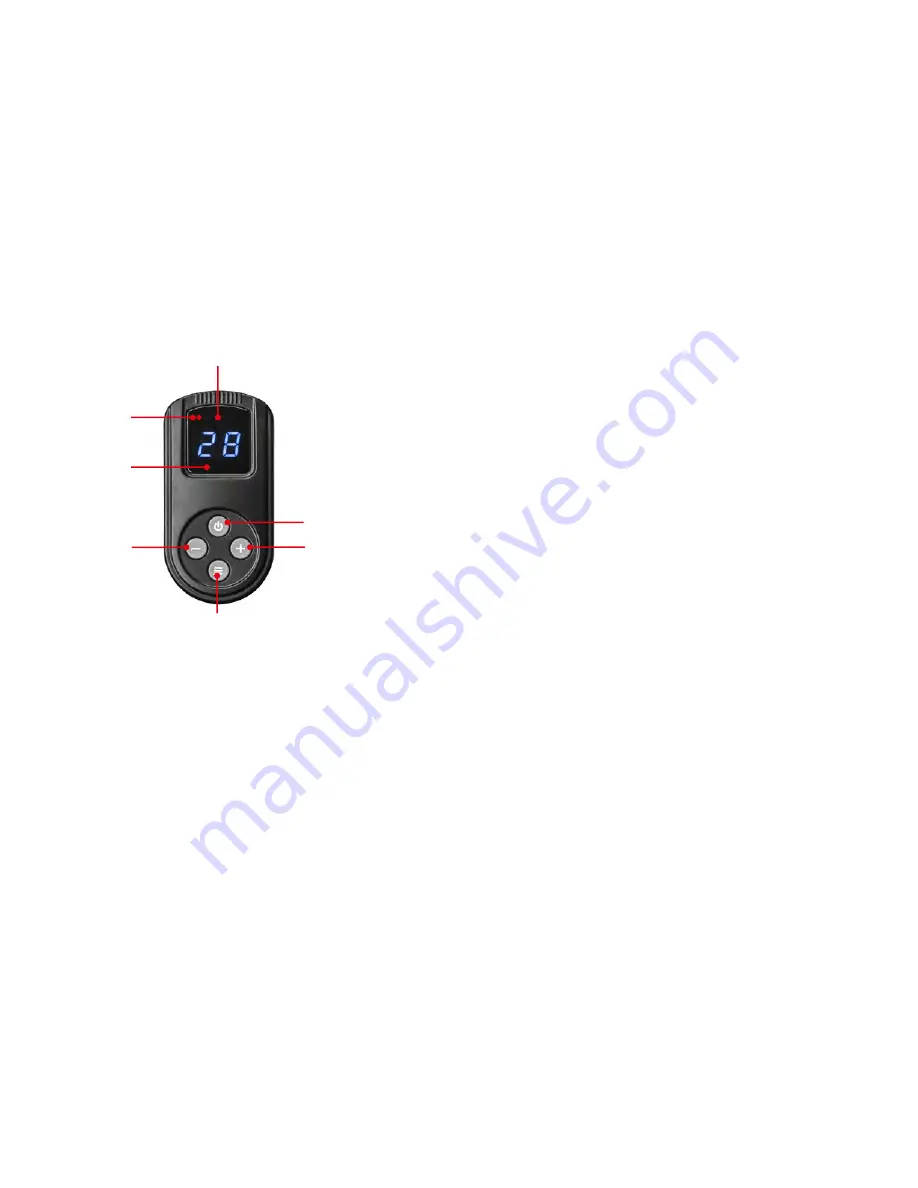
Overview functions remote control display:
•
Red status LED
– Setting brightness by remote control
•
No status LED
– Setting channel by remote control
•
Green status LED
– Illuminates when the minus < > and plus <+> buttons
pushed
Minus
<
>
button
<Menu function selection> button
Display
Plus <+> button
Status LED red
= dimming function
ON/OFF> button
8.5 Function buttons / display data / menu description of the remote control
Display (2-digits), shows the values
for brightness and channel
8.7 Switch ON / OFF, Standby mode via remote control
• Turn on the light by pressing the ON / OFF button (8) on the light stick for 1-2
seconds as described in section 8.1.
• Briefly press the ON / OFF button on the remote control once to activate the
remote control.
• Make sure that the device and the remote control are correctly connected and
set to the same channels. (see previous sections 8.4 and 8.6).
• Make sure the remote control is set to dimming mode and the RED status LED
on the remote control‘s display is lit.
• To turn off the light, press and hold the ON / OFF button on the remote control
for about 2 seconds.
• The light wand goes out and has been set into standby mode.
• To turn the light on again, press the ON/OFF button on the remote control
BRIEFLY.
• The tube light starts to light up.
8.8 Setting brightness (dimmer function) via the remote control
• Press the ON/OFF button on the remote control once briefly to activate the
remote control.
• Ensure that the device and the remote control have been correctly paired up
and the same channels set. (See previous section 8.4 and 8.6).
• Check that the red status LED on the remote control‘s display is on and that
the dimming function is activated.
• If the dimming function is not set, press the <Menu> key on the remote control
until the red status LED on the remote control‘s display lights up. Each time
you press the <Menu Select> button on the remote control, you can switch
between the brightness and the channel settings menu.
8.6
Selecting the channel on the remote control / synchronizing the lamp and
remote control
• Before first using the device, insert sufficiently charged compatible batteries
(2 x AAA 1.5 V) into the remote control.
• Switch the device on with the ON/OFF switch (8) (if not already done). The
remote control will not work if the the lamp is switched off.
• Press the ON/OFF switch on the remote control once briefly to activate the
remote control display
• Select the channel selection setting menu, NO status LED will light on the
remote control display.
-
-
-


