


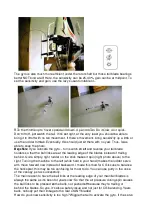


And anchor them to the opposite side screws of the gyro platform. Flown it this way, it
works fine. Note the cleaner wiring this side also. All I did was reroute everything.
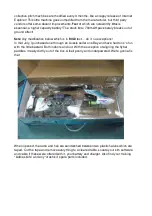
Which brings me to the SOLUTION for tail strikes and ALL this gear/parts BS:
Stepbystep to end of the chapter:
1) The tailrotor box is held in place with 2 weeny screws no bigger than a piece of a
toothpick! Vibration and floor smacks knock the whole rear rotor out of 90° alignment.
Lose those 2 little weeny screws that stick out the side of the tailrotor gearbox like cat
whiskers. Next, locate the 4 tiny (!!!) black screws that clamp the front tube of the box
onto the tailboom blue tube. Back them out enough for the 2 halves to seperate and
pull the whole thing away from the tail tube. Using very THIN masking tape (white
McKesson, which is used in hospitals) wrap the rear of the tube ONCE around... NO
overlap. Now position the tailrotor gearbox back onto the rear of tailboom tube and
reassemble/tighten the whole business back together... checking the 90 degree
alignment and gear mesh as you proceed.
Содержание Dragonfly 4
Страница 4: ...3 RTV silicone sealant VERY important 3...
Страница 72: ...The flybar stabilizer yoke must not bind like this...
Страница 73: ...Take it apart and file sand all the high spots that bind Free up all movement on the 2 bearings...
Страница 75: ...Lock it s position with Loctite Sight them at 0 to each other and center seesaw add some...
Страница 86: ...Pull the Jesus Pin 035 If you ever lose it a paper clip works fine...
Страница 87: ...Unclip the lower ball links of your onion rings Pull the entire head straight up...


