background image

English

   - 23 -

Internet Portal

You  can  access  PORTAL  mode  using  your TV. To 

do  this,  an  active  internet  connection  is  required. 

Follow the steps on Connecting to a Wired (optional) 

Network section to connect your TV to internet.  After 

the connection is established, you can select or view 

portal options.
Note:  Broadband  internet  connection  is  required 

for  high  quality  viewing.  Ensure  that  the  internet 

connection  is  made  properly.  You  must  set  the 

Country and Language data correctly in the First Time 

Installation for the proper operation of internet portal.
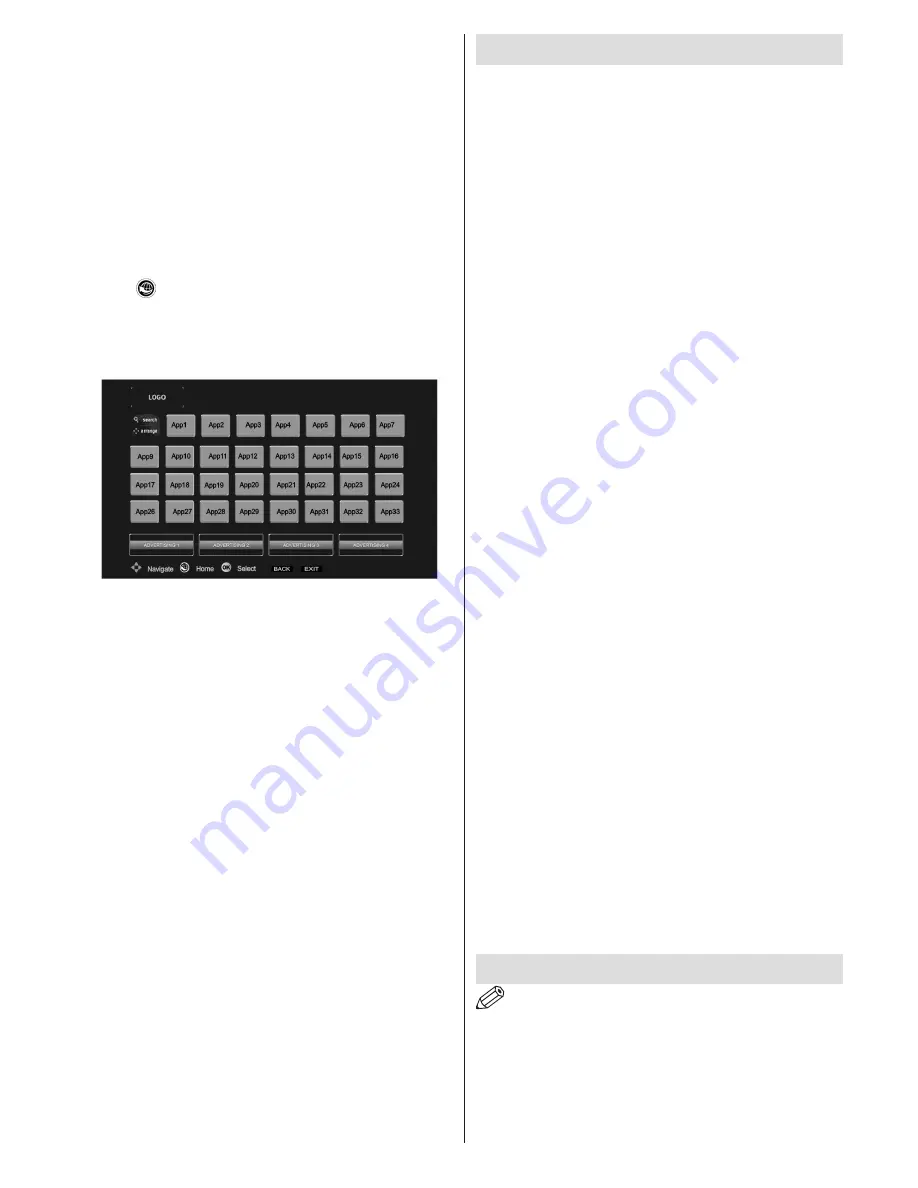
Press “ ” button on your remote control and portal 

application  options  will  be  displayed. Application 

options  will  be  displayed  as  the  template  below. 

Available  applications’  contents  may  change 

depending on the application content provider. 

Select a  link or application using the Left and Right or 

Up or Down buttons and press OK to activate. 
• Use  Up/Down  and  Left/Right  buttons  to  navigate 

between the items on Portal screen. 

• Press 

OK

 button to confirm your selection.

• Press 

BACK

 to go to the previous screen.

• Press 

EXIT

 to quit internet portal mode.

Note: Possible application dependent problems may 

be caused by the content service provider.

Not:

 Virtual remote controller application could be 

available to be downloaded from your smartphone 

application provider. 
Not all smartphones are supported by this application

DVD MODE

Handling Discs

• To keep the disc clean, only handle the disc by its 

edge.   

Do not

 touch the surface.

• 

Do not

 stick paper or tape on the disc.

• If the disc is contaminated with any substance like 

glue, remove before using it.

• 

Do not

 expose the disc to direct sunlight or heat 

sources such as hot air ducts, or leave it in a car 

parked in direct sunlight as the temperature can rise 

quickly and damage the disc.

• After playing, store the disc in its case.

Cleaning Discs

• Before playing, clean the disc with a cleaning cloth. 

Wipe the disc from the centre out.

• 

Do not

  use  solvents  such  as  benzine,  thinner, 

commercially available cleaners or anti-static spray 

intended for vinyl LPs.

DVD  - Features

• DVD / CD / CD-R / CD-RW / MP3 / JPEG / MPEG 

playback.

• NTSC / PAL playback (according to disc content).
• LPCM  audio  via  coaxial  and  optical  digital  audio 

outputs (optional).

• Multi-Audio  (up  to  8)  support  (according  to  disc 

content).

• Multi-Subtitle (up to 32) support (according to disc 

content).

• Multi-Angle  (up  to  9)  support  (according  to  disc 

content).

• 8 level parental control.
• Fast  forward  and  rewind  -  5  different  speeds: 


2x, 4x, 8x, 16x, 32x.

• Slow  motion  playback  -  4  different  speeds: 


1/2x, 1/4x, 1/8x, 1/16x forward.

•  Frame by frame forward playback.
• Search Mode.
• Repeat.
• Coaxial audio output (optional).
• Copied disks may be incompatible.

How to watch a DVD

NOTE

:

 DVD mode cannot be accessed unless a DVD 

is inserted or a DVD control button is pressed.

If you switch to another source by pressing 

SOURCE, SWAP or P+/P- buttons on the remote 

control,  DVD playback will be paused automatically. 

You should press PLAY and resume the playback 

manually when you switch to DVD mode.

Содержание WPS32DVD

Страница 1: ...COLOUR TELEVISION WITH REMOTE CONTROL OPERATING INSTRUCTIONS WPS32DVD BE WALKER WISE logon to www walker ie APPROVED...

Страница 2: ...intended solely for private domestic use and may not be used for industrial and commercial purposes We exclude liability in principle if the device is not used as intended or unauthorized modificatio...

Страница 3: ...ged power cord plug can cause fire or give you an electric shock When damaged it must be replaced this should only be done by qualified personnel Moisture and Water Do not use this TV in a humid or da...

Страница 4: ...efficiency feauture of this TV To reduce energy consumption you should take the following steps You can use Power Save Mode setting located in the Picture Settings menu If you set Power Save Mode as E...

Страница 5: ...turn into standby mode NOTE You can move the switch upward or downward to change the volume If you want to change the channel press the middle of the switch once Position 3 and then move upward or dow...

Страница 6: ...ewind in Media Browser mode 17 Programme recording 18 Play in Media Browser mode Switch to DVD mode 19 Stop in Media Browser mode 20 Pause in Media Browser mode Timeshift recording 21 Fast Forward in...

Страница 7: ...Display 7 Repeat 8 Zoom 9 Lang 10 Rapid reverse 11 Pause 12 Play 13 Stop 14 Fast forward 15 Subtitle 16 Root 17 Title 18 Search Mode 19 Navigation buttons 20 Info 21 Numeric buttons 22 Source selectio...

Страница 8: ...to the back of the TV before mounting on the wall Insert or remove the CI module only when the TV is SWITCHED OFF You should refer to the module instruction manual for details of the settings Insert t...

Страница 9: ...efully inserted 4 Connect the TV to the mains supply switch on and then wait for few moments until the card is activated 5 When no module is inserted No Common Interface module detected message appear...

Страница 10: ...When the TV is switched to standby mode standby LED can blink to indicate that features such as Standby Search Over Air Download or Timer is active The LED can also blink when you switch on the TV fro...

Страница 11: ...es available broadcasts in accordance with a recognizable channel sequence Cable Installation If you select CABLE option and press OK button on the remote control to continue the following message wil...

Страница 12: ...n experience problems with the formatting process Quickly plugging and unplugging USB devices is a very hazardous operation Do not repeatedly quickly plug and unplug the drive This may cause physical...

Страница 13: ...t a function on Channel List menu Use P P buttons to move page up or down Press MENU button to exit Sorting Channel List You can select broadcasts to be listed in the channel list To display specific...

Страница 14: ...9 Zoom 4 3 or Cinema Auto Only available in Scart mode with SCART PIN8 high voltage low voltage switching HDMI True Black optional While watching from HDMI source this feature will be visible in the P...

Страница 15: ...und mode can be changed as On or Off Digital Out Sets digital out audio type Install and Retune Menu Contents Automatic Channel Scan Retune Displays automatic tuning options Digital Aerial Searches an...

Страница 16: ...for menu screens Scan Encrypted When this setting is on search process will locate the encrypted channels as well If it is set as Off encrypted channels will not be located in automatic search or manu...

Страница 17: ...sharing software for more information DLNA renderer mode will not be available with internet portal feature Power Up Mode Thissettingconfiguresthepowerupmodepreference AlwaysOn TheTValwaysswitches on...

Страница 18: ...lled Note It is not possible to record or set timer for two or more individual events at the same time interval Recording a Programme IMPORTANT When using a new USB hard disk drive it is recommended t...

Страница 19: ...me Recommences the recordings Play from offset Specifies a playing point Note Viewing main menu and menu items will not be available during the playback Press STOP button to stop a playback and return...

Страница 20: ...NPUT of your modem 2 Ensure that Nero Media Home software is installed to your PC for DLNA function 3 Afterwards you should connect wireless adaptor to one of the USB inputs of the TV 4 To configure w...

Страница 21: ...ction Select Connected if you want to activate connection Select as Not Connected to end an active connection IP Address If an active connection is available the IP address will be displayed on this s...

Страница 22: ...ished correctly you should now access the shared files of your cell phone via the Media Browser of your TV Enter Media Browser menu and playback device selection OSD will be displayed Select your cell...

Страница 23: ...t OK to display the selected network or USB memory content If you want to refresh the device list press GREEN button You can press MENU to exit If available networks are found they will be listed on t...

Страница 24: ...scs To keep the disc clean only handle the disc by its edge Do not touch the surface Do not stick paper or tape on the disc If the disc is contaminated with any substance like glue remove before using...

Страница 25: ...the initial settings g If a language is selected that is not supported by the disc the subtitle language will automatically be set to the disc s priority default language h Usually a circulation will...

Страница 26: ...evel You can watch the DVD discs which has the same or lower parental level than the player s level only Menu contents are detailed below PASSWORD Using this item you can change the current password T...

Страница 27: ...cture up or down if available Rapid advance Rapid reverse Views the scene from different angles if available Changes slide effect depends on the content X Displays time Views main setup menu Time coun...

Страница 28: ...ou select one of these satcodx files all services and related satellites and transponders in the selected file will be stored in TV If there are any installed terrestrial cable and or analog services...

Страница 29: ...frequency 5 Please retune the channels 6 The picture quality may degrade when two devices are connected to the TV at the same time In such a case disconnect one of the devices No picture 1 No Picture...

Страница 30: ...the loader with the label facing to the front Wrong type of disc The machine cannot play CD ROMS with PC Data Wrong OSD language 1 Select the language in the setup menu 2 The language for the sound or...

Страница 31: ...R On Screen Display RF AERIAL INPUT 75 Ohm unbalanced OPERATING VOLTAGE 220 240V AC 50 Hz AUDIO German Nicam Stereo AUDIO OUTPUT POWER WRMS 10 THD 2x6 POWER CONSUMPTION W 65 W max PANEL 16 9 display 3...

Страница 32: ...p4 mov MPEG1 2 Layer 3 AAC HEAAC AC3 EAC3 LPCM ADPCM H 264 1080Px2 25fps 1080P 50fps Other 1080P 30fps 50Mbit sec avi MPEG1 2 4 Xvid H 264 VC1 WMV3 Sorenson H 263 Motion JPEG MPEG1 2 Layer 1 2 3 AAC H...

Страница 33: ...s by using DVI converter cables not supplied you can refer to the following resolution information 56Hz 60Hz 66Hz 70Hz 72Hz 75Hz 640x400 640x480 800x600 832x624 1024x768 1152x864 1152x870 1280x768 136...

Страница 34: ...tible disc types Disc Types Logos Recording Types Disc Size Max Playing Time Characteristics Audio Video 12cm Single sided 240 min Double sided 480 min DVD contains excellent sound and video due to Do...

Страница 35: ...the installation process The Nero MediaHome installation wizard is displayed If necessary change installation language from the language selection menu before continuing 3 Click the Next button The i...

Страница 36: ...the Next button The Ready to Start Installation Process screen is displayed installation begins and finishes automatically A progress bar informs you of the progress of the installation process 10 In...

Страница 37: ...me 4 on your PC 14 Run Nero MediaHome by pressing shortcut icon Click ADD icon from LOCAL FOLDERS to add the folder you want to share with the network Select the folder that you want to share and clic...

Страница 38: ...green or green and yellow The wire which is coloured blue or black must be connected to the terminal which is marked with the letter N or coloured Black The wire which is coloured brown or red must b...

Страница 39: ...50239336 Executive House Red Cow Naas Road Dublin 22 Rebuplic of Ireland WALKER...

Отзывы: