background image

English   

- 14 -

Press 

“OK’

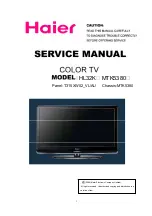
 button to delete the highlighted channel 

in the channel list. Then the message below appears 

on the screen.

Renaming channels

To rename a specific channel, the channel must be 

highlighted via pressing “ ” or “ ” buttons and then 

highlight the 

“Edit Name”

 item by pressing “ ” or “

”  buttons.  Press 

“OK”

  button  to  activate  rename 

feature.

Now pressing “ ” or “ ” buttons moves to the previous/

next character. Pressing “ ” or “ ” buttons toggles the 

current character, i.e., 

‘b’

 character becomes 

‘a’

 on  and 

‘c’

 on . Pressing the numeric buttons 

‘0...9’

 replaces the 

highlighted character with the characters printed above 

the key one by one as the button is pressed. 
Press the 

M

 button to cancel the editing or 

OK

 button 

to save the new name.

Adding Locks to Channels

Channel  Locking  provides  a  password-protected 

access to channels selected by parents. 
In  order  to  lock  a  channel  you  should  know  the 

Parental  Lock

  password  (default  value  is  set  to 

0000 in the factory and can only be changed from the 

Configuration menu

). 

By pressing “ ” or “ ” buttons, highlight the channel 

to be locked and select the 

“Lock” 

option by pressing 

“ ” or “ ” buttons. Then press the 

OK

 button and a 

password box is displayed:
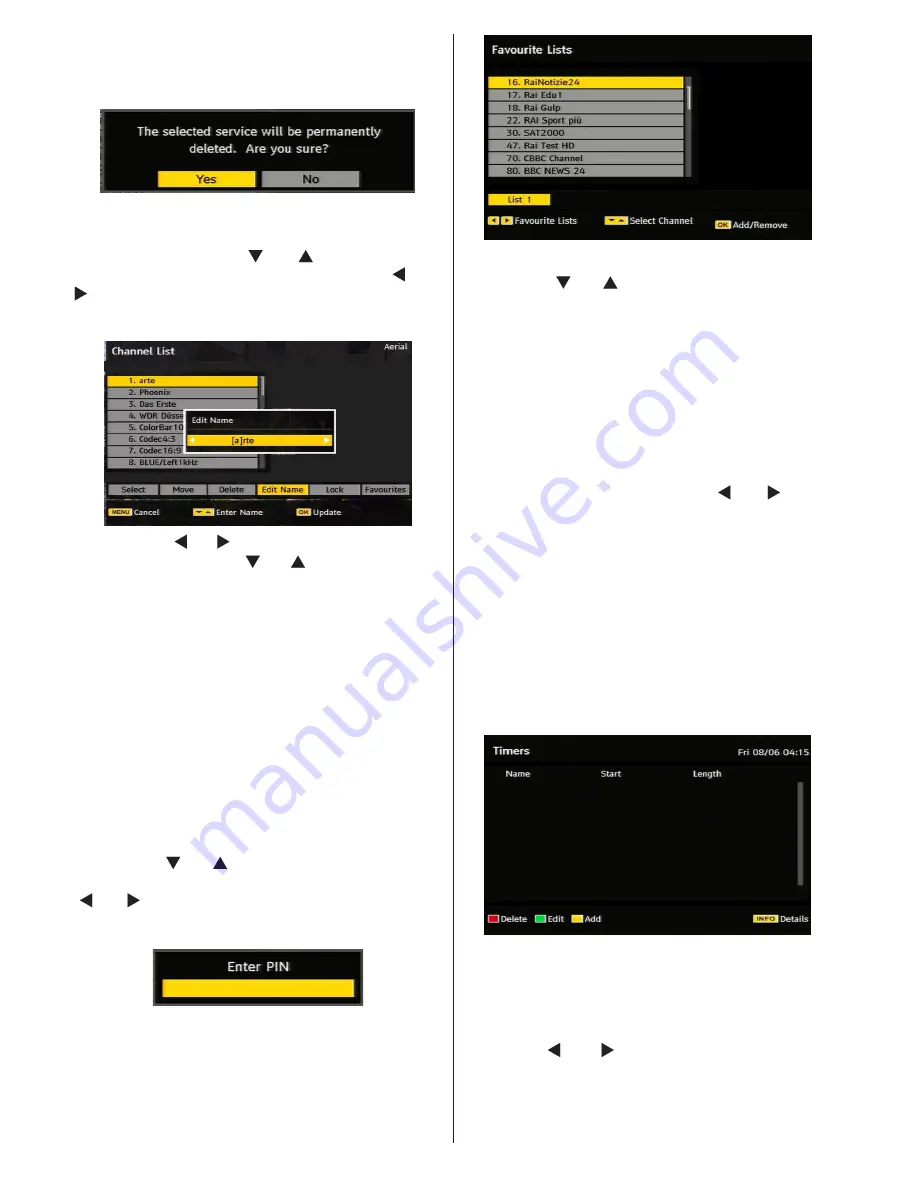
Setting Favourites

To set a favourite you should highlight the 

“Favourites”


item at the bottom of the Channel List menu. Then 

press 

OK

  button  and 

Edit  Favourite  List

  menu 

appears on the screen. 

Adding a Channel to a Favourites List

By pressing “ ” or “ ” buttons, highlight the channel  

that you want to add to the favourite list. By pressing 

OK

  button,  the  highlighted  channel  is  added  to 

Favourite List. 

F

 icon indicates that a channel is added  

to Favourite List.

Removing a Channel from a Favourite List

• Highlight the channel that you want to remove from the 

favourite list and press 

OK

 button to remove.You can 

press 

OK

 button again to re-adding a channel.

• To activate Favourites, go to the Configuration menu 

and select Favourite mode. Use “ ” or “ ” to set 

Favourite  mode  as  on. To  cancel  Favourites,  set 

Favourite Mode to Off.

Hint:  Pressing 

INFO


button  can  help  you  for 

displaying information in IDTV.

Program Guide

This  section  is  same  with  the  instructions  given  in 

the General Operations page. Please see Electronic 

Programme  Guide  (EPG)  section  in  the  General 

Operations part.

Timers

To display timers window, press either 

TIME 

button 

on the remote control or activate the item from the 

main  menu.  To  add  a  timer,  press  the 

YELLOW


button  on  the  remote  control. Then    “

Add  Timer

” 

window appears.

Channel

:  “ ”  or  “ ”  keys  will  navigate  the  user 

through the TV or Radio list.

Date:

 Starting date is entered via the Left/Right or 

the numeric buttons.

Содержание WP2211LCD

Страница 1: ...COLOUR TELEVISION WITH REMOTE CONTROL OPERATING INSTRUCTIONS WP2211LCD BE WALKER WISE logon to www walker ie...

Страница 2: ...Operations 10 Operation with the Buttons on the TV 10 Operation with the Remote Control 10 Initial Settings 11 Electronic Programme Guide EPG 12 Programme Options 12 Analogue Teletext 13 Widescreen 1...

Страница 3: ...Limiting When no valid signal is detected after 5 minutes the TV switches itself automatically to standby mode PLL Frequency Search PC input Plug Play for Windows 98 ME 2000 XP Vista Windows 7 Audio...

Страница 4: ...intense heat such as an electric heater Ensure that no open flame sources such as lighted candles are placed on top of the TV Batteries should not be exposed to excessive heat such as sunshine fire or...

Страница 5: ...perating mode when you leave your house Connection to a Television Distribution System Cable TV etc from Tuner Device connected to the protective earthing of the building installation through the main...

Страница 6: ...16 Green Picture menu Page down Subtitle 17 onoff in DTV mode Red Sound menu Page up Channel list 18 mode selection in DTV mode Menu on off 19 Ok Confirm Channel list in DTV mode 20 Cursor Left 21 AV...

Страница 7: ...ts YPbPr 2 are used for connecting component video You can connect the component video and audio sockets with a device that has component output Connect the component video cables between the COMPONEN...

Страница 8: ...atellite Receiver or DVD Player These devices must be connected via the HDMI sockets or Component Socket These sockets can accept either 480i 480p 576p 576i 720p 1080i 1080p optional signals No sound...

Страница 9: ...t Power off both computer and display before making any connections Use 15 pin D sub display cable to connect a PC to the LCD TV When the connection is made switch to PC source See Input selection sec...

Страница 10: ...in the Sound menu as On External Speakers A device that supports SPDIF signal Connecting Other Equipment via Scart Most devices support SCART connection You can connect a DVD recorder a VCR or a decod...

Страница 11: ...ecrease volume or button to increase volume so a volume level scale slider will be displayed on the screen Programme Selection Press P CH button to select the next programme or P CH button to select t...

Страница 12: ...transmission channels searching for digital terrestrial TV broadcasts and displaying the names of channels found This process will take a few minutes To cancel searching you can press M button at any...

Страница 13: ...programmes of previous day BLUE button Next day displays the programmes of the next day INFO Details displays the programmes in detail OK View Timer shows the highlighted channel sets the reminder for...

Страница 14: ...enu make sure that the first item Channel List is highlighted and press the OK button to display the Channel List You can use following buttons for Move Delete and Lock functions Channel List is the p...

Страница 15: ...favourite you should highlight the Favourites item at the bottom of the Channel List menu Then press OK button and Edit Favourite List menu appears on the screen Adding a Channel to a Favourites List...

Страница 16: ...en highlight Common Interface and press OK button When no module is inserted No Common Interface module detected message appears on the screen Refer to the module instruction manual for details of the...

Страница 17: ...p it safe Time Settings Time setting will not be available for UK In the configuration menu highlight the Time Settings item by pressing or buttons Press OK and Time Settings sub menu will be displaye...

Страница 18: ...Description Optional Audio description refers to an additional narration track for blind and visually impaired viewers of visual media You can use this feature only if the broadcaster supports that ad...

Страница 19: ...elected automatic search starts Selecting No cancels automatic search After search is completed for digital channels a message asking whether to search for analogue channels appears on the screen High...

Страница 20: ...ings for more information After active antenna mode option is selected a message asking for automatic search appears on the screen Highlight Yes item by pressing or buttons and press OK button to star...

Страница 21: ...art again and again Loop GREEN Slideshow goes on continuously and icon turns the highlighted icon Info Activate the operations bar Video Playback optional Play Red button Starts the video playback Sto...

Страница 22: ...the remote control will have no function while Game Mode is on Picture Zoom Select Picture Zoom by pressing or button Use or buttons to change picture zoom to Auto 16 9 4 3 Panoramic 14 9 Cinema Subti...

Страница 23: ...ct Press or button to set as On or Off Store Press or button to select Store Press or OK button to store the settings Stored will be displayed on the screen Feature Menu Sleep Timer Press or button to...

Страница 24: ...an HDMI device and switch the TV to HDMI mode this feature will be visible except for 1080i 1080P resolution Full Mode optional If you connect a device via HDMI connectors and set 1080i 1080P resolut...

Страница 25: ...r button to select the other letters By pressing the RED button you can store the name Move Select the programme which you want to move by navigation buttons Press the GREEN button By navigation butto...

Страница 26: ...owards the top or bottom of the screen Select V Position item by using or button Use or button to adjust the value Phase Depending on the resolution and scan frequency that you input to the TV set you...

Страница 27: ...the ZOOM mode change to another ZOOM mode manually 16 9 This uniformly stretches the left and right sides of a normal picture 4 3 aspect ratio to fill the wide TV screen For 16 9 aspect ratio pictures...

Страница 28: ...le displaying a persistent image LCD TVs image persistence may disappear after a short time Try turning off the TV for a while To avoid this do not leave the screen in still picture for extended perio...

Страница 29: ...5 67 5 VESA 16 1152 870 75 68 9 MAC 17 1280 768 60 47 7 VESA 18 1360 768 60 47 7 19 1280 960 60 60 0 VESA 20 1280 1024 60 64 0 VESA 21 1280 1024 75 80 0 VESA 22 1600 1200 60 75 0 VESA Appendix B AV an...

Страница 30: ...48KHz mp3 MPEG 1 2 Layer 1 2 3 MP3 Sample Rate 8K 48KHz Bit Rate 32K 320Kbps Photo jpg Baseline JPEG WxH 14592x12288 Up to 179 Mega pixel Support format 444 440 422 420 Grayscale Progressive JPEG Up t...

Страница 31: ...e display DIMENSIONS mm DxLxH With foot 118 x 532x 376 Weight Kg 4 70 DxLxH Without foot 60 x 532 x 347 Weight Kg 4 55 Digital Reception DVB T Transmission Standards DVB T MPEG2 DVB T MPEG4 HD i DEMOD...

Страница 32: ...reen or green and yellow The wire which is coloured blue or black must be connected to the terminal which is marked with the letter N or coloured Black The wire which is coloured brown or red must be...

Страница 33: ...50174018...

Отзывы: