Walker WP2210LCD Скачать руководство пользователя страница 21

English   

- 21 -

to 

Music

Movie

Speech

Flat

Classic

 and 

User

.

Select the desired frequency by pressing 

“ ” or “ ” button and increase or decrease the 

frequency gain by pressing “ ” or “ ” button.
Press the “

M

” button to return to the previous 

menu.

Note

: Equalizer menu settings can be changed only 

when the 

Equalizer


Mode

 is in 

User

.

Balance

This setting is used for emphasizing left or right 

speaker balance.
Press  “ ”  or  “ ”  button  to  select 

Balance

Press “ ” or “ ” button to change the level of 

the  balance.  Balance  level  can  be  adjusted 

between 

-32

 and 

+ 32

.

Headphone

Press “ ” or “ ” button to select 

Headphone

Press  “ ”  button  to  view  the  headphone 

menu.

Note: Headphone will be disabled when SPDIF option 

is set to on.

Headphone  sub-menu  options  are  described 

below:

Volume

Press “ ” or “ ” button to select 

Volume

. Press   

“ ”  button  to  increase  headphone  volume 

level. Press “ ” button to decrease headphone 

volume level. Headphone volume level can be 

adjusted between 0 and 63.

AVL

Automatic  Volume  Limiting  (AVL)  function 

adjusts the sound to obtain fixed output level 

between  programmes  (For  instance,  volume 

level of advertisements tend to be louder than 

programmes).
Press “ ” or “ ” button to select 

AVL

. Press “ ” 

or “ ” button  to set the AVL as 

On

 or 

Off

.

Spdif Out

Press  “ ”  or  “ ”  button  to  select 

Spdif Out

Press “ ” or “ ” button to set the 

Spdif Out

.  

as 

On

 or 

Off

.

Note

: If Spdif Out is set to On, headphone will be 

disabled.

Effect

If you are watching a mono broadcast, set Effect 

on to obtain a better sound effect which will be 

more stereo-like. If the current sound system is 

stereo, switching this effect on will give a more 

spatial effect.
Press “ ” or “ ” button to select Effect. Press  

“ ” or “ ” button  to set as On or Off .

Store

Press  “ ”  or  “ ”  button  to  select  Store. 

Press “ ” or 

OK

 button to store the settings. 

Stored...

” will be displayed on the screen.
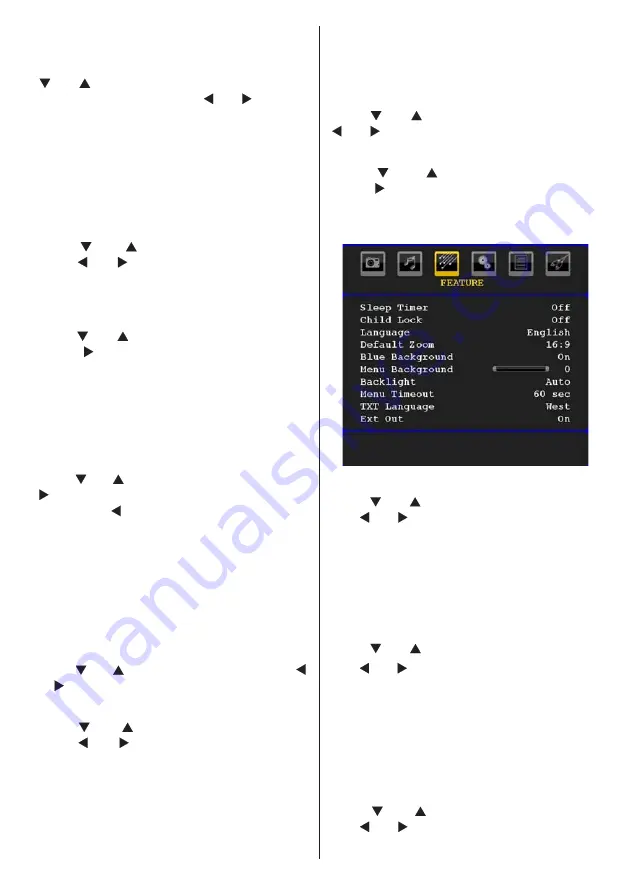
Feature Menu

Sleep Timer

Press “ ” or “ ” button to select 

Sleep Timer

Use “ ” or “ ” button to set the 

Sleep Timer

.

The timer can be programmed between 

Off

 and 

120

 minutes in steps of 

10

 minutes. 

If 

Sleep Timer

 is activated, at the end of the 

selected  time,  the  TV  goes  automatically  to 

standby mode.

Child Lock

Press “ ” or “ ” button to select 

Child Lock

.

Use “ ” or “ ” button  to set the Child Lock 

On


or 

Off

. When On is selected, the TV can only be 

controlled by the remote control handset. In this 

case the control panel buttons will not work.

Hence, if one of those buttons is pressed, 

Child 

Lock On

 will be displayed on the screen when 

the  menu screen is not visible.

Language

Press “ ” or “ ” button to select 

Language

Use “ ” or “ ” button to select the 

Language

Содержание WP2210LCD

Страница 1: ...ations 18 Operation with the Buttons on the TV 18 Volume Setting 18 Programme Selection 18 Viewing Main Menu 18 AV Mode 19 Operation with the Remote Control 19 Volume Setting 19 Programme Selection Previous or Next Programme 19 Programme Selection Direct Access 19 Navigating the Menu System 19 Menu System 19 Picture Menu 19 Mode 19 Brightness Contrast Colour Sharpness Tint 19 Colour Temp 20 Noise ...

Страница 2: ... Screen Care 27 Image Persistence 27 No Power 27 Poor Picture 27 No Picture 27 Sound 27 Remote Control 27 Input Sources 27 Appendix A PC Input Typical Display Modes 28 Appendix B AV and HDMI Signal Compatibility Input Signal Types 29 Appendix C Pin Specifications 30 SCART connector pin specifications 30 HDMI connector pin specifications 30 Signal Input 30 PC RGB Terminal D sub 15 pin connector 30 ...

Страница 3: ...tion Automatic programming system Forward or backward manual tuning Sleep timer Child lock Automatic sound mute when no transmission NTSC playback AVL Automatic Volume Limiting When no valid signal is detected after 5 minutes the TV switches itself automatically to standby mode PLL Frequency Search PC input Plug Play for Windows 98 ME 2000 XP Vista Audio line out Game Mode optional Accessories EXI...

Страница 4: ...fire or give you an electric shock When it is damaged and needs to be replaced it should be done by qualified personnel Moisture and Water Do not use this device in a humid and damp place avoid the bathroom the sink in the kitchen and near the washing machine Do not expose this device to rain or water as this may be dangerous and do not place objects filled with liquids such as flower vases on top...

Страница 5: ...es This symbol on the product or on its packaging means that your electrical and electronic device should be disposed at the end of its service life separately from your household wastes There are separate collection systems for recycling in EU For more information please contact the local authority or the dealer where you purchased the product Disconnecting the Device The mains plug is used to di...

Страница 6: ...ogramme 4 Cursor up 5 Cursor right 6 Cursor down 7 TV mode No function 8 Mono Stereo Dual I II 9 Programme up down 10 Numeric buttons 11 No function 12 Hold in TXT mode 13 Update in TXT mode 14 Index page Guide No function 15 Reveal in TXT mode Switch from TV to 16 PC Green Picture menu 17 Red Sound menu 18 Menu on off 19 Ok Confirm 20 Cursor Left 21 AV Source 22 Info 23 Volume up down 24 Mute 25 ...

Страница 7: ... TV and Operating Buttons FRONT VIEW REAR VIEW Standby button 1 TV AV button 2 Programme Up Down 3 buttons Volume Up Down buttons 4 Note Press buttons at the same time to view main menu TOP VIEW TV V A E U M N P CH ...

Страница 8: ...s on your TV Y Pb Pr correspond with your device s connectors PC YPbPr Audio Inputs 3 are used for connecting audio signals of a PC or a device that connects to the TV via YPbPr Connect the PC audio cable between the AUDIO INPUTS on the TV and audio output of your PC to enable PC audio Connect the audio cable between AUDIO INPUTS on the TV and audio outputs of your device to enable component audio...

Страница 9: ...put on your PC HDMI 1 8 HDMI input HDMI Input is for connecting a device that has an HDMI socket Your LCD Television is capable of displaying High Definition pictures from devices such as a High Definition Satellite Receiver or DVD Player These devices must be connected via the HDMI sockets or Component Socket These sockets can accept either 480i 480p 576p 576i 720p 1080i 1080p signals No sound co...

Страница 10: ... 2 external devices Connect the video cable between the VIDEO IN socket on the TV and the VIDEO OUT jack on your device Audio Inputs are used for connecting audio signals of 3 external devices Connect the audio cable between the AUDIO INPUTS on the TV and the AUDIO OUTPUT jacks on your device Note If you connect a device to the TV via the VIDEO INPUT you should also connect your device with an aud...

Страница 11: ...C 50 Hz After unpacking allow the TV set to reach the ambient room temperature before you connect the set to the mains Plug the power cable to the mains socket outlet Aerial Connection Connect the aerial or cable TV plug to the AERIAL INPUT socket located at the rear of the TV REAR VIEW ...

Страница 12: ...ng any connections Use 15 pin D sub display cable to connect a PC to the LCD TV When the connection is made switch to PC source See Input selection section Set the resolution that suits your viewing requirements Resolution information can be found in the appendix parts REAR VIEW PC audio cable not supplied to AUDIO INPUTS on the TV PC RGB cable not supplied to PC input Audio Inputs PC Input ...

Страница 13: ... player as illustrated below switch to HDMI source See Input Selection section Most DVD players are connected through COMPONENT SOCKETS Use a component video cable to connect video input For enabling audio use a component audio cable as illustrated below When the connection is made switch to YPbPr source See Input selection section You may also connect through the SCART socket Use a SCART cable as...

Страница 14: ...Note that cables shown in the illustration are not supplied For connecting a camcorder connect to the VIDEO IN socket and the AUDIO SOCKETS For selecting the related source see the section Input selection in the following parts To listen the TV sound from headphones connect to the HEADPHONE jack of theTV Camcorder Headphone SIDE VIEW ...

Страница 15: ... audio cable Do not reverse the AUDIO LEFT and AUDIO RIGHT jacks Turn on the LCD TV and external speaker set after all connections are made Refer to your speaker set s manual for further queries For connecting a to a device that has SPDIF support use an appropriate SPDIF cable to enable sound connection You should also set SPDIF Out option in the Sound menu as On External Speakers A device that su...

Страница 16: ...der a VCR or a decoder to your LCD TV by using the SCART socket Note that cables shown in the illustration are not supplied Power off both the TV and the devices before making any connections For more information refer to your device s own instruction book REAR VIEW Scart socket Decoder DVD Recorder Video Recorder ...

Страница 17: ...MNO PQR STU VWX YZ M P P TV DTV i I II INFO V P PP 0 1 2 3 4 5 6 7 8 9 PC OK Remote range is approximately 7m 23ft Switching the TV On Off To Switch the TV On Connect the power cord to the 220 240V AC 50 Hz Press STANDBY switch Then the standby LED lights up To switch on the TV from standby mode either Press the button P P or a numeric button on the remote control Press the P CH or P CH button on ...

Страница 18: ... button on your remote control for directly changing sources or Select Source option from the main menu by using or button Use then or button to highlight an input and press button to select Note You can mark desired source options by pressing the OK button Therefore when button is pressed only the marked source options will be available except for the TV source Basic Operations You can operate yo...

Страница 19: ...nsecutively e g for programme 27 first press 2 and then 7 When the pressing time is due for the second numeric button only the first digit programme will be displayed The limit of the delay time is 3 seconds Press directly the programme number to reselect single digit programmes Navigating the Menu System For displaying menu options For navigation To confirm choices Press M to display the main men...

Страница 20: ...optional Select Game Mode by pressing or button Use or button to set Game Mode as On or Off When Game Mode is set to On specific game mode settings which are optimized for better video quality will be loaded Also Picture Mode Contrast Brightness Sharpness Colour and Colour Temp settings will be invisible and disabled while Game Mode is on Note Picture mode selection button on the remote control wi...

Страница 21: ...AVL Press or button to set the AVL as On or Off Spdif Out Press or button to select Spdif Out Press or button to set the Spdif Out as On or Off Note If Spdif Out is set to On headphone will be disabled Effect If you are watching a mono broadcast set Effect on to obtain a better sound effect which will be more stereo like If the current sound system is stereo switching this effect on will give a mo...

Страница 22: ...Language Use or button to change Teletext Language to West East Turk Gre Cyrillic Arabic or Persian Ext Out Press or button to select Ext Out Use or button to set the Ext Out as On or Off Note For copying from a DVD or VCR device you should choose desired source from source menu and turn On to EXT Out from feature menu Install Menu Program Press or button to select Program Use or button to select ...

Страница 23: ... Name To change the name of a programme select the programme and press the RED button The first letter of the selected name will be highlighted Press or button to change that letter and or button to select the other letters By pressing the RED button you can store the name Move Select the programme which you want to move by navigation buttons Press the GREEN button By navigation buttons move the s...

Страница 24: ...he first icon by pressing or button PC Position menu appears on the screen Autoposition If you shift the picture horizontally or vertically to an unwanted position use this item to put the picture into correct place automatically This setting therefore automatically optimizes the display Select Autoposition item by using or buttons Press OK or button Warning Please ensure auto adjustment is perfor...

Страница 25: ...Picture Mode Selection By pressing PP button you can change Picture Mode settings in accordance with your viewing requirements Available options are Dynamic Natural and Cinema Note This feature cannot be set while in PC mode Freezing Picture You can freeze the picture on the screen by pressing the OK button on the remote control Press the OK button to freeze picture Press again to quit freeze mode...

Страница 26: ...t the teletext mode Index Selects the teletext index page Mix Places the teletext screen over the programme Expand Press once to enlarge top half of the page press again to enlarge the bottom half of the page Press again to revert back to normal size Reveal Shows hidden information e g solutions of games Hold Holds a text page when convenient Press again to resume Subcode Pages Time Selects subcod...

Страница 27: ...icture or teletext unrecognisable Check if you have entered the correct frequency Please retune the channels The picture quality may degrade when two peripherals are connected to the TV at the same time In such a case disconnect one of the peripherals No Picture Is the aerial connected properly Are the plugs connected tightly to the aerial socket Is the aerial cable damaged Are suitable plugs used...

Страница 28: ... 4 3 2 640 480 72 37 9 VESA 16 9 4 3 3 640 480 75 37 5 VESA 16 9 4 3 4 800 600 56 35 2 VESA 16 9 4 3 5 800 600 60 37 9 VESA 16 9 4 3 6 800 600 70 43 8 16 9 4 3 7 800 600 72 48 1 VESA 16 9 4 3 8 800 600 75 46 9 VESA 16 9 4 3 9 832 624 75 49 7 MAC 16 9 4 3 10 1024 768 60 48 4 VESA 16 9 4 3 11 1024 768 70 56 5 VESA 16 9 4 3 12 1024 768 72 57 7 16 9 4 3 13 1024 768 75 60 0 16 9 4 3 14 1152 864 70 64 2...

Страница 29: ...60Hz O 1080P 50Hz O 1080P 60Hz O HDMI1 480I 60Hz O 480P 60Hz O 576I 50Hz O 576P 50Hz O 720P 50Hz O 720P 60Hz O 1080I 50Hz O 1080I 60Hz O 1080P 50Hz O 1080P 60Hz O 1080P 24 HZ O X Not Available O Available Note In some cases a signal on the LCD TV may not be displayed properly The problem may be an inconsistency with standards from the source equipment DVD Set top box etc If you do expereince such ...

Страница 30: ...Not used 21 GND SHIELD CHASSIS 11 RGB G IN HDMI connector pin specifications Pin Input signal Pin Input signal 1 TMDS Data2 11 TMDS Clock Shield 2 TMDS Data2 Shield 12 TMDS Clock 3 TMDS Data 2 13 CEC 4 TMDS Data 1 14 Reserved N C on device 5 TMDS Data1 Shield 15 SCL 6 TMDS Data1 16 SDA 7 TMDS Data0 17 DDC CED Ground 8 TMDS Data0 Shield 18 5V Power 9 TMDS Data0 19 Hot Plug Detect 10 TMDS Clock Sign...

Страница 31: ... PANEL 22 Wide Display DIMENSIONS mm DxLxH With foot 155 x 532 x 384 5 Weight Kg 4 70 DxLxH Without foot 60 x 532 x 347 Weight Kg 4 55 Products Battery Information for Users on Disposal of Old Equipment and Batteries European Union only These symbols indicate that equipment with these symbols should not be disposed of as general household waste If you want to dispose of the product or battery plea...

Страница 32: ...green or green and yellow The wire which is coloured blue or black must be connected to the terminal which is marked with the letter N or coloured Black The wire which is coloured brown or red must be connected to the terminal which is marked with the letter L or coloured Red For continued protection against risk of fire replace only with same type and rating of fuse ASTA approved 5A 250VAC fuse C...

Отзывы: