background image

Operation


Griddle 

1. 

Turn 'ON' the power at the mains supply, the green neon will illuminate. 

2. 

Turn the thermostat control knob to the desired temperature.  When the amber neon goes out, the 

desired temperature has been reached and the griddle is ready for use. 


NOTE:  Turning the control to a higher setting than required will not shorten the heat up time. 


3. 

To turn 'OFF' the griddle, turn the thermostat control knob to the lowest setting and turn 'OFF' the 

mains power to the griddle. 

4. 

Both the amber and green neons should not be illuminated. 


Oven 

The oven is fitted with top and bottom elements.  The thermostat maintains the overall oven  

temperature.  The top element is further controlled by the oven top heat control.  Convection ovens 

(GP8910E / EC) are fitted with a circulation fan. 


NOTE:  The Thermostat on the oven provides overall control of the temperature within the oven by 

controlling both elements, where as the Oven Top Heat Control provides a means of  
balancing the distribution of heat between the top and bottom of the oven. 


Place oven racks in desired position. 


Preheat: 

Preheat the oven by selecting the desired temperature, and turning the oven top heat control (Refer 

to Fig 5 on the previous page) to a maximum of 2.  When the desired temperature is reached, the 
amber neon will go out. 


Cooking: 

When the desired temperature has been reached, load the oven with product and set the oven top 

heat control to the desired setting. 


NOTE: When the oven top heat control is set to a high setting, proportionally more heat is 

produced at the top of the oven.  (This can be used for browning, etc, during the cooking 
operation).  With the oven top heat control set on a low setting, less heat is produced from 
the top oven elements.  (This mode is used for general baking purposes to prevent cakes, 
etc, from getting too brown and crisp on the top, but  allow the cake to cook through). 


To obtain more top heat during cooking, turn the oven top heat control to a higher position.  (The 

higher the setting, the more top heat). 


Turning ‘OFF’ the Oven: 

a.  Turn the oven top heat control to the ‘O’ off position.  The top heating will be turned ‘OFF’ and 

the upper heating indicator lamp (Amber) will extinguish. 

b.  Turn the thermostat control knob to the ‘O’ off position and the lower heating indicator lamp 

(Amber) will extinguish.  The oven is now turned ‘OFF’. 

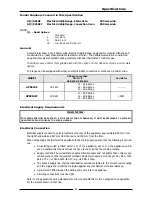
! IMPORTANT 

DO NOT USE aluminium foil or trays directly on the cast iron sole plate(s). 
NEVER block or cover the openings on each side of the sole plate(s). 

! IMPORTANT 

DO NOT USE aluminium foil or trays directly on the cast iron sole plate(s). 
NEVER block or cover the openings on each side of the sole plate(s). 

Содержание GP8910E

Страница 1: ...o n a n d O p e r a t i o n M a n u a l GP8910E GP8910EC Electric Griddle Ranges Date Purchased Serial Number Dealer Service Provider 230379 8 For use in GB IE GPL8910E GPL8910EC GPB8910E GPB8910EC G...

Страница 2: ...ares tel 1800 337 963 Customer Service tel 1800 335 315 fax 1800 350 281 CANADA Serve Canada Web www servecanada com E Mail info servecanada com Sales tel 800 551 8795 Toll Free Service tel 800 263 14...

Страница 3: ...General Electrical Supply Requirements Electrical Connection Dimensions Installation 5 Installation Requirements Unpacking Location Clearances Assembly Electrical Connection Commissioning Operation 8...

Страница 4: ...PROPER INSTALLATION ADJUSTMENT ALTERATION SERVICE OR MAINTENANCE CAN CAUSE PROPERTY DAMAGE INJURY OR DEATH READ THE INSTALLATION OPERATING AND MAINTENANCE INSTRUCTIONS THOROUGHLY BEFORE INSTALLING OR...

Страница 5: ...ppliance to the main supply ensure that the following is carried out An isolating switch is fitted within 2 m of the appliance but not on the appliance and in such a position that the user does not ha...

Страница 6: ...4 Dimensions GP L 8910E EC...

Страница 7: ...ed service agent They are not to be adjusted by the installation person Unpacking Remove all packaging and transit protection from the appliance including all protective plastic coating from the exter...

Страница 8: ...al supply 4 Bring the supply cable up through the grommet at the back of the appliance and through the compression type gland provided on the rear of the main electrical switchgear panel 5 Connect the...

Страница 9: ...ontacts have been added to the front of this manual b Ensure that the operator has been instructed in the areas of correct operation and shutdown procedure for the appliance 2 This manual must be kept...

Страница 10: ...scription of Controls Griddle Control Knob With temperature Gradient of 50 C to 320 C Heating Indicator Lamps Amber Power Indicator Lamps Green CAUTION This appliance is for professional use and is on...

Страница 11: ...maximum of 2 When the desired temperature is reached the amber neon will go out Cooking When the desired temperature has been reached load the oven with product and set the oven top heat control to t...

Страница 12: ...n the griddle plate Steel Plate ensure that any detergent or cleaning material has been completely removed after each cleaning The appliance should be switched on briefly to ensure the griddle plate b...

Страница 13: ...ddle Steel Plate NOTE In order to prevent the forming of rust on the griddle plate ensure that all detergent and cleaning material has been entirely removed after each cleaning process The appliance s...

Страница 14: ...ty domestic oven cleaner c Once a week remove and clean any built up of grease etc from the oven racks and the bottom spill over cover Stainless Steel Surfaces a Clean the exterior surfaces of the gri...

Страница 15: ...lem Please note that the service agent will require the following information The Model Trade Name and the Serial Number of the Appliance both can be found on the Technical Data Plate located on the a...

Страница 16: ...3 2 2 7 7 6 9 9 9 7 6 8 8 4 4 5 11 13 14 10 10 10 12 11 22 32 12 3 P3 4 P4 CONTROL PANEL GRIDDLE PLATE 21 31 11 22 32 12 15 16 15 16 THERMOSTAT 229146 SWITCH 229145 2 1 P2 P1 NEON GREEN 227962 NEON AM...

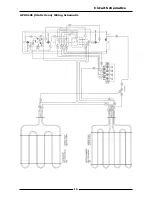
Страница 17: ...15 Circuit Schematics GP8910E Static Oven Wiring Schematic...

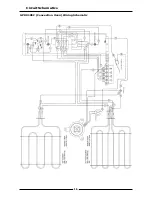
Страница 18: ...16 Circuit Schematics GP8910EC Convection Oven Wiring Schematic...

Страница 19: ...026160 Terminal Block Mains 227399 Control Knob 50 C to 300 C 229146 Thermostat 50 300 C 229145 Switch 4 pole 227962 Neon Green 227963 Neon Amber 013989 Energy Regulator 227398 Control Knob HI LO Heat...

Страница 20: ...28571 Index Mark Moulding 227850 Leg 150 mm Adjustable Accessories 228566 Griddle Scraper Tool 228567 Smooth Plate Scraper Blades Pack of 5 blades 233817 Ribbed Plate Scraper Blade Individual Blade 22...

Страница 21: ......
Отзывы: