Wahlberg 320.704 Скачать руководство пользователя страница 10

320.805.004 

10


Date: 2022-02-09 


WARNING

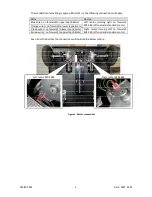
2  before  connecting  AC  mains  power  to  the 

charger. 


Voltage  

WARNING! Check that the voltage range specified on the charger matches the local AC mains 
power voltage before applying power to the charger.  


Power plug 

The charger unit comes with four changeable power plugs and contact your local electrician for 

another converter if needed. 


WARNING! This equipment can cause radio interference, make sure this equipment respects 

all national and local regulations before use. 
 

CAUSION: Change or modifications not expressly approved by the party responsible for 


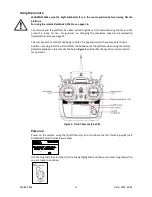
A standard RC transmitter and receiver is used to control the motors, and there is no manual or 
other control options available. 


The radio device uses the 2.4 GHz band as accepted in Europe and USA. For other locations and 

national restrictions consult your national authority, like in France there  are specific frequency 

ranges required 2.4056 GHz   2.4482 GHz. 

FCC Notice 

This  device  complies  with  Part  15  of  the  FCC  Rules.  Operation  is  subject  to  the  following  two 

conditions: (1) This device may not cause harmful interference, and (2) this device must accept 
any interference received, including interference that may cause an undesired operation. 


Tips for reliable radio transmission 


Do a range check before each live event, and make sure the range limitation is not exceeded. 


Know your batteries condition, keep both remote and platform charged. 


Always use the Fail-

-


Power off unused wireless devices 

-

during use. 


Содержание 320.704

Страница 1: ...BERG DK JENS JUULS VEJ 1 TELEPHONE 45 86 18 14 20 8260 VIBY EMAIL sales wahlberg dk DENMARK Remote Controlled Platform Series Item No 320 704 Off Road No 320 703 Standard and No 320 702 Low Height Use...

Страница 2: ...r other component is damaged defective deformed wet or showing signs of overheating Do not reapply power until repairs have been completed Refer any service operation not described in this manual to a...

Страница 3: ...EEL TO AN OBJECT 8 AC POWER 10 VOLTAGE 10 POWER PLUG 10 RADIO CONTROL 10 TIPS FOR RELIABLE RADIO TRANSMISSION 10 SETUP 11 MOUNTING THE LOAD 11 USING THE REMOTE 12 SPEED RAMP AND SYSTEM SETTINGS FACTOR...

Страница 4: ...704 Height 240mm 9 5 in Moving speed No load 2 0 m s or 7 2 km t 6 5 ft s or 4 4 mph Maximum Load 200 kg 440 9 lb Wheel 200 mm 7 9 in Standard platform 320 703 Height 160mm 6 3 in Moving speed No loa...

Страница 5: ...320 805 004 5 Date 2022 02 09 Remote Controlled Platform Series 320 Item No 320 704 Off Road Item No 320 703 Standard Item No 320 702 Low Height...

Страница 6: ...e battery for remote AT9s Pro only 1x User Manual Description Smart and easy controlled moving platform for running stenographic elements actors or Musicians on stage The platform comes in 3 different...

Страница 7: ...oduct are fulfilled Using for the first time Important The product must be protected from environmental factors such as physical shocks and vibration during transportation and storage WARNING 2 before...

Страница 8: ...m and they should also be positioned at each corner of an object for proper stability however more castor wheels may be added in order to secure an irregular object Wooden objects may be fixed with a...

Страница 9: ...right on forward 404 386 off road and standard motor Orange wire on forward to lower tap 6 3mm Green wire on forward to lower tap 6 3mm Right motor turning left on forward 404 385 off road and standa...

Страница 10: ...ol the motors and there is no manual or other control options available The radio device uses the 2 4 GHz band as accepted in Europe and USA For other locations and national restrictions consult your...

Страница 11: ...away from the drive and castor wheels Mounting the load The standard products will have mounting holes along each side of the platform A and minimum one screw at each corner or side is recommended Th...

Страница 12: ...eleration deceleration ramp see page 13 The unit has a lot of controls not being used for this application and these may be left is any position meaning that this will not affect the behaviour of the...

Страница 13: ...ed Using the menu you may need to change the following parameters in each sub menu Enter the Acro List list by press and hold the Jog Dial button only Sub menu Parameter Setting Note E P A Maximum Spe...

Страница 14: ...to select the correct 2AILE mode called DELTA ELEVON shown in the settings Adjusting the trims As a starting point the right gimbal indicators in the display see Figure 4 should both be set in the cen...

Страница 15: ...em setting When the above setting is selected scroll down to the BINDING and press enter using the Jog Dial and the display will show Highlight the Optima and press Enter the display will show Press Y...

Страница 16: ...will flash When it stops flashing the remote and platform are connected Menu options Navigating the menu Hold MODE for 1 second to enter menu navigate using the Dial enter menu points by pressing the...

Страница 17: ...nd speed then power off the remote and the drive wheels must come to a stop within a second or so The procedure must be repeated if this is not the situation Duty cycle When the unit is continually op...

Страница 18: ...tails Charging A charge of the platform will usually take about 24 hours with the included charger and 1 hour with a rapid charger ordered separately Also keep the charger connected when the product i...

Страница 19: ...running the platform and at least every week when the product is in use Object safety mounted on platform Batteries fully charged Transmitter range Monthly At regular intervals but at least every mont...

Страница 20: ...led platform Power in 12V Charging XLR 4 Pole Battery charger 12VDC External Motor controller Battery 2x12VDC 12AH Fused 2xT16A Gear M Gear M Power switch Left Drive wheel Right Drive wheel 2 4GHz Ban...

Отзывы: