WAGNER Plast Coat 25 Скачать руководство пользователя страница 17

39

Fill water into receptacle.
When operating using the container suction system,
immerse suction hose into receptacle with water. 
Turn on mortar spraying machine.

After a few seconds the cleaning ball will come out
of the spray lance.

Repeat cleaning procedure 3–4 times, depending on
the coating material used.

There is a further possibility for cleaning using the
cleaning adapter.

This cleaning adapter can be connected to a water hose
or tap with a claw coupling.

Place cleaning ball in the mortar hose.
Couple mortar hose to the cleaning adapter and rinse
through with water.

10.2


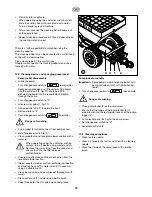
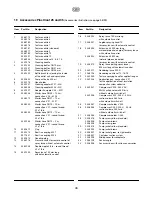
Cleaning device and changing pump jacket

Pump jacket disassembly
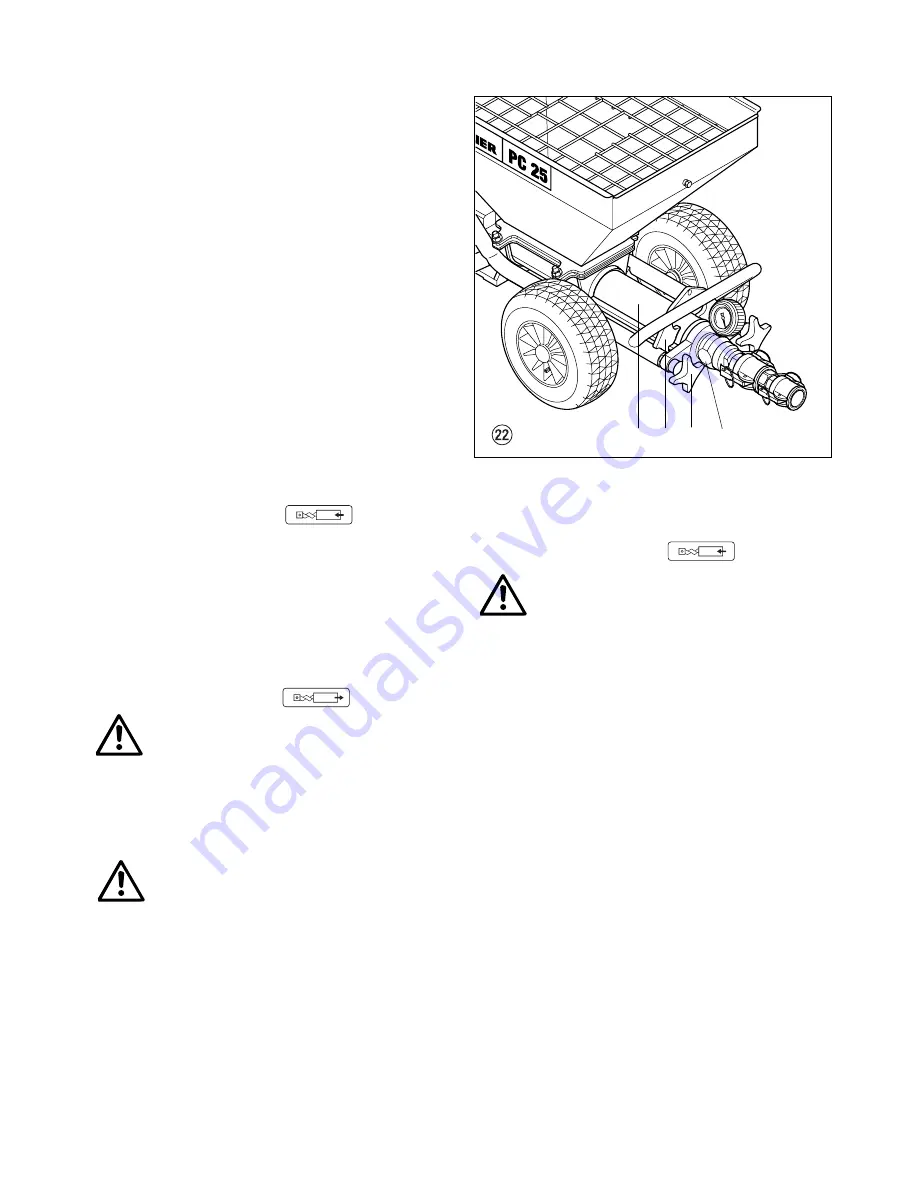
• Lubricate pump

Turn changeover switch to                     (backwards).

Spray pump antiseize or a little dishwashing liquid
into the outlet unit (2, fig. 22) or place a little
dishwashing liquid into the receptacle and pump
through the pump.

• Turn changeover switch to "0".

• Unscrew star grips (1, fig. 22).

• Remove outlet unit (2) towards the front.

• Set feed rate to "3".

• Turn changeover switch to                    (forwards).

Danger of crushing

• Pump jacket (3) will disconnect from pump screw.

• Set changeover switch to "0".

• Clean receptacle and receptacle lower section with a

water jet.

When operating using the container suction
system, turn off device using master switch.
Remove the mains plug from the socket and
ensure that it cannot be replaced
unintentionally.

• Unscrew and remove container connection from the

receptacle lower section.

• Clean receptacle lower section, container connection

and suction hose with a water jet and, if necessary,
using a suitable brush. 

• Clean pump screw and pump jacket thoroughly with

water.

• Clean outlet unit (2) inside using a bottle brush.

• Keep threads for the star grips clean and grease.

Pump jacket assembly

Important:

Spray pump screw and pump jacket with
pump antiseize or wet with dishwashing
liquid.

• Turn changeover switch to                     (backwards).


Danger of crushing

• Place pump jacket (3) onto pump screw.

• Ensure that the ledge of the pump jacket (3) is

properly slid into the rectangular recess of the pump
trigger (4).

• Pump jacket pulls itself onto the pump screw.

• Set changeover switch to "0".

• Assemble outlet unit.

10.3  Cleaning spray lance

• Clean texture nozzle.

• Clean air holes in the texture nozzle with a cleaning

needle.

• Clean the inside of the spray lance with a bottle

brush

g

3

2

1

4

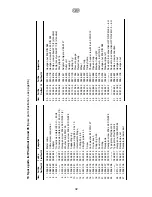
Содержание Plast Coat 25

Страница 1: ...Ow n e r s Ma n u a l...

Страница 2: ...tributing point e g using a site distribution system with fault current protection with INF 30 mA PlastCoat 35 Only connect to the mains supply using a special distributing point e g using a site dist...

Страница 3: ...ssor 37 9 2 Sack mangle 37 38 Using coating materials in sacks 38 9 3 Container suction system 38 Page 10 Placing out of operation and cleaning 38 10 1 Cleaning the mortar hose 38 39 10 2 Cleaning dev...

Страница 4: ...ust be observed For safe operation of the mortar spraying machines always comply with the following specific instructions 1 Use of the mortar spraying machines The mortar spraying machines PlastCoat 2...

Страница 5: ...ze 5 Insulation plaster Renovating plaster Foam mortar coating Quartz plastic Roof coatings Flameproof coatings Mineral sealing slurries Bitumen emulsions Reinforcing filler Liquid wood chip Frame sea...

Страница 6: ...nozzle 10 Spray lance with automatic control 11 Switch sleeve for switching the mortar spraying machine on and off using remote control 12 Spray lance without automatic control 13 Remote control switc...

Страница 7: ...hangeover switch fig 4 1 Releasing the pressure or removing the pump jacket Pump runs in reverse direction 2 0 drive is switched off 3 AUTO remote control using the spray lance 4 Spraying or pulling o...

Страница 8: ...360 l min fig 6 1 Compressor holder 2 Compressed air connection Note Only operate the compressor according to the operating manual included C 350 suction volume 350 l min fig 7 1 Compressor holder 2...

Страница 9: ...y lance without automatic control fig 10 1 Atomization air connection 2 Air tap 3 Texture nozzle 4 Material tap 5 Material connection Various different texture nozzle can be fitted to the spray lance...

Страница 10: ...Tabelle Teil 1 32 g...

Страница 11: ...Tabelle Teil 2 33 g...

Страница 12: ...ying head The nozzle size should be at least three times the grain size e g grain size synthetic resin plaster 3 mm nozzle size 10 mm Connect spray lance 2 and secure with tension levers 3 Close mater...

Страница 13: ...tic resin products synthetic resin dispersion PCC systems cellulose paste Fill 2 3 l synthetic resin dispersion or cellulose paste into the receptacle Caution set changeover switch 4 fig 15 to 0 befor...

Страница 14: ...e separately Do not kink the mortar hose Protect it against damage e g resulting from it being run over or from sharp objects Starting the spraying procedure Open air tap 2 fig 16 and 17 and material...

Страница 15: ...ace Note Sharp edged grains and pigments will increase wear on the pump hose material ball valve and tip 9 Fitting accessories 9 1 Compressor V 400 suction volume 360 l min Attach compressor holder it...

Страница 16: ...container Turn on mortar spraying machine Note All connections must be sealed air tight so that a vacuum can be produced Place a small amount of machine lubricant onto the rubber seals of the connect...

Страница 17: ...3 will disconnect from pump screw Set changeover switch to 0 Clean receptacle and receptacle lower section with a water jet When operating using the container suction system turn off device using mast...

Страница 18: ...before turning on master switch Set delivery rate switch to 0 Set changeover switch to forward As soon as the pump screw rotates at a constant speed slowly set the delivery rate switch to the desired...

Страница 19: ...witch and changeover switch to 0 Turn mortar spraying machine back on after about 20 sec Caution set changeover switch to 0 before turning on master switch If none of the above mentioned possible caus...

Страница 20: ...3 Spare parts list PlastCoat 25 and 35 Spare parts illustration see page 96 30 9910 208 9910 208 Hexagon nut M 8 DIN 985 31 9900 118 9900 118 Hexagon screw M 8 x 30 DIN 933 32 0348 316 0348 316 Pump s...

Страница 21: ...omatic control 1 0268 779 Texture nozzle 4 0348 915 Texture nozzle 5 0268 780 Texture nozzle 6 0348 916 Texture nozzle 7 0268 781 Texture nozzle 8 standard 0348 917 Texture nozzle 9 0268 782 Texture n...

Страница 22: ...0348 957 Compressor holder 16 Spare parts list Compressor V 400 Item Part No Designation 5 5 2 1 6 3 4 1 0348 955 Compressor C 350 230 V 50 Hz suction volume 350 l min 2 9993 040 Rapid action coupling...

Страница 23: ...uction system Item Part No Designation 1 0348 907 Container suction system 2 0097 100 Seal 3 0342 205 Suction hose 4 0097 085 Coupling 5 0348 361 Connecting plate 6 0348 947 Connecting bridge 7 0097 1...

Страница 24: ...le nipple 3 4 in round thread 32 x 1 8 in 15 0342 200 Spray lance 100 mm long without automatic control Item Part No Designation 16 0348 224 Spray lance 100 mm long with automatic control 17 0348 931...

Страница 25: ...430528 A B Wagner Spraytech Iberica S A Apartado 132 08750 Molins de Rey Barcelona Spain Phone 93 6800028 Fax 93 6680156 J Wagner France S A R L B P 75 91122 Palaiseau Cedex France Phone 01 60114050 F...

Отзывы: