


17
FineCoat 9700
EN
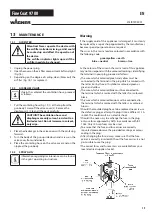
SETTING THE SPRAY GUN /STARTING OPERATION/
SPRAYING TECHNIQUE
7
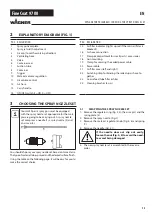
SETTING THE SPRAY GUN
7.1
SETTING THE REQUIRED SPRAY PATTERN (FIG. 6)
Attention:
Never pull trigger while adjusting the air
cap settings.
Turn the air cap (Fig. 6, 3) to the desired spray pattern position.
A horizontal flat jet
for vertical surfaces
B
vertical flat jet
for horizontal surfaces
C
round jet
for corners and edges
as well as hard-to-reach
places.
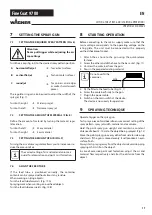
The regulator ring can also be used to adjust the width of the
spray jet (Fig. 7):
Turn to the right
Wider spray jet
Turn to the left
Narrower spray jet
7.2
SETTING THE AMOUNT OF MATERIAL (FIG. 8)
Define the amount of material by turning the material regu-
lator knob.
Turn to the left
More material
Turn to the right
Less material
7.3
SETTING THE AMOUNT OF AIR (FIG. 9)
Turning the air volume regulator allows you to increase or re-
duce the amount of air.
The correct setting of air and material volume is
crucial for atomisation and paint mist formation.
7.4
ALIGN THE FEED TUBE
If the feed tube is positioned correctly, the container
contents can be sprayed without almost any residue.
When working on lying objects:
Turn the feed tube forwards. (Fig. 10 A)
Spraying work when working on overhead objects:
Turn the feed tube rearwards. (Fig. 10 B)
8
STARTING OPERATION
Before connecting to the mains supply make sure that the
mains voltage corresponds to the operating voltage on the
rating plate. The unit must be connected with a properly
earthed shockproof socket.
1. Attach the air hose to the gun using the quick-release
fastener.
2. Screw the other end of the hose to the base unit. (Fig. 11)
3. Unscrew the container from the gun.
4. Pour in the prepared coating material.
Do not overfill the
container.
MAX
5. Fit the filter to the feed tube (Fig. 12, 1)
6. Screw the container firmly to the gun.
7. Plug in the power cable.
8. Switch on the main switch at the device.
The device is now ready for operation.
9
SPRAYING TECHNIQUE
Operate trigger on the spray gun.
Test spray a piece of cardboard to ensure correct setting of the
spray pattern, spray jet width, material and air volume.
Hold the paint spray gun upright and maintain a constant
distance of about 3 - 10 cm to the object being sprayed. (Fig. 13)
Move the paint spray gun evenly either from side to side or up
and down. If the gun is moved evenly, it will produce an even
surface finish.
Always start spraying away from the object and avoid stop-ping
spraying whilst still on the object.
In case of excessive paint mist formation, adjust the air and
material flow respectively and alter the distance from the
object.
Содержание FINE COAT 9700
Страница 3: ...FineCoat 9700 k h g m 3 10 cm n l Maximum Minimum Minimum i j A B 1 2...
Страница 4: ...FineCoat 9700 q o t 1 r p 6 7 s 1 2 3 1 2 4 5 3 4...
Страница 5: ...FineCoat 9700 2 1 3 4 5 1 8 2 3 5 6 7 9 10 11 4 12...
Страница 111: ...105 FineCoat 9700 RU 1 1 a b c 2 a b c d e f 3 a b c d e f g...
Страница 112: ...106 FineCoat 9700 RU 4 a b c d e f g 5 a b 1 2...
Страница 113: ...107 FineCoat 9700 RU 3 4 3 5 6 1 4 13 2 7 8 9 10 11 12 13 14 15 16 17...
Страница 117: ...111 FineCoat 9700 RU 9 3 10 13 10 1 2 3 11 1 2 3 4 12 1 2 3 14 15 16 4 15 5 14 2 6 2 4 3 5 7 3 8 16 16 7 9 16 6 10 17 11...
Страница 118: ...112 FineCoat 9700 RU 12 1 1 2 3 13 13 1 1 2 18 3 18 1 13 2 1 19 1 2 3 2 3 4 13 3...
Страница 119: ...113 FineCoat 9700 RU 14 30 13 2 3 1 13 1 13 1...
Страница 122: ...116 FineCoat 9700 RU 12 Wagner 2002 96 Wagner 01 01 1990 Wagner 01 02 2009 1 Wagner Wagner 2 12 12 12 3 2...
Страница 123: ...117 FineCoat 9700 RU 4 Wagner 5 18 88677...


