


4
5
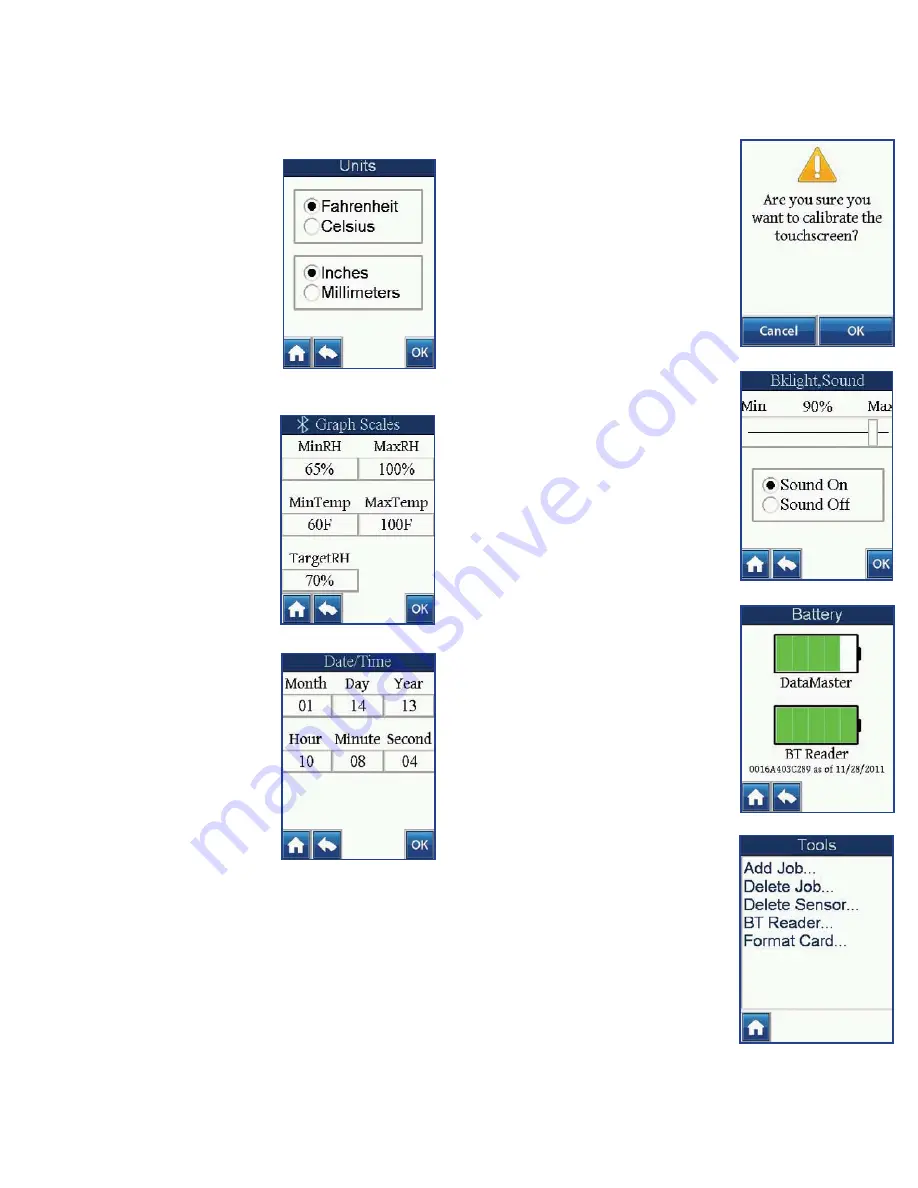
Units Setting
Choose the units used to record the
temperature and depth of the drilled
hole.
1. From the Settings menu, select the
Units option.
2. Select either Fahrenheit or Celsius.
3. Select either Inches or Millimeters.
4. Select
OK
.
NOTE: Changing the Unit Settings after
data has been recorded will automatically
convert all readings on the DataMaster™
to the selected units.
Graph Scales Setting
Recorded data can be viewed with cus-
tomized scale and graph view on the
DataMaster™ unit.
1. From the Settings menu, select the
Graph Scales setting.
2. Set the Min RH and the Max RH.
3. Set the Min Temp and the Max
Temp.
4. Set the Target RH.
5. Select
OK
.
Date/Time Setting
1. From the Settings menu, select the
Date/Time option.
2. Set month, day, year, hour, minute
and second by touching the appro-
priate box and using the up or down
arrows at the bottom of the screen
to select the correct number.
3. Select
OK
when finished.
Setting the correct Date and Time is vital to ensure that all data is
accurately recorded as being within the selected time and date for
a Job. All data records are date and time-stamped accordingly for
specific recordkeeping, and the date and time displays when view
-
ing the results of a particular test.
Touch-screen Calibration
Touch-screen Calibration on each
DataMaster™ unit has been carefully
completed prior to shipping.
We rec-
ommend NOT using this feature un-
less absolutely necessary.
For precision, use a stylus or pencil
eraser tip when performing this opera-
tion, and follow the onscreen directions
exactly.
Backlight and Sound Setting
Users can customize the display bright-
ness and audible indicator.
1. Select the Backlight and Sound
Setting option.
2. Select and slide the sliding bar to
the left or right for the appropriate
Backlight percentage setting.
3. Select the Sound as On or Off.
4. Select
OK
.
NOTE: Battery life can be extended by de
-
creasing the backlight brightness
.
The Battery
The Battery option indicates the battery
charge level in both the unit’s battery
and the paired Bluetooth
®
Reader.
To charge the battery, use the USB
cable and connect it to any computer
USB port or USB power-source adap-
tor. A pop-up screen will display the
unit charge level.
Return to the Settings menu by select-
ing the “back” arrow.
The Tools option is available to users
from the Main Menu of the unit. Once
the Tools option is selected, the Tools
menu displays and users can select
from the following options:
Add Job
,
Delete Job
,
Delete Sensor
,
BT Read-
er
, and
Format Card
.
Tools Menu
Содержание Datamaster
Страница 1: ......


