background image

EN

G

LIS

H

©2018 Wagan Corporation. All Rights Reserved.

Wagan Tech and 

wagan.com

 are trademarks of Wagan Corporation.

9

User’s Manual—Read before using this equipment

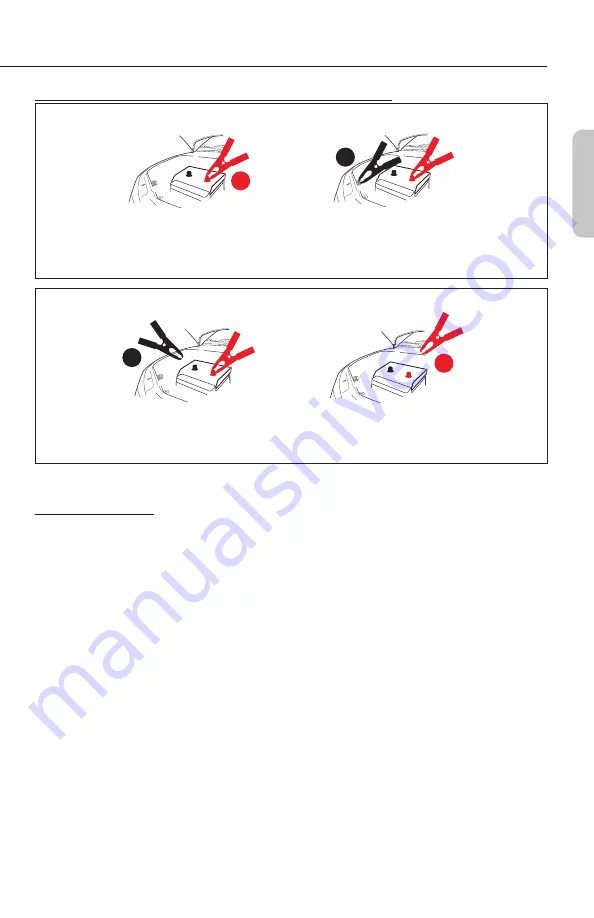
Brief Recap of Sequences for Connection and Disconnection

1

2

ORDER OF CONNECTION

1.  Connect positive (red) 

clamp to positive battery 

terminal.

2. Connect negative (black) 

clamp to solid metal ground 

on engine or frame, away 

from battery).

1

2

ORDER OF DISCONNECTION

2. 

Disconnect positive 

(red) clamp from positive 

battery terminal.

1. 

Disconnect negative 

(black) clamp

from frame.

READ THE REMAINDER OF THE INSTRUCTIONS BEFORE USING THE IONBOOST!

Jumpstart Procedure

1.  Make sure iOnBoost is fully charged.
2.  Turn off the vehicle ignition and all accessories (radios, lights, air conditioners), and disconnect 

electronic devices.

3.  Set the emergency brake and put vehicles with automatic transmission in park position.
4.  Determine the polarity of the vehicle’s battery terminals. The positive (POS, P, +) battery 

terminal usually is red and larger in diameter than the negative (NEG, N, −) terminal. If you 

are unsure, first refer to the vehicle owner’s manual. Make sure the negative battery terminal is 

also connected to the vehicle frame.

5.  If engine was recently cranked, use a non-conductive material (cardboard or a folded 

newspaper) to wave away (dispel) explosive gases. Do this for a few minutes before any 

vehicle connections.

6.  Remove the jumpstarter clamps from the storage posts. 


Never allow clamps (positive & negative terminals) to touch together or contact the same 

piece of metal to prevent short-circuits and arcing�

7.  Securely connect the positive (+) red clamp to the positive (POS, P, +) terminal of the vehicle 

battery or the remote positive (+) terminal if equipped.

Содержание iOnBoost v10

Страница 1: ...tanto las especificaciones están sujetas a cambios sin previo aviso Visite nuestro sitio web para obtener la información más reciente de los productos Nous améliorons constamment nos produits alors les spécifications sont sujettes à changement sans préavis Visitez notre site Web pour obtenir les dernières informations sur nos produits BC LITHIUM JUMP STARTER POWER BANK ARRANCADOR DE LITIO Y FUENTE...

Страница 2: ......

Страница 3: ...Especificaciones 15 Cuidado y Mantenimiento 15 Carga del iOnBoost 16 Arrancador Auxiliar 17 Solución de Problemas 20 Uso de la toma de alimentación CC 21 Uso de la Conexión USB 21 Linterna LED 21 Eliminación Adecuada 21 TABLE DES MATIÈRES Information Importante 24 Avertissements Généraux 24 Fonctionnalités 24 Spécifications 25 Entretien et Maintenance 25 Recharge du iOnBoost 26 Batterie d Appoint ...

Страница 4: ...ate this appliance unless he she has been given supervision or instruction concerning the proper usage and warnings of the appliance by a person responsible for their safety For proper and safe operation of any accessory outlet do not place anything in it except the plug of the accessory to be used Do not operate this unit in or around water Exposure to excessive moisture will damage the unit Drop...

Страница 5: ...ry type Lithium ion Polymer Battery capacity watt hours 50 0 Wh Peak amps 700 A Cranking amps 400 A Jumper cables 8 AWG 16 inch DC Socket 12V USB power ports 5V 1 2 1A and 1 1 0A Flashlight LED with 3 lighting modes Operating temperatures 32 F 140 F Storage temperatures 0 F 185 F Input 14V 1 0A Recharging time AC 3 5 hours Recharging time DC with engine running 5 6 hours CARE MAINTENANCE This unit...

Страница 6: ...h 1 2 3 4 5 6 8 9 7 1 Battery status LED flashlight button 2 LED flashlight 3 iOnBoost battery status indicator 4 USB ports 5 Jumpstarter status light 6 Jumpstarter reset button 7 Jumpstarter power switch 8 Charging adapter input port 9 12V DC socket ...

Страница 7: ...uses Charging is complete when all battery status indicator lights illuminate solid 5 When charging is complete unplug the AC charging adapter from the wall socket first then from the charging port on the unit 6 The battery status can be checked by tapping on the button once 7 Store the unit and charging adapters in a cool dry environment away from flammable materials Remember to fully charge the ...

Страница 8: ... vehicle frame Negative Ground Check the negative battery terminal connecting wire to make sure it also connects to the frame Vehicles equipped with on board computers may be affected if the engine battery is jumpstarted Read your vehicle owner s manual before attempting to start the vehicle to determine if external starting assistance can be used Do not attempt to jumpstart your vehicle when iOnB...

Страница 9: ...connect electronic devices 3 Set the emergency brake and put vehicles with automatic transmission in park position 4 Determine the polarity of the vehicle s battery terminals The positive POS P battery terminal usually is red and larger in diameter than the negative NEG N terminal If you are unsure first refer to the vehicle owner s manual Make sure the negative battery terminal is also connected ...

Страница 10: ...ocedure first disconnect negative black then positive red clamps Do not let the clamps touch each other 15 When convenient using either AC or DC charging adapter completely charge the iOnBoost battery 16 Store the unit and charge adapters in a cool dry environment away from flammable materials Remember to fully charge the unit every three months Bypass Mode It is possible to override the safety ci...

Страница 11: ...g of the accessory you wish to use Power will be automatically supplied 2 Do not use jumpstart feature while DC socket is in use 3 Recharge the iOnBoost as soon as convenient USING THE USB SOCKETS If the charge in the iOnBoost is low the USB ports will shut off to prevent damage to the iOnBoost 1 Insert USB plug of the device you wish to charge 2 Tap the button 3 Do not use jumpstart feature while...

Страница 12: ...s This warranty is in lieu of all warranties expressed or implied and no representative or person is authorized to assume any other liability in connection with the sale of our products There shall be no claims for defects or failure of performance or product failure under any theory of tort contract or commercial law including but not limited to negligence gross negligence strict liability breach...

Страница 13: ......

Страница 14: ...esorios no coloque nada allí excepto el conector del accesorio a utilizar Utilice únicamente los adaptadores de carga y pinzas de puente suministradas con este paquete Las piezas no autorizadas pueden causar daños o lesiones graves Utilice protección para los ojos y para la ropa al puentear un vehículo No se toque los ojos al trabajar con la batería Quítese las joyas y artículos metálicos como ani...

Страница 15: ... de estado de la batería ESPECIFICACIONES Tipo de batería Polímero de iones de litio Capacidad de la batería vatios hora 50 0 Wh Amp pico 700 A Amperios de arranque 400 A Cables de puente 8 AWG 20 3 cm Fuente de alimentación CC 12 V Puerto de carga USB 5 V 2 1 A Linterna LED con 3 modos de iluminación Temperatura de funcionamiento 32 F 140 F Temperatura de almacenamiento 32 F 185 F Consumo 14 V 1 ...

Страница 16: ...el arranque auxiliar 8 Puerto de entrada del adaptador de carga 9 Toma 12V CC CARGA DEL iOnBoost Este producto podría estar parcialmente cargado de fábrica Se recomienda realizar una carga completa de la unidad inmediatamente después de comprarla y antes de utilizarla por primera vez Antes de cargar la unidad lea y comprenda todas las instrucciones en este manual Para prolongar la duración del iOn...

Страница 17: ...de los adaptadores de la unidad de carga y en un ambiente fresco y seco lejos de materiales inflamables Recuerde cargar la unidad completamente cada tres meses Carga con CC en Su Vehículo El motor debe estar en funcionamiento al cargar el iOnBoost 1 Verifique que el interruptor de encendido del arrancador auxiliar esté en la posición apagado 2 Encienda el motor del vehículo 3 Inserte el adaptador ...

Страница 18: ...egativos al puentear Use anteojos de seguridad para proteger los ojos al puentear una batería Si el motor no arranca después de dos intentos de 3 segundos suspenda el procedimiento Intentar arrancar excesivamente puede dañar el motor de arranque del vehículo Podría ser necesario solucionar otros problemas solicite asistencia profesional La desconexión de las pinzas de los cables siempre se hace en...

Страница 19: ...e realizar cualquier conexión en el vehículo 6 Quite las pinzas del arranque auxiliar de los postes de almacenamiento Nunca junte las pinzas terminales positivo y negativo y evite que entren en contacto con una misma pieza de metal a fin de prevenir cortocircuitos y arcos voltaicos 7 Conecte firmemente la pinza positiva roja al terminal positivo POS P de la batería del vehículo o al terminal posit...

Страница 20: ...s de precaución apropiadas 1 Desconecte los cables 2 Encienda el interruptor de puenteo 3 Mantenga presionado el botón de desactivación por encima del interruptor durante 5 segundos Mantenga presionado durante 3 segundos aproximadamente hasta escuchar un clic y ver la luz encendida 4 Conecte los cables teniendo mucho cuidado de conectarlos con la polaridad correcta 5 Ponga en marcha el vehículo El...

Страница 21: ...a conveniente USO DE LA CONEXIÓN USB Si la carga del iOnBoost está baja el puerto USB se desactivará para evitar daños al iOnBoost Recargue el iOnBoost lo antes posible 1 Inserte el conector USB del dispositivo que desea cargar 2 Toque el botón 3 No use la función de arranque auxiliar mientras esté en uso alguno de los puertos USB 4 Recargue el iOnBoost tan pronto como sea conveniente LINTERNA LED...

Страница 22: ...ún representante o persona están autorizados a asumir responsabilidad alguna en relación con la venta de nuestros productos No se aceptarán reclamos por defectos o falla de funcionamiento o falla del producto bajo ninguna interpretación del derecho de responsabilidad civil contractual o comercial sin limitarse a negligencia negligencia grave responsabilidad objetiva violación de garantía y violaci...

Страница 23: ......

Страница 24: ...l appareil Pour un bon fonctionnement et une sécurité optimale de toute prise accessoire n insérez rien à l intérieur de celle ci à l exception de la fiche de l accessoire à être utilisé Utilisez uniquement les adaptateurs de charge et les pinces de démarrage fournis dans cet emballage Des pièces non autorisées peuvent causer des dommages graves ou des blessures Portez des lunettes et de vêtements...

Страница 25: ...e Autres Fonctionnalités Lampe torche à DEL continu code Morse SOS et clignotement Voyants d état de charge de la batterie SPÉCIFICATIONS Type de batterie Lithium ion polymère Capacité de la batterie watts heure 50 0 Wh Ampères crête 700 A Ampères de démarrage 400 A Câbles d appoint 8 AWG 20 3 cm Source d alimentation CC 12 V 16 V 19 V Port d alimentation USB 5 V 2 1 A Lampe torche DEL avec 3 mode...

Страница 26: ... de secours 7 Interrupteur du bloc d alimentation pour démarrage de secours 8 Port d entrée de l adaptateur de charge 9 Prise CC 12 V RECHARGE DU iOnBoost Ce produit peut être livré partiellement chargé par le fabricant Il est recommandé de charger complètement l appareil immédiatement après l achat et avant de l utiliser pour la première fois Lisez attentivement toutes les instructions de ce manu...

Страница 27: ...L état de la batterie peut être vérifié en appuyant une fois sur le bouton 7 Rangez l appareil et les adaptateurs de charge dans un endroit frais et sec loin des matériaux inflammables N oubliez pas de charger totalement l appareil environ tous les trois mois Chargement CC dans Votre Véhicule Le moteur doit être en allumé pendant la charge du iOnBoost 1 Assurez vous que l interrupteur du bloc d al...

Страница 28: ...necté au châssis Assurez vous que les pinces de démarrage soient connectées dans la bonne polarité rouge à la borne positive de la batterie noire au châssis du véhicule pour les systèmes de pôle négatif reliés à la masse lors du démarrage Utilisez des lunettes de sécurité pour protéger vos yeux lors d un démarrage d appoint Si le moteur ne s allume pas après 2 ou 3 secondes d essai cessez le proce...

Страница 29: ... frein d urgence et mettez les véhicules avec transmission automatique en position de stationnement 4 Déterminez la polarité des bornes de la batterie du véhicule La borne positive de la batterie POS P est habituellement rouge et a un diamètre plus grand que la borne négative NEG N Si vous êtes incertain consultez d abord le manuel de l utilisateur du véhicule Assurez vous que la borne négative de...

Страница 30: ...ettez l interrupteur du bloc d alimentation pour démarrage de secours en position Déconnectez les pinces dans la séquence inverse du processus de connexion déconnectez en premier la pince négative noire puis la positive rouge Ne laissez pas les pinces se toucher 15 Lorsque vous êtes prêt en utilisant l adaptateur de charge CA ou CC chargez complètement la batterie du iOnBoost 16 Rangez l appareil ...

Страница 31: ...nt Appuyez sur le bouton et suivez les étapes de connexion à nouveau UTILISATION DE LA PRISE D ALIMENTATION CC Pour un bon fonctionnement et une sécurité optimale de la prise accessoire CC n insérez rien à l intérieur de celle ci à l exception de la fiche de l accessoire à être utilisé Une surcharge du port peut entraîner le déclenchement d un disjoncteur à auto réinitialisation Le retrait de la s...

Страница 32: ...econdes 2 Appuyez une fois pour changer de modes d éclairage constant clignotant SOS éteint 3 Rechargez la batterie aussitôt que possible MISE AU REBUT Ce produit ne contient aucune pièce pouvant être réparée par le consommateur Ne tentez pas de retirer ou de remplacer la batterie utilisée dans cet appareil Lorsque la batterie atteint la fin de sa durée de vie veuillez apporter l appareil complet ...

Страница 33: ...rsonne n est autorisé à assumer toute autre responsabilité en lien avec la vente ou les produits Les réclamations ne sont pas valides pour la défectuosité ou la défaillance de fonctionnement ou la défaillance du produit sous tout autre principe de droit ou d équité contrat ou loi commerciale incluant mais non limité à la négligence grossière négligence responsabilité absolue bris de garantie et br...

Страница 34: ......

Страница 35: ......

Страница 36: ... Wagan Tech y wagan com son marcas registradas de la Corporación Wagan 2018 Wagan Corporation Tous droits réservés Wagan Tech et wagan com sont des marques de commerce utilisées par Wagan Corporation REV20180618 ESF 31088 San Clemente Street Hayward CA 94544 U S A Tel 1 510 471 9221 U S Canada Toll Free 1 800 231 5806 customerservice wagan com www wagan com ...

Отзывы: