background image

2

WARNING

DO NOT INGEST BATTERY, CHEMICAL BURN HAZARD

The remote control supplied with this product contains a coin/
button cell battery. If the coin/button cell battery is swal-
lowed, it can cause severe internal burns in just 2 hours and 
can lead to death. Keep new and used batteries away from 
children. If the battery compartment does not close securely, 
stop using the product and keep it away from children. If you 
think batteries might have been swallowed or placed inside of 
the body, seek immediate medical attention.

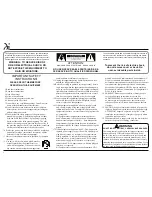
T

KHOLJKWQLQJÀDVKZLWKDUURZKHDGZLWKLQDQHTXLODWHUDOWULDQJOH

is intended to alert the user to the presence of uninsulated “dan-
gerous voltage” within the product’s enclosure that may be of suf-

¿FLHQWPDJQLWXGHWRFRQVWLWXWHDULVNRIHOHFWULFVKRFNWRSHUVRQV

7KHH[FODPDWLRQSRLQWZLWKLQDQHTXLODWHUDOWULDQJOHLVLQWHQGHGWR

alert the user to the presence of important operating and mainte-
nance (servicing) instructions in the literature accompanying the 

DSSOLDQFH

ATTENTION:

RISQUE DE CHOC ELECTRIQUE - NE PAS OUVRIR

WARNING - TO REDUCE RISK OF 

FIRE OR ELECTRICAL SHOCK, DO 

NOT EXPOSE THIS EQUIPMENT TO 

RAIN OR MOISTURE.

NO USER-SERVICEABLE PARTS INSIDE. RE-

FER SERVICING TO QUALIFIED PERSONNEL.

To prevent the risk of electric shock, 

do not remove cover or back. No 

user-serviceable parts inside.

1. Read these instructions.
2. Keep these instructions.
3. Heed all warnings.
4. Follow all instructions.
5. Do not use this apparatus near water.
6. Clean only with a dry cloth.
7. Do not block any ventilation openings. Install in accor-

dance with the manufacturer’s instructions.

8. Do not install near any heat sources such as radiators, 

heat registers, stoves, or other apparatus (including am-

SOL¿HUVWKDWSURGXFHKHDW

9. Do not defeat the safety purpose of the polarized or 

grounding-type plug. A polarized plug has two blades 
with one wider than the other. A grounding type plug 
has two blades and a third grounding prong. The wide 
blade or the third prong are provided for your safety. If 

WKHSURYLGHGSOXJGRHVQRW¿WLQWR\RXURXWOHWFRQVXOWDQ

electrician for replacement of the obsolete outlet.

10. Protect the power cord from being walked on or pinched 

particularly at plugs, convenience receptacles, and the 
point where they exit from the apparatus.

2QO\XVHDWWDFKPHQWVDFFHVVRULHVVSHFL¿HGE\WKHPDQX

-

facturer.

12. Use only with the cart, stand, tripod, bracket, 

RUWDEOHVSHFL¿HGE\WKHPDQXIDFWXUHURU

sold with the apparatus. When a cart is used, 
use caution when moving the cart/apparatus 

combination to avoid injury from tip-over.

13. Unplug this apparatus during lightning storms or when 

unused for long periods of time.

5HIHUDOOVHUYLFLQJWRTXDOL¿HGVHUYLFHSHUVRQQHO6HUYLF

-

ing is required when the apparatus has been damaged in 
any way, such as power-supply cord or plug is damaged, 
liquid has been spilled or objects have fallen into the ap-
paratus, the apparatus has been exposed to rain or mois-
ture, does not operate normally, or has been dropped.

15. Do not expose this equipment to dripping or splashing 

DQGHQVXUHWKDWQRREMHFWV¿OOHGZLWKOLTXLGVVXFKDV

vases, are placed on the equipment.

16. If this equipment is supplied with a power supply cord 

only, the mains plug of the power supply cord shall 
remain readily operable. To completely disconnect this 
equipment from the a.c. mains remove the plug from the 
a.c. receptacle.

6LO¶pTXLSHPHQWHVWXQLTXHPHQWDOLPHQWpSDUXQFRU

-

GRQG¶DOLPHQWDWLRQOD¿FKHGXFRUGRQG¶DOLPHQWDWLRQ
GRLWGHPHXUHUDLVpPHQWDFFHVVLEOH3RXUGpFRQQHFWHU
FRPSOqWHPHQWO¶pTXLSHPHQWGXUpVHDXG¶DOLPHQWDWLRQ
GpFRQQHFWHUOD¿FKHGXFRUGRQG¶DOLPHQWDWLRQGHODSULVH

murale.

17. If this equipment is supplied with AC /DC Adapter with 

separate power supply cord or the AC/DC Adapter plug-
ging directly into an a.c. receptacle, they shall remain 
readily operable. To completely disconnect this equip-
ment from the a.c. mains remove the AC /DC Adapter 
mains power supply cord from the a.c. receptacle or 
remove the AC /DC Adapter when it is directly plugged 
into the a.c. receptacle.

6LO¶pTXLSHPHQWHVWDOLPHQWpSDUXQDGDSWDWHXU$&'&

munis d’un cordon d’alimentation ou un adaptateur AC/

'&TXLHVWDOLPHQWpGLUHFWHPHQWjODSULVHPXUDOHLOV
GRLYHQWGHPHXUHUDLVpPHQWDFFHVVLEOHV3RXUGpFRQQHFWHU
FRPSOqWHPHQWO¶pTXLSHPHQWGXUpVHDXG¶DOLPHQWDWLRQ
GpFRQQHFWHUO¶DGDSWDWHXU$&'&GHODSULVHPXUDOHRX
GpFRQQHFWHUOHFRUGRQG¶DOLPHQWDWLRQGHO¶DGDSWDWHXU$&

DC de la prise murale.

18. WARNING: Do not expose batteries or battery pack to 

H[FHVVLYHKHDWVXFKDVVXQVKLQH¿UHRUWKHOLNH
$9(57,66(0(17/HVEDWWHULHVRXEORFGHEDWWHULHV

ne doivent pas etre exposees a une chaleur excessive 
telle que celle du soleil, feu ou autre source de chaleur 
similaire.

19. CAUTION: danger of explosion if battery is incorrectly 

replaced. Replace only with the same or equivalent type.
ATTENTION: danger d’explosion si la pile n’est pas 

UHPSODFpHFRUUHFWHPHQW1HUHPSODFHUTXHSDUOHPrPH
W\SHRXXQW\SHpTXLYDOHQW

20. Connect mains power supply cord only to a mains socket 

outlet with a protective earthing connection.

IMPORTANT SAFETY

INSTRUCTIONS!

   PLEASE READ THEM BEFORE
   OPERATING THIS EQUIPMENT.

Содержание di322

Страница 1: ...Wadia Digital LLC 2 Chambers Street Binghamton New York 13903 2699 Phone 607 723 3539 Fax 607 724 0549 www wadia com di322 digital audio decoder Owner s Manual ...

Страница 2: ...rt is used use caution when moving the cart apparatus combination to avoid injury from tip over 13 Unplug this apparatus during lightning storms or when unused for long periods of time 5HIHU DOO VHUYLFLQJ WR TXDOL HG VHUYLFH SHUVRQQHO 6HUYLF ing is required when the apparatus has been damaged in any way such as power supply cord or plug is damaged liquid has been spilled or objects have fallen int...

Страница 3: ...ing steps to remove the battery from the Remote Control 1 Press the tab and lift up on the Battery Cover and temporarily place it aside Refer to figures 2 and 3 2 Referring to figure 6 press on the bottom edge of the battery to release the battery from the molded battery socket Then remove the bat tery from inside of the Remote Control 2 Remove the CR2032 Battery from its packaging 3 Orient the ba...

Страница 4: ... you to record that information 6HULDO 1XPEHU _______________________________ Purchase Date _______________________________ Dealer Name ________________________________ 6DIHW QVWUXFWLRQV 2 Battery Installation and Replacement 3 7KDQN RX DQG 3OHDVH 7DNH D 0RPHQW 4 7HFKQLFDO VVLVWDQFH DQG XVWRPHU 6HUYLFH 4 Table of Contents 4 General Information 5 Connector and Cable Information 5 Introduction 6 Per...

Страница 5: ...XLWU LV GHVLJQHG WR GHFRGH FKDQQHO 3 0 3XOVH RGH 0RGXODWLRQ LJLWDO 6LJQDO SUHVHQW DW WKH RD LDO 2SWLFDO DQG 86 LJLWDO QSXWV 2WKHU LJLWDO XGLR 6LJQDO RUPDW 7 SHV ZLOO FDXVH WKH Audio Outputs of the di322 to be muted 5 The term Absolute Phase relative to reproduction RI VRXQG E RXGVSHDNHUV RU KHDGSKRQHV UHIHUV to the phase of the reproduced signal relative to the original signal retaining the origin...

Страница 6: ...DQFH HDGSKRQH 2XWSXW The separate Headphone Power Amplifier Circuitry is designed to produce high power output into Head phones with a low output impedance 3UHFLVLRQ 7UDFNLQJ 9ROXPH RQWURO Volume levels are controlled by a Digitally Controlled WWHQXDWRU 6 VWHP ZLWK D WUDFNLQJ DFFXUDF RI G OSKDQXPHULF OXRUHVFHQW LVSOD The Front Panel Information Display indicates the 6RXUFH 6HOHFWLRQ 6DPSOLQJ UHTXH...

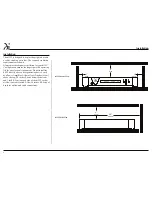
Страница 7: ... for your di322 There is additional information on the next page pertaining to installing the di322 into cabinets Side View of the di322 Front View of the di322 17 7 8 45 4cm COAX1 192K 65 2 7 8 7 3cm 3 3 8 8 6cm 17 7 8 45 4cm 16 7 16 41 8cm Rear View of the di322 17 7 8 45 4cm 16 7 16 41 8cm ...

Страница 8: ...the longest possible operating life for any electronic instrument Do not install the di322 directly above a heat generating device such DV D 3RZHU PSOLILHU OORZ DW OHDVW LQFKHV FP DERYH WKH WRS LQFKHV FP EHORZ WKH ERWWRP DQG LQFK FP RQ HDFK VLGH RI WKH GL VR WKDW DLUIORZ LV QRW REVWUXFWHG OORZ LQFKHV FP RI depth for airflow and cable connections di322 Side View 20 50 8cm di322 Front View 2 5 1cm 1...

Страница 9: ...G IRU FRPSRQHQWV ZLWK a Digital Audio Optical Output 86 7 8 2 1387 with control signal for connection to a computer 81 1 8 2 2873876 DQDORJ audio output signals to a Preamplifier or A V Control Center 1 8 2 2873876 DQDORJ audio output signals to a Preamplifier or A V Control Center 1 7 8 2 1387 for streaming high bandwidth GLJLWDO VLJQDOV IURP 6 Transport Components TRIGGER IN receives turn on sig...

Страница 10: ... WKH XQEDODQFHG 8 2 2873876 RU 5 to the unbalanced Inputs on the second Ampli ILHU LJLWDO XGLR RQQHFWLRQV 2 Connect a Digital DIN Cable from the di322 7 1 1 DFN WR WKH 6 7UDQVSRUW Digital Audio DIN Output Jack 3 Connect a Digital Optical Cable from the di322 7 8 2 13876 237 FRQQHFWRU WR WKH 0HGLD 3OD HU LJLWDO 2SWLFDO 2XWSXW FRQQHF tor 4 Connect a Digital Coaxial Cable from the di322 Connecting to...

Страница 11: ...XWV LJLWDO XGLR RQQHFWLRQV 2 Connect a Digital DIN Cable from the di322 7 1 1 DFN WR WKH 6 7UDQVSRUW Digital Audio DIN Output Jack 3 Connect a Digital Optical Cable from the di322 7 8 2 13876 237 FRQQHFWRU WR WKH 0HGLD 3OD HU LJLWDO 2SWLFDO 2XWSXW FRQQHF tor 4 Connect a Digital Coaxial Cable from the di322 7 8 2 13876 2 FRQQHF WRU WR WKH 0 0 7XQHU LJLWDO RD LDO 2XWSXW connector RQQHFW D 86 FDEOH Z...

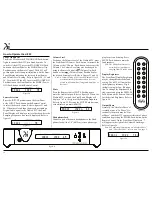
Страница 12: ...WK RWKHU DGLD 3URGXFWV 3UHVV WKH RU WR DGMXVW WKH 9ROXPH HYHO 8S RU RZQ 6WHSV WKUX WKH LJLWDO QSXWV IRU VRXUFH VHOHFWLRQ 3UHVV 02 WR VZLWFK power On or Off to the di322 0XWHV WKH DXGLR 3UHVV 63 WR DGMXVW brightness of the di322 Front Panel Display 3UHVV 3 6 WR FKDQJH WKH SKDVH of the Outputs Connections ...

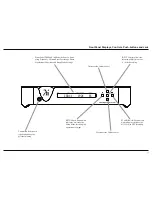
Страница 13: ...QGLFDWHV WKH 6RXUFH 6DP SOLQJ UHTXHQF 9ROXPH HYHO 3HUFHQWDJH 3KDVH 2SHUDWLRQDO XQFWLRQV DQG 6HWXS 0RGH 6HWWLQJV Front Panel Displays Controls Push buttons and Jack 6 783 3XVK EXWWRQ ZLWK indicator activates the 6HWXS 0RGH IRU FKDQJLQJ operational settings QFUHDVHV WKH 9ROXPH HYHO HFUHDVHV WKH 9ROXPH HYHO Connection for dynamic type headphones for private listening ...

Страница 14: ...5 9B B BB LV LQGLFDWHG RQ WKH Front Panel Display Refer to figure 2 3UHVV WKH 6 783 3XVK EXWWRQ XQWLO WKH DERYH WKH 6 783 3XVK EXWWRQ LV H WLQJXLVKHG How to Operate the Setup Mode 7KH HIDXOW 6HWWLQJV KDUW WKDW IROORZV LQGLFDWHV WKH XQFWLRQ 1DPH HIDXOW 6HWWLQJ DQG WKH 3DJH 1XPEHU for additional information Default Settings Firmware Version Default Settings Function Name Setting Page No AUTO POWER O...

Страница 15: ...15 Notes ...

Страница 16: ...SOLILHU RU 5HFHLYHU Mute 3UHVV WKH 5HPRWH RQWURO 087 3XVK EXWWRQ WR mute the Audio Outputs Refer to figure 56 When the Wadia di322 is muted the Front Panel Display will GLVSOD D P WR WKH ULJKW RI WKH 6DPSOLQJ UHTXHQF 5HIHU WR ILJXUH 3UHVVLQJ WKH 087 3XVK EXWWRQ D second time to un mute the di322 HDGSKRQHV DFN Connect a pair of dynamic headphones to the Head SKRQHV DFN ZLWK D FP VWHUHR SKRQH W SH 3...

Страница 17: ...r Purpose 7R QVWDOO WKH DGLD 86 XGLR LQGRZV Driver for use with Wadia Products with DQ 86 LJLWDO XGLR QSXW Requirements 1 A PC Computer with a functioning 86 3RUW LQGRZV 63 RU JUHDWHU RU LQGRZV 2SHUDWLQJ 6 VWHP How to Operate the di322 Figure 73 Figure 74 Q 86 DEOH ZLWK 7 SH WR Type B Connectors QVWDOOLQJ WKH 6RIWZDUH It is important to first install the downloaded software on your computer before...

Страница 18: ...FN GHYLFHV OLVWHG ZKHQ XVLQJ WKLV DGLD 3URG XFW IRU 86 XGLR RQWURO 3DQHO 6HWWLQJV 7R DFWLYDWH WKH DGLD 86 XGLR RQWURO 3DQHO Click on the Wadia Icon located in the Windows QRWLILFDWLRQ DUHD RQ WKH ULJKW VLGH RI WKH WDVNEDU RU FOLFN RQ WKH LQGRZV 6KRZ KLGGHQ LFRQV WKHQ VH lect the Wadia Icon Refer to figures 84 and 85 1RWHV W LV QRW QHFHV sary for the DGLD 86 XGLR RQWURO Panel to be run QLQJ XQOHVV ...

Страница 19: ... besides Ap SOLFDWLRQV OLNH LQGRZV 0HGLD 3OD HU IRU VWHDPLQJ PXVLF IURP WKH FRPSXWHU WR DGLD GL 86 QSXW An example of just one of the available applications is 5LYHU 0HGLD HQWHU How to Operate the di322 con t Figure 86 US B 1 92K 75 VOLUME INPUT SAMPLING FREQUENCY Figure 87 US B 35 2 8 K 75 VOLUME INPUT SAMPLING FREQUENCY Figure 88 US B DS D 64 75 VOLUME INPUT SAMPLING FREQUENCY Figure 89 USB DS D...

Страница 20: ...20 ...

Страница 21: ...21 Photos ...

Страница 22: ...60Hz at 30 watts 220 Volts 50 60Hz at 30 watts 230 Volts 50 60Hz at 30 watts 240 Volts 50 60Hz at 30 watts 6WDQGE 3RZHU OHVV WKDQ ZDWWV 1RWH 5HIHU WR WKH UHDU SDQHO RI WKH GL IRU WKH FRUUHFW YROWDJH 2YHUDOO LPHQVLRQV LGWK LV LQFKHV FP HLJKW LV LQFKHV FP LQFOXGLQJ IHHW HSWK LV LQFKHV FP LQFOXGLQJ WKH URQW 3DQHO and Cables HLJKW SRXQGV NJ QHW SRXQGV NJ LQ VKLS ping carton 6KLSSLQJ DUWRQ LPHQVLRQV LG...

Страница 23: ...hipping damage Use the original shipping carton and interior parts only if they are all in good serviceable condition If D VKLSSLQJ FDUWRQ RU DQ RI WKH LQWHULRU SDUW V DUH QHHGHG SOHDVH FDOO RU ZULWH XVWRPHU 6HUYLFH HSDUW ment of Wadia Refer to page 4 Please see the Part LVW IRU WKH FRUUHFW SDUW QXPEHUV 4XDQWLW Part Number Description 6KLSSLQJ FDUWRQ RQO 1 034556 Top foam pad 1 034564 Bottom foam ...

Страница 24: ...nt of its products is the policy of Wadia Digital who reserve the right to improve design without notice Printed in the U S A Wadia Digital LLC 2 Chambers Street Binghamton NY 13903 www wadia com Wadia Digital Part No 04158100 ...

Страница 25: ...dia Player Note Refer to the di322 Owner s Manual page 10 for additional connection information Connection Legend Data Cable Digital Signal Cable Sensor Keypad Cable RS232 Cable Power Control Cable Ground Wire Audio Signal Cable AC Power Cords Video Signal Cable Loudspeaker Cable RF Signal Cable 2 conductor shielded with 1 8 inch stereo mini phone plug on each end Connect to AC Outlet SACD CD Tran...

Страница 26: ...i322 Owner s Manual page 11 for additional connection information Connection Legend Data Cable Digital Signal Cable Sensor Keypad Cable RS232 Cable Power Control Cable Ground Wire Audio Signal Cable AC Power Cords Video Signal Cable Loudspeaker Cable RF Signal Cable 2 conductor shielded with 1 8 inch stereo mini phone plug on each end AM FM Tuner Media Player Connect to AC Outlet SACD CD Transport...

Страница 27: ...di322 digital audio decoder ...

Страница 28: ...ction adds aesthetic beauty Combine the di322 with the m330 media server and a315 or a340 amplifiers for a complete system solution The di322 two channel digital audio decoder 2 Chambers Street Binghamton NY 13903 855 326 9816 www wadia com Specifications Frequency Response 0 5dB from 4Hz to 20 000Hz 0 5 3dB from 4Hz to 68 000Hz Source dependent Total Harmonic Distortion 0 002 Variable Output Level...

Отзывы: