background image

15

Remote Control until the Front Panel Display will 
indicate “AUTO POWER OFF,  : ENABLE”. Refer 
to figure 59.

2. Then press and hold the ENTER Push-button a 

second time and the display will then indicate 
“AUTO POWER OFF,  : DISABLE”. Refer to        
figure 60.

3. The Auto Power Off feature is now disabled. To 

re-activate the Auto Power Off feature repeat steps 
1 and 2. 

86%,QSXW2SHUDWLRQDQG'ULYHU,QVWDOODWLRQ

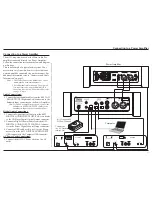
The di122 USB Input provides the capability to play 
back music from a computer when the di122 Rear 
Panel USB Connector is connected to a computer USB 
Connector. Refer to figure 61.

1RWH7KH86%,QSXWLVIRUGLUHFWFRQQHFWLRQWRDFRP

-

SXWHURQO\7RSOD\EDFNPXVLFIURPD86%'ULYH
FRQQHFWWKH86%'ULYHWRDQRWKHU86%3RUWRQ
WKHFRPSXWHUDQGVHOHFWWKH86%'ULYHZLWKWKH
0HGLD3OD\EDFN3URJUDP

2. Press and release the         Push-button on the 

Remote Control to decrease the volume level of 
the Left Channel in one decibel increments (up to 

G%³%$/$1&(/G%5G%´DSSHDUV

on the Front Panel Display. Refer to figures 57   
and 58.

After approximately 3 seconds, the Display returns to 
indicate the Volume Level and Sampling Rate.

Note: The di122 will retain any changes made to the 

&KDQQHO%DODQFHXQWLOLWLVFKDQJHGDJDLQ

'LVSOD\RI6DPSOLQJ5DWH

The Wadia di122 indicates the digital sampling rate 
for all of the Input Sources connected to the Digital 
Audio Decoder. Referring to figure 53, the second line 
of the Front Panel Display is indicating the di122 is 
receiving a DSD128 Digital Signal, via the USB Input. 
When there is no digital signal present for the selected 
Input Source the Front panel Display will indicate “ - - 
-”. Refer to figure 50.

$XWR3RZHU2II

The di122 incorporates an Auto Power Off Feature, 
which can automatically place the Digital Audio 
Decoder into the Power Saving Standby/Off Mode. 
This occurs approximately 2 hours after there has 
been an absence of user activity. User activity includes 
changes to any of the Operation Functions such as 
source selection, volume adjustment, etc. If it is 
desirable to disable the Auto Off Power Save Feature 
perform the following steps:

1. Press and hold the ENTER Push-button on the 

  A U T O   P O W E R   O F F

    :   D I S A B L E

Figure 60

  A U T O   P O W E R   O F F

    :   E N A B L E

Figure 59

Figure 61

  I N P U T :   U S B

        1 9 2 k H z

The di122 USB Input is compatible with PC 

&RPSXWHUVXVLQJ0LFURVRIWŠ:LQGRZVŠ9LVWD63
:LQGRZV63DQG:LQGRZV63,WLVDOVRFRP

-

patible with Apple® Macintosh® Computers using 
OS-10.9 Mavericks or later.

When using a PC Computer with Windows, a spe-

cial Wadia USB Audio Software Driver needs to be 
installed on the PC Computer. The driver needs to be 
installed before connecting the di122 USB Input to the 
USB Port on the computer.

Note: If an Apple Macintosh computer is used with the 

GLQRDGGLWLRQDOGULYHULVUHTXLUHG

The Wadia USB Audio Windows Driver is avail-

able for download from the Wadia Web Site:

KWWSZZZ:DGLDFRPHQXVSURGXFWVGL

Under “Products” select “Wadia di122” then 

scroll down to the bottom of the Wadia di122 to the 
“DOWNLOAD AREA”. Select the “WADIA di122 
PC DRIVER SETUP” and download the PC Windows 
Driver. Follow the instructions below to install the 
Wadia di122 Driver:

3XUSRVH

  To Install the Wadia USB Audio Windows


 Driver for use with Wadia Products with


 an USB-Digital Audio Input.

5HTXLUHPHQWV

 1. A functioning Wadia Product with


an USB-Digital Audio Input.


2. A PC Computer with a

JHQXLQH


Intel

 Main Processor and a 


functioning USB Port.

:LQGRZV9LVWD63:LQGRZV

63RUJUHDWHURU:LQGRZV

63RUJUHDWHU2SHUDWLQJ


    System.


4. An USB Cable with Type A to


Type B Connectors.


B A L A N C E  

L : - 3 0 d B           R : 0 d B

Figure 57

Содержание di122

Страница 1: ...Wadia Digital LLC 2 Chambers Street Binghamton New York 13903 2699 Phone 607 723 3539 Fax 607 724 0549 www wadia com di122 digital audio decoder Owner s Manual ...

Страница 2: ...SHFL HG E WKH manufacturer 12 Use only with the cart stand tripod bracket or WDEOH VSHFL HG E WKH PDQXIDFWXUHU or sold with the apparatus When a cart is used use caution when mov ing the cart apparatus combination to avoid injury from tip over 13 Unplug this apparatus during light ning storms or when unused for long periods of time 5HIHU DOO VHUYLFLQJ WR TXDOL HG VHUYLFH SHUVRQQHO Servicing is req...

Страница 3: ...Perform the following steps to remove the battery from the Remote Control 1 Press the tab and lift up on the Battery Cover and temporarily place it aside Refer to figures 2 and 3 2 Referring to figure 6 press on the bottom edge of the battery to release the battery from the molded battery socket Then remove the bat tery from inside of the Remote Control 2 Remove the CR2032 Battery from its packagi...

Страница 4: ...below have been provided for you to record that information Serial Number _______________________________ Purchase Date _______________________________ Dealer Name ________________________________ Safety Instructions 2 Battery Installation and Replacement 3 Thank You and Please Take a Moment 4 Technical Assistance and Customer Service 4 Table of Contents 4 General Information 5 Connector and Cable...

Страница 5: ... and USB Digital Inputs Other Digital Audio Signal Format Types will cause the Audio Outputs of the di122 to be muted 5 When discarding the unit comply with local rules or regulations Batteries should never be thrown away or incinerated but disposed of in accordance with the local regulations concerning battery disposal 6 For additional information on the di122 and other Wadia Products please visi...

Страница 6: ... Digital Signals and LW ZLWK D VDPSOLQJ UDWH RI RU 66 LJLWDO WR QDORJ RQYHUWHU The patented SABRE32 HyperstreamTM DAC architec ture and time Domain Jitter Eliminator is a 8 chan nel 32 bit 192kHz Digital to Analog Converter This assures the music is reproduced with a wide dynamic range and extremely low distortion for all Input Sources 3UHFLVLRQ 7UDFNLQJ 9ROXPH RQWURO Volume levels are controlled ...

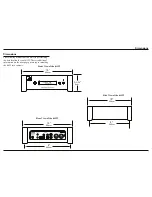
Страница 7: ...he best location for your di122 There is additional information on the next page pertaining to installing the di122 into cabinets Front View of the di122 10 25 4cm Rear View of the di122 VOLUME 35 352 8kHz 3 5 32 8cm 8 20 3cm Side View of the di122 10 25 4cm 10 25 4cm 8 20 3cm ...

Страница 8: ... longest possible operating life for any electronic instrument Do not install the di122 directly above a heat generating device such DV D 3RZHU PSOLILHU OORZ DW OHDVW LQFKHV FP DERYH WKH WRS LQFKHV FP EHORZ WKH ERWWRP DQG LQFK FP RQ HDFK VLGH RI WKH GL VR WKDW DLUIORZ LV QRW REVWUXFWHG OORZ LQFKHV FP RI depth for airflow and cable connections di122 Side View 14 35 6cm di122 Front View 2 5 1cm 1 2 ...

Страница 9: ... Amplifier DIGITAL INPUTS Coaxial Inputs 1 and 2 for source components with a Digital Audio Coaxial Output Connect the supplied AC DC Power Adapter DC Output Connnector TRIGGER IN receives turn on signals from a component and TRIGGER OUT sends turn on signals onto another component Connect to the DC IN 5V connector on the Rear Panel of the di122 Digital Audio Decoder RQQHFW WR D OLYH RXWOHW DOZD V...

Страница 10: ...ontrol Center QWHJUDWHG PSOLILHU RU 5HFHLYHU 1RWH 7KH DODQFHG 2XWSXWV PD EH XVHG LQVWHDG RI WKH 8QEDODQFHG 2XWSXWV LJLWDO XGLR RQQHFWLRQV 2 Connect a Digital Optical Cable from the di122 DIGITAL INPUTS OPTICAL 3 connector to the CD Player Digital Optical Output connector 3 Connect a Digital Coaxial Cable from the di122 DIGITAL INPUTS COAXIAL 1 connector to the Server Digital Coaxial Output connect...

Страница 11: ...bles from the di122 AU 2 2873876 5LJKW DQG HIW FRQQHFWRUV WR WKH balanced Input connectors on the Power Amplifier 1RWH I WZR 3RZHU PSOLILHUV DUH XVHG FRQQHFW WKH XQEDODQFHG 8 2 2873876 5 WR WKH XQEDODQFHG QSXWV RQ WKH VHFRQG PSOLILHU LJLWDO XGLR RQQHFWLRQV 2 Connect a Digital Optical Cable from the di122 DIGITAL AUDIO INPUTS OPTICAL 1 connector to the CD Player Digital Optical Output connector 3 C...

Страница 12: ...H RU WR DGMXVW WKH Volume Level Up or Down Steps thru the Digital Inputs IRU VRXUFH VHOHFWLRQ Press MODE to switch Power On or Off to the di122 Mutes the audio Press and hold to change the Auto Power Off from Enabled to Disabled Press DISPLAY to change from displaying normal status to a single dot Press to adjust the Channel Balance ...

Страница 13: ...ital sources for decoding VOLumn down is also used to select the Volume Adjust Mode and then will decrease the volume level Front Panel DISPLAY indicates the Source Vol ume Level Percentage Sampling Frequency and Operational Functions Front Panel Displays Controls Push buttons and Jack IR Sensor receives commands from a Remote Control Connection for dynamic type headphones for private listening ...

Страница 14: ... or U VOL Push buttons to either increase or decrease the Volume to the desired level When the arrows disappear from the Front Panel Display the Volume Adjust Mode will be deactivated Refer to figures 51 53 and 58 0XWH Press the Remote Control MUTE Push button to mute the Audio Outputs Refer to figure 58 When the Wadia di122 is muted the Front Panel Display will in 3RZHU 2Q DQG 2II The Red LED abo...

Страница 15: ...ure which can automatically place the Digital Audio Decoder into the Power Saving Standby Off Mode This occurs approximately 2 hours after there has been an absence of user activity User activity includes changes to any of the Operation Functions such as source selection volume adjustment etc If it is desirable to disable the Auto Off Power Save Feature perform the following steps 1 Press and hold...

Страница 16: ...ault button to set the just se lected Wadia Icon as the default Refer to figures 7 8 and 9 1RWHV KHQ WKH DGLD 86 XGLR 3URGXFW LV QRW FRQQHFWHG WR RXU FRPSXWHU WKH SUHYLRXV GHIDXOW XGLR HYLFH ZLOO EH VHOHFWHG I RWKHU DGLD 3URGXFWV ZLWK 86 XGLR RQQHFWLRQV DUH DOVR FRQQHFWHG WR WKH QVWDOOLQJ WKH 6RIWZDUH It is important to first install the downloaded software on your computer before connecting the W...

Страница 17: ...XVLF RZHYHU WKLV KLJKHU rate results in consuming larger amounts of stor DJH VSDFH 7KH 6DPSOH 5DWH XVXDOO VKRXOG EH VHW WR PDWFK WKH 6DPSOH 5DWH RI WKH PXVLF UHFRUGLQJ EHLQJ SOD HG EDFN There are many third party Windows Applications EHVLGHV LQGRZV 0HGLD 3OD HU IRU VWHDPLQJ PXVLF from the computer to Wadia di122 USB Input An example of just one of the available applications is JRiver Media Center ...

Страница 18: ...LQFKHV FP HLJKW LV LQFKHV FP LQFOXGLQJ IHHW HSWK LV LQFKHV FP LQFOXGLQJ WKH URQW 3DQHO and Cables HLJKW SRXQGV NJ QHW SRXQGV NJ LQ VKLSSLQJ carton 6KLSSLQJ DUWRQ LPHQVLRQV LGWK LV LQFKHV FP HLJKW LV LQFKHV FP HSWK LV LQFKHV FP LJLWDO QSXW 6LJQDO RUPDW Coaxial and Optical Inputs SPDIF PCM1 USB Input PCM1 DSD LJLWDO QSXW 6DPSOH 5DWH Coaxial and Optical 44 1kHz to 192kHz 24 Bit 86 N WR N LW 3 0 DSD64...

Страница 19: ...s Failure to do this will result in shipping damage Use the original shipping carton and interior parts only if they are all in good serviceable condition If D VKLSSLQJ FDUWRQ RU DQ RI WKH LQWHULRU SDUW V DUH needed please call or write Customer Service Depart ment of Wadia Refer to page 4 Please see the Part List for the correct part numbers Quantity Part Number Description 1 03456100 Shipping ca...

Страница 20: ...nt of its products is the policy of Wadia Digital who reserve the right to improve design without notice Printed in the U S A Wadia Digital LLC 2 Chambers Street Binghamton NY 13903 www wadia com Wadia Digital Part No 04152300 ...

Страница 21: ... that is capable of providing DSD DXD support We will be using JRiver Media Engine 20 XX in this example Steps on set up of PC 1 Download the Wadia PC driver from the di122 of the Wadia website www wadia com di122 downloads PC Driver set up Run setup and install on your computer 2 Install JRiver Media 20 on your computer If you have an older version of JRiver it is a good time to update to version...

Страница 22: ... Wadia Digital 2 Chambers Street Binghamton NY 13903 855 326Ͳ9816 www wadia com ...

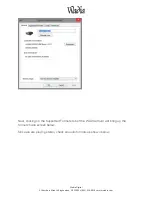
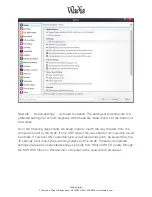
Страница 23: ...adia 1 0 57 driver is not set as default mouse over then click Set Default Default Device JRiver Media Center 20 should be set to Default Communications device When other sound devices are connected to the computer such as an HDMI cable these will appear in the menu and will need to be enabled if used Clicking on Properties will bring up the Digital Output Properties screen below and its tabs Devi...

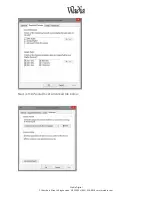
Страница 24: ...Street Binghamton NY 13903 855 326Ͳ9816 www wadia com Next clicking on the Supported Formats tab of the WADIA driver will bring up the format choice screen below Since we are playing stereo check all audio formats as shown below ...

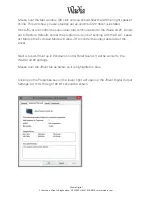
Страница 25: ... Wadia Digital 2 Chambers Street Binghamton NY 13903 855 326Ͳ9816 www wadia com Next is the Wadia Driver Advanced tab below ...

Страница 26: ...to the Wadia di122 simply set to Restore Defaults and let the program do its job of syncing with the DAC Leave at 16 44 as the Exclusive Mode will allow JR to control the output data rate of the driver Next is to set JRiver up in Windows Control Panel Sound It will be similar to the WADIA di122 settings Mouse over the JRiver tab as below so it is highlighted in blue Clicking on the Properties box ...

Страница 27: ...816 www wadia com Level tab should always be set to 100 as shown since listening Volume is set in the WADIA di122 and all bits are always sent from the JRiver player to the di122 for Bit Perfect Asynchronous playback Finally open the Advanced Tab section of JRiver ...

Страница 28: ...nce they do not use the same drivers When the computer is powered up it will recognize the device and driver needed as long as the driver has been previously installed on the computer If you are listening to a streaming feed like YouTube JRiver should be on but not playing music as it will then process the streaming feed automatically The next section will cover the settings in the JRiver Media En...

Страница 29: ...ustment page The left hand side AUDIO tab should be checked so the adjustments to the Audio Device section of the program are listed The first selection made needs to be the Digital Output under Audio Device Selecting Digital Output will list all of the USB audio drivers on the computer Please check WADIA DIGITAL USB Driver 1 0 57 WASAPI This is the correct driver that matches the di122 If it does...

Страница 30: ...g adjustments are being made to match the way the data from the computer is sent to the di122 If only ONE type of file was used for all music this would be simple If however ANY audio file type and all resolutions are to be played then the JR settings must match the switching cadence of the di122 These recommended settings are based on extended testing using files from 16bit 44kHz CD quality throu...

Страница 31: ...ding in any way Output Format will allow the actual playback resolution bit rates to be set which also determines the file types that can be played All other tabs in this left hand list can be used but this will result in the loss of Bit Perfect playback which for maximum fidelity is the goal of these adjustments B Clip Protection should be checked as this will prevent digital overload which can p...

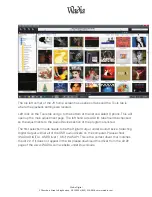
Страница 32: ...hot above is of a normal 16 bit 44 1 CD rip to the HD playing At the bottom of the page the actual peak level is showing 20 which goes up and down as the volume changes in the course of the song playing Internally JRiver is processing this CD file at 44 1KHz and 64 bits The 64bit Internal processing allows Volume Leveling mentioned above since the maximum music file size of 24 bits is far exceeded...

Страница 33: ...di122 1 DSP Output format was set above 2 Bitsreaming YES DSD if DSD files will be played if not can be left to NO 3 Prebuffering 6 seconds recommended 4 Play silence at startup for hardware synchronization second 5 Check Play Files from memory instead of disk Note This will pull the music from the solid state memory instead of the spinning disc drive which is more precise ...

Страница 34: ...the tracks are the same resolution they will switch like a normal CD 2 Use gapless for sequential album tracks Check Note this is for albums that are gapless like Dark Side of The Moon etc Seek Smooth normal Stop Immediate Pause Immediate At the bottom of the Options page open the Advanced tab Set Live playback latency Minimum This will prevent sync audio sync issues when streaming video content ...

Страница 35: ...ooth playback using the Wadia di122 with music stored on or streamed from a computer Please refer to the JRiver Wiki Help forum for detailed advice and information on JRiver operation Additional questions on the Wadia di122 may be sent to Wadia Tech Support at www wadia com Contact Us Thank you Wadia Tech Support RC 2 11 15 ...

Страница 36: ...di122 digital audio decoder ...

Страница 37: ... di122 also features a high powered headphone output making it versatile choice for any listening experience The di122 two channel digital audio decoder 2 Chambers Street Binghamton NY 13903 855 326 9816 www wadia com Specifications Frequency Response 0 5dB from 20Hz to 20 000Hz Total Harmonic Distortion 0 005 Variable Output Level 0 4 0Vrms Unbalanced 0 8 0Vrms Balanced Signal To Noise Ratio A Wei...

Отзывы: