TOOL SERVICE
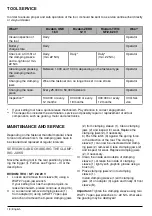
In order to ensure proper and safe operation of the tool, it should be sent to a service centre either directly
or via your dealer.
What?
Rivdom ONE
16 V
Rivdom ZERO
12 V
Rivdom TWO/
SF/2.8 20 V
Who?
Visual inspection of
the tool
Daily
Operator
Battery
charge state
Daily
Operator
Check on a firm fit of
the clamping sleeve
and re-tighten at min.
22 Nm
Daily
(min. 22 Nm)
Daily*
Daily*
(min. 22 Nm)
Operator
Cleaning and greasing
the clamping mecha-
nism
Between 1,000 and 10,000, depending on the fastener type
Operator
Changing the clamping
jaws
When the fastener can no longer be set in one stroke
Operator
Changing the nose-
piece
Every 25,000 to 50,000 fasteners
Operator
Inspection**
100,000 or every
12 months
300,000 or every
18 months
300,000 or every
12 months
VVG Ser-
vice
* If your setting tool has a quick-release mechanism. Pay attention to correct engagement.
** The inspection includes the examination, service and possibly repair or replacement of all tool
components, such as gearing, motor and electronics.
MAINTENANCE AND SERVICE
Depending on the fastener mandrel material, shear
force and surface finish, the clamping jaws have to
be cleaned and replaced at regular intervals.
SERVICING AND CHANGING THE CLAMP-
ING JAWS
Move the setting tool to the rear position by press-
ing the trigger (I). Further, see Figure I – IV or the
description:
RIVDOM TWO / SF / 2.8 20 V
I Loosen and remove front sleeve (B) using a
WAF 27 open-jaw wrench.
If your setting tool has the optional quick-re-
lease mechanism, please continue at step II b).
II a) Loosen and remove clamping sleeve (1)
from adapter (3) using a WAF 17 open-jaw
wrench and remove the 3-piece clamping jaws
(2) from clamping sleeve (1). Clean clamping
jaws (2) and inspect for wear. Replace the
clamping jaws (2), if necessary.
b) Push the latch (3) against the spring force
in the direction of the tool. The clamping
sleeve (1) can now be unscrewed and clamp-
ing jaws (2) removed. Clean clamping jaws (2)
and inspect for wear. Replace clamping jaws
(2), if necessary.
III Clean the inside and outside of clamping
sleeve (1). Grease the inside of clamping
sleeve (1) lightly with graphite grease using a
brush (4).
IV Place clamping jaws (2) into clamping
sleeve (1).
Install clamping sleeve (1) with clamping
jaws (2) on adapter (3) again and finally fit front
sleeve (B).
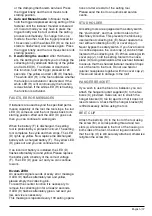
Important:
Tighten the clamping sleeve using two
WAF 17 open-jaw wrenches to ~22 Nm, otherwise
the gearing may be destroyed!
18 | English
Содержание 320.210.000.000
Страница 2: ...2 h l2 d B C D E A I H G F O M L l1 b ...
Страница 3: ... 3 C P 1 4 3 2 B 3 2 1 B 3 1 2 IV III I II K J B B Rivdom ZERO Rivdom ONE TWO SF 2 8 ...
Страница 233: ......


