background image

8

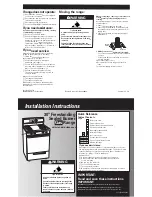
BUMPER BAR INSTALLATION (RANGES ON CASTERS ONLY)

There are 2 sets of bumper bars packaged separately and placed inside the oven compartment for shipping.  Bumper
bars must be installed on the side(s) of the convection oven that is placed near a combustible wall during operation.

1.

Remove bumper bars from the oven cavity and unwrap.

2.

Using a 

5

16

" socket and socket driver, attach bumper bar to the side(s) of the oven nearest the combustible wall.

Note that there are predrilled bumper bar mounting holes supplied on the sides and back of the oven (Fig. 1).

Fig. 1

LEVELING

Full Body Ranges

Using a carpenter's level placed on top of the range, adjust the feet so the range is level from front to back and from
side to side.

Masonry Base/Toe Base

Using a carpenter's level, ensure that the base where the range will be installed is level.  If the base is not level, it
must be levelled before installing the range.

ELECTRICAL CONNECTIONS

WARNING:

  ELECTRICAL AND GROUNDING CONNECTIONS MUST COMPLY WITH THE APPLICABLE

PORTIONS OF THE NATIONAL ELECTRICAL CODE AND/OR OTHER LOCAL ELECTRICAL CODES.

WARNING:

  DISCONNECT ELECTRICAL POWER SUPPLY AND PLACE A TAG AT THE DISCONNECT SWITCH

TO INDICATE THAT YOU ARE WORKING ON THE CIRCUIT.

Bring conduit containing the proper supply wire (size and type in accordance with latest edition of the National
Electrical Code ANSI/NFPA-70) to the range through the 2" hole located in the bottom of the range.  On modular
ranges and expando units, the conduit enters the range through the clearance hole located in the back of the range.
Use wire suitable for 75°C on ranges carrying more than 80 amps.

Connect the supply leads to the terminal block and the green grounding lead to the labeled ground lug.

PL-40033-1

Bumper Bar
Mounting
Location

Bumper Bar

Mounting

Location

Содержание VEX

Страница 1: ...RT COMPANY P O BOX 696 LOUISVILLE KY 40201 0696 TEL 502 778 2791 INSTALLATIONAND OPERATION MANUAL FOR ELECTRIC HEAVY DUTY RANGES MODELS VR VS VM VEX VMXAND VRC VR SERIES FORM 30820 6 93 Formerly 11268...

Страница 2: ...2...

Страница 3: ...y performance The manufacturer suggests that you thoroughly read this entire manual and carefully follow all of the instructions provided DESCRIPTION PAGE INDEX 3 VULCAN RANGE CONFIGURATIONS 4 GENERAL...

Страница 4: ...VS2 VR3 VR6 VM3 VM6 VS3 VS6 VR5 VM5 VS5 VR4 VM4 VS4 VR3 VR6 VM3 VM6 VS3 VS6 SHOWN WITH OPTIONAL HIGH SPEED ELEMENTS VR7 VS7 VM7 VRC SERIES VS SERIES VULCAN RANGE CONFIGURATIONS VR1C VR2C VR3C VR6C VR5...

Страница 5: ...5 VEX1 VMX1 VMX3 VEX3 VMX2 VEX2 VM1 VM2 VULCAN RANGE CONFIGURATIONS PL 51130 2...

Страница 6: ...t center and right VM4 6 91 2 dia round French hot plates VM5 36 wide griddle with front grease trough VM6 2 91 2 dia round French hot plates at left and 2 12 x 24 all purpose plates at center and rig...

Страница 7: ...n option All VR and VRC ranges with full size ovens VS cabinet base or VM modular ranges will have two drawers in the front of the range under the cooking top area The left hand drawer is a baffled gr...

Страница 8: ...the range will be installed is level If the base is not level it must be levelled before installing the range ELECTRICAL CONNECTIONS WARNING ELECTRICAL AND GROUNDING CONNECTIONS MUST COMPLY WITH THE A...

Страница 9: ...34 36 N A VR3 6 7 VB73 26 7 7 7 11 8 28 34 34 N A VS VM1 2 5 VB73 21 5 11 5 18 29 29 44 VS VM3 6 7 VB73 20 5 11 4 16 29 27 42 VR4 VB73 24 7 6 7 10 8 27 30 33 N A VS VM4 VB73 18 4 10 4 14 25 25 38 VR...

Страница 10: ...EN 3 PHASE LOAD NOMINAL AMPS PER LINE WIRE TOTAL KW PER PHASE 3 PHASE 1 PHASE KW 220 380V 240 415V MODEL CONN X N Y N Z N X Y Z X Y Z X Z VR1C 2C 5C 22 6 2 6 2 9 6 33 25 33 34 26 34 34 60 VR1C 2C 5C V...

Страница 11: ...VTM6 element rated at 5 KW Indicator light with without VEX2 VEX6 VMX2 next to thermostat is ON when thermostat trough VMX6 VR2C VR6C calls for heat and goes OFF when VS2 VS6 desired temperatire is re...

Страница 12: ...dampened with a grease solvent Wipe with a clean damp cloth then dry thoroughly Seasoning The cast iron surface plates must be seasoned To do this grease top then turn element switches to LO or therm...

Страница 13: ...n using rack and deck at the same time rotate foods halfway through cooking cycle When baking on the rack it may be necessary to set the bottom 3 heat switch at HI Preheat oven Set top and bottom 3 he...

Страница 14: ...e 3 heat switches be set to the HI position in order to preheat the oven to the desired temperature it is necessary for some baking products to turn the 3 heat switch controlling the top elements to t...

Страница 15: ...d parts with a damp cloth Stubborn soils may be removed with a detergent Rinse thoroughly and dry with a soft clean cloth Never use abrasive cleaners scrapers or steel wool on stainless steel parts 5...

Отзывы: