background image


21

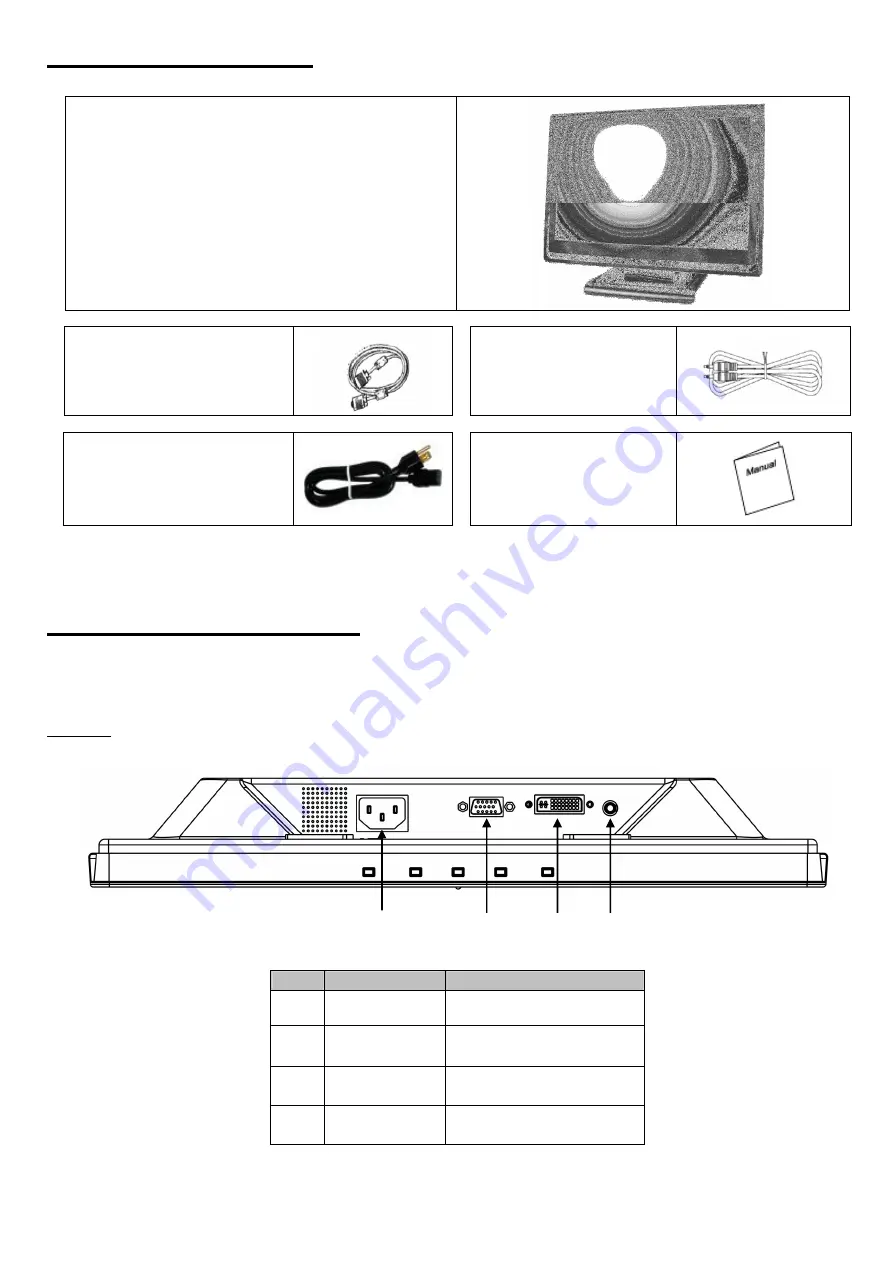
Contenidos de Paquete


Monitor LCD TFT 19” 


Cable de Señal Externo 

Univ15   pin D-sub   

(RGB Analógico)i 


Conectador de Audio: 

estéreo


Cordón de Alimentación 


Manual de Usuario 


Configuración de Hardware 

Use el monitor LCD cuidadosamente. Apague el monitor LCD y la computadora antes de instalarlo. Siga las 

instrucciones de instalación paso a paso. 
 
Entradas 


NO. 

Terminal 

Function 


Entrada CC 

Entrada de alimentación de 

CC 100~240V, 50/60HZ 


Entrada VGA 

Se conecta al puerto VGA 

de la PC 


Entrada DVI 

Se conecta al puerto DVI de 

la PC 


Audio 

Entrada de audio 

Содержание 11009588

Страница 1: ...escreen Flat Panel TFT LCD Monitor Item Number 11009588 Installation User s Manual All brand names and trademarks are the property of their respective owners Important Notice Please read this manual carefully ...

Страница 2: ...ference to radio communication However there is no guarantee that interference will not occur in television reception which can be determined by turning the equipment on and off Interference may be corrected by one or more of the following measures Reorient or relocate the receiving antenna Increase the separation between the equipment and the receiver Plug the equipment into an outlet on a circui...

Страница 3: ...ontents 6 Hardware Setup 6 Hardware Installation 7 Menu Control Buttons 8 On Screen Display OSD Menu Mode 9 10 Display Modes 11 Specifications 12 Troubleshooting your DVI monitor connection 13 Troubleshooting 14 Maintenance Cleaning Your Monitor 15 Service Procedure 16 Warranty 17 ...

Страница 4: ...r an extended period of time 6 Do not attempt to service this product yourself as opening or removing the cover may expose you to potential electric shock Only a qualified technician should service this product 7 Do not touch the screen directly with your fingers as it may damage the screen the oil from your skin is difficult to remove 8 Do not apply pressure to the screen the LCD is very delicate...

Страница 5: ...ching the Base to the Monitor STEP 1 STEP 2 Detaching the Base off the Monitor STEP 1 STEP 2 Press the two tabs toward the inside of the base While holding the two tabs in pull the base away from the pedestal ...

Страница 6: ...er s Manual Hardware Setup Handle the LCD monitor with care Turn off the monitor s and computer s power before beginning setup Follow the installation instructions step by step Input NO Terminal Function AC In AC power input 100 240V 50 60HZ VGA connector To PC VGA connector DVI connector To PC DVI connector Audio In Audio input ...

Страница 7: ...ition your LCD monitor so that you can see all of the connection ports on the bottom of the monitor 2 A Plug one end of the 15 pin D Sub signal cable into the VGA connector on the monitor and plug the other end of the cable into the 15 pin D Sub connector at the rear of your PC B OR if you are using a DVI signal cable not included plug one end into the DVI connector on the monitor and plug the oth...

Страница 8: ... on 1 Decrease an option value 2 To enter a submenu 1 Increase an option value 2 To enter a submenu Press the button to auto adjust horizontal and vertical position to default settings Press the button to display the OSD menu in OSD mode this button will also navigate to the submenus Select the desired option menu by pressing the or button Push the or button to decrease or increase the value of th...

Страница 9: ...se or press any key to wake it and return to working mode 4 Please check input diagrams and make sure the monitor has been properly configured OUT OF RANGE This warning indicates that the input signal frequency does not match those supported by this monitor For this model horizontal frequency must be in the range of 30 80 KHz and vertical frequency in the range of 60 75 Hz Please make sure your in...

Страница 10: ...RATION Adjusts the time that the OSD menu remains on the screen AUTO COLOR Adjusts the color to the optimal settings for your computer automatically SOURCE Selects the Video source as either VGA or DVI CONTRAST Adjusts the difference between light and dark areas PHASE Adjusts the phase of PLL clock CLOCK Adjusts the frequency of the PLL clock H POSITION Adjusts the horizontal position of the displ...

Страница 11: ...erference on your screen while you are modulating your PC or OSD is normal 3 For best quality resolution remember to upgrade your video card driver and choose a mode listed in the table 4 Other modes not listed on the table may not be supported 5 You may use the power management on your computer It may provide a longer service life for the product To Adjust Your Display Properties 1 Set the resolu...

Страница 12: ...V 56 75Hz Digital DVI D Compatibility PC Up to 1440X900 60Hz Non interlaced Connector RGB Analog DVI Audio Power D sub 15 pins DVI D Stereo Phone Jack RCA Jack L R A C Socket Power Voltage Consumption Power saving mode 100 240V 50 60Hz universal via internal power supply Active 45Watt Max Standby 3Watt Internal Speaker x2 Stereo User Interface LED Indicator Active Blue Off Turn off Operating Condi...

Страница 13: ...ated on the front of the monitor The video card in your computer may have two types of connectors VGA and DVI Digital Visual Interface Many cards have both types of connectors Plug the monitor cable into the appropriate port and tighten the thumbscrews to secure it Some cards simply give you a choice of connectors while others can run both DVI and VGA monitor at the same time Read the video card s...

Страница 14: ...rranty card for Tech Support information 3 No image A Make sure the power button is ON B Check whether the LCD monitor and computer power cords are connected and that there is a supply of power 4 No Signal Input A Check the signal connection between the computer and LCD monitor 5 Fuzzy image A Adjust the Phase through the OSD menu 6 Image too bright Image too dark A Adjust the Brightness and Contr...

Страница 15: ...tor these chemicals can damage the LCD monitor 5 Screen To clean your LCD monitor screen or case use water or a mild cleaner as listed above Moisten a soft clean cloth or if possible use a special screen cleaner sheet or a solution suitable for static electricity application Using any cleaner other than water or a mild cleaner may damage your monitor and will not be covered under the warranty 6 St...

Страница 16: ...e complete unit including power cord and adapter in the original carton to the address below Include a copy of the original receipt for proof of purchase within one year Write the RA number on the outside of the package Packages without RA numbers will not be accepted The LCD monitor is fragile Use extreme care when handling and packaging the unit The purchaser is responsible for any shipping char...

Страница 17: ...ts or revenues cost of temporary replacements loss of data loss of equipment or use of equipment or any claims by third parties After 14 days from purchasing the product please call the phone number mentioned below to obtain service DO NOT RETURN THIS PRODUCT TO THE STORE A customer representative will give you a return authorization number RA number allowing you to ship product to the service cen...

Страница 18: ...nfiguración de Hardware 21 Instalación de Hardware 22 Menú de Botones de Control 23 Modo del Menú OSD 24 25 Modos de Imagen 26 Especificaciones 27 Solucionando Problemas de la conexión DVI 28 Solucionando Problemas 29 Mantenimiento Limpiando Su Monitor 30 Procedimiento de Reparación 31 Garantía 32 ...

Страница 19: ...la va usar por un tiempo extendido 6 No intente de repara este producto usted mismo abriendo la tapa lo expone a una sacudida eléctrica Solamente un técnico cualificado puede repara este producto 7 No toque la pantalla directamente con sus dedos puede dañar la pantalla el aceite de su piel es bien difícil de remover 8 No aplique presión a la pantalla el monitor LCD es bien delicado 9 Mantenga el m...

Страница 20: ... la Base al Monitor 1 PASO 2 PASO Separando la Base al Monitor 1 PASO 2 PASO Oprima las dos fichas hacia dentro de la base Mientras usted esta sosteniendo las fichas hacia dentro hale la base fuera del pedestal ...

Страница 21: ...Configuración de Hardware Use el monitor LCD cuidadosamente Apague el monitor LCD y la computadora antes de instalarlo Siga las instrucciones de instalación paso a paso Entradas NO Terminal Function Entrada CC Entrada de alimentación de CC 100 240V 50 60HZ Entrada VGA Se conecta al puerto VGA de la PC Entrada DVI Se conecta al puerto DVI de la PC Audio Entrada de audio ...

Страница 22: ... de consultar el manual o la manufactura de su tarjeta de video para saber las compatibilidades de su tarjeta 1 Cuidadosamente de le la vuelta a su monitor LCD para poder ver todos los puertos de conexión 2 A Conecte un extremo del Cable de 15 pernos D SUB al conectador de 15 pernos VGA y el otro extremo del cable a la portilla de la computadora Asegure que los tornillos estén bien asegurados B O ...

Страница 23: ...endido 1 Disminuye el valor de la opción 2 Seleccionar el submenú 1 Aumenta el valor de la opción 2 Seleccionar el submenú Oprima el botón para ajustar automáticamente la posición vertical y horizontal a la configuración de omision Oprima el botón para mostrar el menú principal del OSD este botón tambien funciona para navegar el menú OSD Seleccione la opcion del menú deseado oprimiendo el botón o ...

Страница 24: ...cualquier tecla para despertarlo y regresar al modo de trabajo 4 Por favor inspeccione los diagramas pertinentes y asegúrese que el monitor haya sido configurado adecuadamente OUT OF RANGE Esta advertencia indica que la frecuencia de la señal de entrada no corresponde con la soportada por el monitor Para este modelo la frecuencia horizontal debe estar entre 30 80 Khz y la frecuencia en el rango en...

Страница 25: ...la posición vertical de la imagen RESET Retorna a la configuracion de omision de factoria TEMP DE COLOR Ajusta la temperatura del color del píxel ROJO Ajusta la temperatura del color rojo VERDE Ajusta la temperatura del color verde AZUL Ajusta la temperatura del color azul LENGUAJE Selecciona el idioma del menú OSD MISCELANEO No lo llevara a la salida del menu Yes lo llevara a los sub menus del me...

Страница 26: ...D es normal 3 Para adquirir una mejor resolución actualice el driver de su tarjeta de video y escoja un modo de la lista que ve en la tabla arriba 4 Cualquier otro modo que no este en la tabla no es compatible 5 Usted puede usar la administracion de enrgia en su computadora Esto puede expander la vida de este producto Para ajustar la configuracion del Modo de Imagen 1 Configure la resolución haga ...

Страница 27: ...tal DVI D Compatibilidad PC Mayor de 1440X900 60Hz No interlazado Connectador RGB Análogo DVI Audio Energía D Sub 15 broches DVI D Toma de corriente de telefóno estéreo RCA toma de corriente L R Zócalo de A C Energía Voltaje Consumo Modelo de reservación de energía 100 240V 50 60Hz universal vía fuente de alimentación interna Activo 45Watt Max En espera 3Watt Altavoz Interna x2 Estéreo Interfaz de...

Страница 28: ...os tipos de conectadores VGA y DVI Muchas tarjetas tienen ambos tipos de conectadores Conecte el cable del monitor en el puerto apropiado y apriete los tornillos de seguridad para asegurarlo Algunas tarjetas simplemente le dan una opción de conectador mientras que otras pueden funcionar con ambos tipo de monitor de DVI y de VGA al mismo tiempo Lea la documentación de la tarjeta video para descubri...

Страница 29: ...ormación de Soporte Técnico 3 No tiene imagen en la pantalla A Asegúrese que el botón de alimentación este encendido B Cheque si el cordón de alimentación del monitor y de la computadora esté conectados y si están recibiendo alimentación 4 No tiene señal A Cheque la conexión de la señal entre el monitor LCD y la computadora 5 Imagen Borrosa A Ajuste el Fase por el Menú OSD 6 La imagen está muy osc...

Страница 30: ...stos químicos pueden dañar su monitor LCD 5 Pantalla Para limpiar la pantalla de su monitor LCD use agua o un detergente suave Cuidadosamente agarre una tela suave y limpia que este húmeda para limpiar la pantalla Si es posible use un limpiador especial de pantalla o un detergente conveniente contra la aplicación estática de electricidad 6 Almacenando la Unidad Si el monitor no sé esta usando por ...

Страница 31: ...ié la unidad completa incluyendo el cordón de alimentación y el adaptador a la siguiente dirección Incluya una copia del recibo original como prueba de compra entre un ano Escriba él numero RA en la parte de afuera del paquete Los paquetes sin él numero RA no se aceptan y serán retornados El monitor LCD es frágil Use mucho cuidado cuando lo este empacando la unidad El comprador es responsable por ...

Страница 32: ...o temporario perdida de datos perdida del equipo o del use del mismo o cualquier reclamo de tercera partes Después de los primeros 14 días de compra del monitor favor de llamar al siguiente numero para obtener servicio NO DEVUELVA ESTE MONITOR A LA TIENDA DONDE LO ADQUIRIO Un representante de atencíon al cliente le dara un numero de autorizacion de devolucíon numero RA que le permitira enviar el p...

Страница 33: ...R1610MA9WFR01 V1 0 ...

Отзывы: