1.
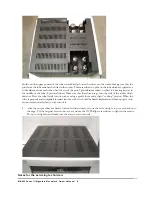
If any of the tubes should become loose, please follow the procedure to remove the covers on the cage so you
can access the tubes.
2.
Remove the protective cage on the top deck of the amplifier. The cage is mounted with two screws on the
front panel, three screws on each side of the amplifier, and three screws on the back panel. Loosen the screws
and lift the wire cage slowly and carefully. Do not let the cage touch or hit any of the tubes inside the amplifier.
Keep the cage and the screws in a separate place while you’re working on the amplifier.
3.
Make sure that the amplifier is not connected to the power outlet and not turned on. Use your fingers to hold
onto the upper portion of the tube towards its tip. Gently rock the side of the tube to see if there is any
movement in the tube. If there is any movement, that means the tube has come loose. Press the tube firmly
into its socket, using a gentle force and a slight “rocking” motion.
4.
Repeat the above test for the rest of the tubes. There are a total of eight output tubes and one input tube and
one driver tube in each amplifier.
5.
After you’ve examined all the tubes to make sure that they are firmly placed in their sockets, you can put the
protective cage back onto the amplifier unit. Tighten the screws to make sure that the cage is securely fastened
to the unit.
Connecting Your Amplifier to your system
The MB-450 amplifier is a self-contained unit with the amplifier and power supply sections on one chassis. The
amplifiers are setup to work in this configuration, and under no circumstances should you attempt to take the amplifier
apart.
1.
Connect all source components (e.g. CD, Tuner, Tape, DAT, Turntable etc.) to the preamplifier.
Follow the
instructions on your preamplifier and source component manuals to connect these components together.
2.
Connect the power amplifier to the output channel of the preamplifier.
The interconnect cable between the
amplifier and the preamplifier links the input channel of the power amplifier to the output channel of the preamplifier.
The amplifier, which is going to drive the left channel of your speaker system, should be connected to the left output
channel of the preamplifier. The same applies to the right channel amplifier.
3.
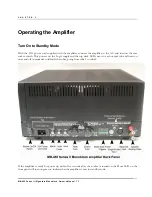
Select the input connector type
. The amplifier supports two types of input connectors – the RCA input and the
balanced (XLR) input. Place the interconnect cable firmly into the input jack which matches the type you have, and
firmly insert the interconnect cable into the input jack marked “INPUT”. Locate the switch marked XLR on one side
and RCA on another side near the input jack and flip the switch to the side that matches the cable you are using. For
example, if you use RCA input cables, flip the switch to the RCA side and plug the RCA cable to the connector marked
RCA.
4.
Connect the loudspeaker cable to your amplifier
.
There is a pair of speaker binding posts in the back of your
amplifier for connecting your loudspeaker cables to the amplifier. These binding posts are marked “+” and “-“
above the posts and “SPEAKER” in between the posts. For example, if you are connecting the monoblock
amplifier to the left channel speaker, you should take the speaker cable connected to the left speaker and connect it
to the amplifier’s “SPEAKER” binding posts. First, loosen the binding posts on the amplifier. Take the red
connector from the speaker cable and connect it to the “SPEAKER” binding post marked “+”. Take the black
connector from the speaker cable and connect it to the “SPEAKER” binding post marked “-“. Tighten the
binding posts by hand, using a nut-driver (3/8”). Be careful not to over-tighten the posts, as you may break the
connection inside the amplifier if you exert too much force on the posts.
MB-450 Series III Signature Monoblock Owner’s Manual
9


