background image

14

INSTallaTION SeTUP

TelePHONe INSTallaTION

You can choose to connect the telephone base for desktop usage or 
wall mounting.

NOTES

Use only the adapters provided.
Make sure the electrical outlets are not controlled by wall switches.

The adapters are intended to be correctly oriented in a vertical or loor 

mount position. The prongs are not designed to hold the plug in place if it 
is plugged into a ceiling, under-the-table or cabinet outlet.

TIP

If you subscribe to digital subscriber line (DSL) high-speed Internet 

service through your telephone line, make sure you install a DSL ilter 

(not included) between the telephone line cord and telephone wall jack. 
Contact your DSL service provider for more information.

CONNeCT THe TelePHONe baSe


Содержание VS150 TWIN

Страница 1: ...For product support please call 1 300 369 193 Model VTech VS150 TWIN User guide ...

Страница 2: ...anted visitors or even the kids coming and going Small or medium sized pets in the home This sensor s smart enough to know the difference and won t trouble you NOTE Your VS150 can pair up to 30 sensor simultaneously SenSor alert When someone has arrived home or you have forgotten to close the door you will receive audible and text sensor alerts for example DOOR is open on the handset and telephone...

Страница 3: ...bject is open for more than 5 10 or 20 minutes if you have set a reminder for alerts The monitored object is open or a motion is detected during a certain period of time if you have set a time range for alerts How you receive alerts Audible and text sensor alerts on handset and telephone base Receive a remote alert call on your mobile phone or to other external numbers you have programmed ...

Страница 4: ...om got eVerYtHIng The package contains the following items VTech VS150 handset x 2 VTech VS150 telephone base Telephone base power adaptor Telephone line cord and adaptor Battery compartment cover x 2 NiMH rechargeable battery pack x 2 Charger Charger power adaptor Sensor unit x 2 Magnet unit x 2 AAA batteries for sensor x 4 Spacers for sensor unit x 2 Spacers for magnet unit x 8 Double side mount...

Страница 5: ...ventilation To protect them from overheating these openings must not be blocked by placing the product on a soft surface such as a bed sofa or rug This product should never be placed near or over a radiator or heat register This product should not be placed in any area where proper ventilation is not provided This product should be operated only from the type of power source indicated on the marki...

Страница 6: ...one other than cordless during an electrical storm There is a remote risk of electric shock from lightning 14 Avoid using a telephone other than cordless during an electrical storm There is a remote risk of electric shock from lightning 15 Do not use the telephone to report a gas leak in the vicinity of the leak Under certain circumstances a spark may be created when the adapter is plugged into th...

Страница 7: ...ll metallic objects such as pins or staples To avoid injury do not place the handset where such objects can be picked up SAVE THESE INSTRUCTIONS Battery CAUTION Use only the batteries indicated in this user s guide There may be a risk of explosion if a wrong type of battery is used for the handset Use only the supplied rechargeable battery or replacement battery pack BT183342 BT283342 for the hand...

Страница 8: ...ge for alerts 38 Turn off the alert 39 Alert notiications 40 Test sensor signal strength 41 Reset sensor alerts 42 Rename the sensor 42 Pet immunity 43 Sensor log 44 Conigure your telephone 45 Navigating the menus 45 Handset menu layout 46 Base menu layout 47 Keystroke table 48 Set date and time 49 Time format 50 Date format 50 Quiet mode 51 Flash time 51 Calling Number Display announce 52 Telepho...

Страница 9: ...ing message for calls without number 68 Sound settings 70 Key tone 70 Ringer tone 70 Ringer volume 71 Temporary ringer silencing 71 About the built in answering system and voicemail service 72 Set your built in answering system 73 Turn the answering system on or off 73 Default announcement 74 Record your own announcement 74 Play the announcement 75 Reset the announcement 75 Set number of rings 76 ...

Страница 10: ...ervice 86 Retrieve voicemail 86 Turn off the new voicemail indicators 86 ECO mode 87 General product care 87 Storage 87 How many telephone can you have 90 Customer service and product warranty 91 Technical Speciications 93 Disclaimer 94 ...

Страница 11: ...1 oVerVIew HandSet oVerVIew 1 CHARGE light 2 LCD display a b i k l m c d e f g h j n o ...

Страница 12: ...ist Press and hold to insert a dialing pause while entering a number 5 TALK RECALL Make or answer a call Press to activate Recall for use with Telephone Network Services such as Call Waiting during a call 6 Dialing keys Press to enter numbers or characters 1 Press and hold to set or dial your voicemail number Press to add a space when entering names Press and hold to enter quiet mode setting menu ...

Страница 13: ...l Press and hold while talking in a OTB call 11 MENU SELECT While in a menu press to select an item or save an entry or setting 12 VOLUME Review the phonebook when the phone is not in use Increase the listening volume during a call or message playback Scroll up while in a menu or in the phonebook call log or redial list Move the cursor to the right when entering numbers or names VOLUME CALLS Revie...

Страница 14: ... handset is ringing Press and hold to erase the missed call indicator while the phone is not in use Press to return to the previous menu or press and hold to return to idle mode without making changes 14 ARM DISARM Press to turn of off the sensor alert system 15 Microphone ...

Страница 15: ...status when the phone is not in use While in a menu press to select a menu item or save an entry or setting Left Soft key Press to enter the sensor mode menu when the phone is not in use Press to return to the previous menu i j k r q n o p l m t u v w s x a b c d e f g h ...

Страница 16: ... return to the previous menu or press and hold to return to idle mode without making changes 4 HANDSET LOCATOR Press to page all system handsets 5 RECALL Press to activate Recall for use with Telephone Network Services such as Call Waiting during a call 6 VOL Adjust the volume during a call or message playback Adjust the telephone base ringer volume when the phone is not in use 7 OTB One touch Bro...

Страница 17: ...dsets Flashes slowly when another telephone sharing the same line is in use 12 LCD display 13 REDIAL PAUSE Press repeatedly to review the redial list Press and hold to insert a dialing pause while entering a number 14 MENU SELECT While in a menu press to select an item or save an entry or setting 15 PHONEBOOK Review the phonebook when the phone is not in use Scroll up while in a menu or in the pho...

Страница 18: ...ete all digits or characters Delete the playing message Press twice to delete all previously reviewed messages when the phone is not in use 20 SKIP Skip to the next message 21 REPEAT Press to repeat a message Press twice to play the previous message 22 PLAY STOP Play messages Stop playing messages 23 SPEAKER Make or answer a call using the speakerphone Hang up a call 24 MUTE Mute the microphone du...

Страница 19: ... button Press to open the battery compartment case 2 Back cover 3 Pair button When the sensor has been deregistered from the telephone base press and hold to enter the registration mode 4 LED light Flashes red when the sensor is in the registration mode 5 Battery compartment case P P ...

Страница 20: ... calls Message you have new message in the built in answering system Search bar icon appears when in the phonebook menu ECO mode activates automatically to reduce power consumption when the handset is within range from the telephone base New caller ID log displays in caller ID log when there are new missed calls MISSED Missed alerts in sensor log displays in sensor log when there are new missed al...

Страница 21: ... turned on and is set to receive alerts remotely Alerts are received at the stored telephone numbers telePHone baSe IconS Ringer off the telephone base ringer is off New voicemail you have new voicemail from your telephone service provider Answering system on the answering system is turned on to answer calls Message you have new message in the built in answering system Search bar icon appears when...

Страница 22: ...ew missed alerts from sensors L Armed local mode displays when the sensor alert system is turned on and is set to receive alerts locally Alerts are received on the telephone system only R Armed remote mode displays when the sensor alert system is turned on and is set to receive alerts remotely Alerts are received at the stored telephone numbers lIgHtS oVerVIew HandSet lIgHtS On when the handset sp...

Страница 23: ...ashes slowly when another telephone sharing the same line is in use ANSON OFF On when the answering system is turned on MUTE On when the telephone base microphone is muted PLAY STOP On when the answering system is playing a message Flashes slowly when there is a new message SenSor lIgHt LED light On for five seconds when the sensor is successfully registered to the telephone base Flashes slowly wh...

Страница 24: ...rrectly oriented in a vertical or loor mount position The prongs are not designed to hold the plug in place if it is plugged into a ceiling under the table or cabinet outlet TIP If you subscribe to digital subscriber line DSL high speed Internet service through your telephone line make sure you install a DSL ilter not included between the telephone line cord and telephone wall jack Contact your DS...

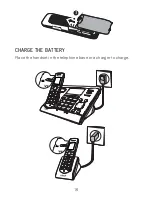
Страница 25: ...15 CONNeCT THe CHaRgeR INSTall THe HaNDSeT baTTeRY NOTES Use only the supplied battery If the handset will not be used for a long time disconnect and remove the battery to prevent possible leakage 1 ...

Страница 26: ...16 CHaRge THe baTTeRY Place the handset in the telephone base or a charger to charge 3 ...

Страница 27: ...tors Battery status Action The screen is blank or shows Place in charger and lashes The battery has no charge or very little charge The handset cannot be used Charge without interruption at least 30 minutes The screen shows Low battery and lashes The battery has enough charge to be used for a short time Charge without interruption at least 30 minutes The screen shows VTECHX The battery is charged ...

Страница 28: ...nplug the telephone base power adapter from the wall outlet before mounting your telephone on a wall Follow the steps below to mount your telephone on a wall Press down on the tabs on the wall mount bracket on the telephone base to release it from tabletop orientation Rotate the wall mount bracket down to wall mount position and then push it into the telephone base until it clicks into place 1 2 ...

Страница 29: ...d wall plate Slide the bracket down until it clicks securely in place Connect the power adapter to the telephone base and an electrical outlet not controlled by a wall switch Slide the telephone base down until it clicks securely in place Bundle the telephone line cord and power adapter cord neatly with twist ties if necessary 3 4 ...

Страница 30: ...are pre installed in your contact sensor To activate the batteries Pull the battery tab off from the sensor to activate the batteries The garage door sensor powers on NOTE The contact sensors in your package are already pre registered to the telephone base REMOVE BEFORE USE ...

Страница 31: ...sed X is open and then The SENSOR light on the telephone base will turn red 2 Combine the sensor unit with the magnet unit will disappear from the handset and the telephone base The SENSOR light on the telephone base will turn off CONTACT X refers to the sensor s name X refers to the system assigned number of the sensor Open Closed X is open Missed alert icon and open icon will be displayed Missed...

Страница 32: ...teps to test the sensor s signal strength and then exit the sensor setup mode 3 Open the door window or medicine cabinet again to make sure you receive alerts NOTES If No signal or Weak signal message is displayed in sensor setup mode or if there is no alert announcement when you open the door move the base closer to the mounting location or move the sensor closer to the base Use adhesive tape to ...

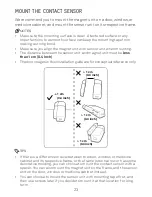
Страница 33: ...e less than 1 cm 0 4 inch The door images in this installation guide are for conceptual reference only TIPS If there is a difference in level between the door window or medicine cabinet and its respective frame or the frame is too narrow or has some decorative molding you can choose to mount the contact sensor with a spacer You can also mount the magnet unit on the frame and the sensor unit on the...

Страница 34: ... magnet unit onto the door With Spacer Mount with tape You can choose one out of the four spacers with suitable height and then add it to the magnet unit 1 Push the spacer towards the magnet unit until it securely clicks into place 2 Attach mounting tape C onto the rectangular area at the rear side of the spacer 3 Stick the magnet unit onto the door c c ...

Страница 35: ...y compartment case 2 Use a pencil to mark two holes on the desired location on the frame with the aid of the two holes on the back cover of the sensor unit Then remove the back cover and drill two holes into the frame 3 Align the holes on the back cover with the holes on the frame Tighten the small screws into the holes to secure the back cover onto the frame 4 Push the battery compartment case ba...

Страница 36: ...ame 2 Align the holes on the spacer with the holes on the frame Tighten the large screws into the holes to secure the spacer onto the frame Mount sensor unit onto spacer 3 Press the latch button on the sensor unit to open the battery compartment case from the back cover 4 Align the holes on the battery compartment back cover with the holes on the mounted spacer 5 Tighten the small screws into the ...

Страница 37: ...reens show Battery backup mode OR If there is no handset placed in the telephone base after the power goes out all handsets show Out of range OR no power at base and Put HS on base to power base alternatively Place any handset with enough charge in the telephone base Its screen shows Powering base Don t pick up All other handset screens show Battery backup mode NOTE A handset which does not have e...

Страница 38: ...e telephone base when this mode is on Using other system handsets Recommended Operate the handsets the same way as usual except the answering system and sensor alert system which will be disabled Using the handset placed in the telephone base To maximize the operating time you are not advised to use this handset If you do have to use it make sure you do not lift it from the telephone base All oper...

Страница 39: ... and minute 3 Press or on the handset or CALLS orPHONEBOOK on the telephone base to scroll to choose AM or PM and then press SAVE to save After the setting for the date and time the screen will display Start voice guide to set up Answering system now SeT aNSweRINg SYSTem THROUgH VOICe gUIDe This feature assists you to do the basic setup of the answering system You can follow the voice guide to rec...

Страница 40: ...information OPeRaTINg RaNge This handset and telephone base can communicate over only a certain distance which can vary with the locations of the telephone base and handset the weather and the layout of your home or ofice When the handset is out of range the handset displays Out of range OR no power at base and Put HS on base to power base alternately If there is a call while the handset is out of...

Страница 41: ...r s menu to check the current sensor status You can choose to receive alert calls at other telephones Store up to three desired telephone numbers for example your mobile phone number and ofice phone number into the telephone base You will be notiied even when you are away from home When you receive the remote alert call from the telephone base you can choose to listen to the sound in your house or...

Страница 42: ...isplay on the handset and telephone base The SENSOR light on the telephone base will also remain on To arm the sensor alert system When the sensor alert system is in disarmed mode press ARM on the handset or telephone base to turn on the sensor alerts In idle mode the handset and telephone base will display L when the current sensor mode is Local or R when the current sensor mode is Remote NOTES T...

Страница 43: ...ne system Receive calls at up to 3 desired phones Remote Local Press MODE on the handset or telephone base when idle Press or on the handset or CALLS orPHONEBOOK to scroll to choose Remote or Local and then press SELECT to select or save When Remote is chosen and no telephone number has been previously set you will be prompted to set the telephone numbers for remote calls NOTES Once Remote mode is...

Страница 44: ...it or entrance delay time for the remote calls so that when a sensor is triggered when you exit or enter your home within the delay time you will not receive the unnecessary remote call For example when you are about to leave home you can set the exit delay time to 5 minutes Once the delay is set you will not receive a remote call even when you open the door within those ive minutes As for the ent...

Страница 45: ...is switched to Armed from the Disarmed Remote mode Press MODE on the handset or telephone base when idle Press or on the handset or CALLS or PHONEBOOK on the telephone base to scroll to choose Remote and then press OPTIONS Press or on the handset or CALLS or PHONEBOOK on the telephone base to scroll to choose Set delay and then press SELECT Press or on the handset or CALLS or PHONEBOOK on the tele...

Страница 46: ...ensors and then press SELECT iii Press or on the handset or CALLS or PHONEBOOK on the telephone base to scroll to the desired sensor and then press SELECT 2 Press OPTIONS to enter the individual sensor menu 3 Press or on the handset or CALLS or PHONEBOOK on the telephone base to scroll until the screen displays the desired feature menu 4 Press SELECT to enter that menu To return to the previous me...

Страница 47: ...n the handset or CALLS or PHONEBOOK on the telephone base to scroll to the desired sensor and then press SELECT 2 Press OPTIONS to enter the individual sensor menu 3 Press SELECT to select Set schedule 4 Press SELECT to select Always on The reminder menu appears 5 Scroll to choose Off 5 minutes 10 minutes or 20 minutes and then press SELECT to save NOTES When you received the alert tone and announ...

Страница 48: ...ess or on the handset or CALLS or PHONEBOOK on the telephone base to scroll to the desired sensor and then press SELECT 2 Press OPTIONS to enter the individual sensor menu 3 Press SELECT to select Set schedule 4 Press or on the handset or CALLS or PHONEBOOK on the telephone base to scroll to choose Time range and then press SELECT If time range has been set previously press EDIT to edit 5 Use the ...

Страница 49: ...the handset or telephone base when idle and then scroll to the desired sensor OR i Press MENU when the phone is not in use ii Press or on the handset or CALLS or PHONEBOOK on the telephone base to scroll to Sensors and then press SELECT iii Press or on the handset or CALLS or PHONEBOOK on the telephone base to scroll to the desired sensor and then press SELECT 2 Press OPTIONS to enter the individu...

Страница 50: ... loggedin sensorlog Allalertson Msg tone Message only Press MENU on the handset or telephone base when idle Press or on the handset or CALLS or PHONEBOOK on the telephone base to scroll to Sensor setup and then press SELECT Press SELECT to select Sensor annc and then press SELECT Press or on the handset or CALLS or PHONEBOOK on the telephone base to scroll to choose All alerts on Msg tone or Messa...

Страница 51: ...on the handset or CALLS or PHONEBOOK on the telephone base to scroll to the sensor you want to test and then press SELECT The screen displays Test signal strength between base and sensor Press NEXT The screen displays Awaiting signal Please wait The screen displays Please trigger your sensor now Trigger your sensor refer to Installation Guide and then press NEXT If the screen displays No signal Pl...

Страница 52: ...enamed the sensor s the name s will not be reset to default The current sensor mode will remain unchanged after reset ReName THe SeNSOR You can create a customized name of up to 15 characters for each sensor The new name will also be announced in announcement alerts Press SENSORS on the handset or telephone base when idle and then scroll to the desired sensor OR i Press MENU when the phone is not ...

Страница 53: ...nter the individual sensor menu 3 Press or on the handset or CALLS orPHONEBOOK to scroll to Pet immunity and then press SELECT 4 Press or on the handset or CALLS orPHONEBOOK to scroll to choose On or Off and then press SELECT You need to trigger the sensor by motion to activate the change of Pet Immunity setting A message to this effect will appear on this handset display AS THE MOTION SENSOR USES...

Страница 54: ... The screen will display Log empty Individual sensor s log You can also access each individual sensor s log for the sensor activities of a single sensor Press SENSORS on the handset or telephone base when idle and then scroll to the desired sensor OR i Press MENU on the handset or telephone base when idle ii Scroll to Sensors and then press SELECT iii Scroll to the desired sensor and then press SE...

Страница 55: ...ng page To enter the main menu of the handset or telephone base 1 Press MENU on the handset or telephone base when idle 2 Press or on the handset or CALLS orPHONEBOOK to scroll until the screen displays the desired feature menu 3 Press SELECT to enter that menu To return to the previous menu press CANCEL To return to idle mode press and hold CANCEL ...

Страница 56: ...Del all calls Announcement Delete all old Record memo Answer ON OFF Voice guide Ans sys setup Call guard Ringers Set date time Block list Calls w o number Ringer volume Ringer tone CND annc Phone setup Sensor setup On Number only Off Time format Date format Clear voicemail Key tone Flash time Reset Sensor annc Check signal Reset alerts Sensors ...

Страница 57: ...guard Announcement Delete all old Record memo Answer ON OFF Voice guide Ans sys setup Block list Calls w o number Ringers Set date time CND annc Ringer volume Ringer tone On Number only Off Phone setup Sensor setup Sensors Time format Date format Clear voicemail Key tone Flash time Reset Sensor annc Add new sensor Reset alerts ...

Страница 58: ...48 keYStroke table ...

Страница 59: ...mp 1 Press MENU on the handset or telephone base when idle 2 Press Press or on the handset or CALLS orPHONEBOOK to scroll to Set date time and then press SELECT 3 Use the dialing keys 0 9 to enter the month date and year and then press NEXT 4 Use the dialing keys 0 9 to enter the hour and minute Press Press or on the handset or CALLS orPHONEBOOK to scroll to choose AM or PM and then press SAVE to ...

Страница 60: ...confirmation tone and the screen returns to the previous menu DaTe fORmaT You can change the date format of the time displayed in idle mode or during date and time setting 1 Press MENU on the handset or telephone base when idle 2 Press or on the handset or CALLS orPHONEBOOK on the telephone base to scroll to Phone setup then press SELECT 3 Press or on the handset or CALLS orPHONEBOOK on the teleph...

Страница 61: ...silenced in quiet mode flaSH TIme The lash time is preset to 100ms If you want to lengthen the lash time you can change the lash time settings Be sure to check with your service provider before make any change 1 Press MENU on the handset or telephone base when idle 2 Press or on the handset or CALLS orPHONEBOOK on the telephone base to scroll to Phone setup then press SELECT 3 Press or on the hand...

Страница 62: ...nirmation tone The handset and telephone base screen show CID Annc ON OFF on all HS BS brielybeforereturningtothepreviousmenu NOTES To use the Calling Number Display Announce feature you must subscribe to Calling Number Display service from your telephone service provider When there are more than four DECT devices registered the telephone system supports Calling Number Display Announce for the irs...

Страница 63: ... telephone base shows the elapsed time as you talk in hours minutes and seconds While entering numbers press and hold PAUSE to insert a dialing pause a p appears aNSweR a Call Press or on the handset on the base or any dialing key 0 9 eND a Call Press OFF on the handset or put the handset to the base or charger OR Press on the base HaNDSeT SPeakeRPHONe During a call press on the handset to switch ...

Страница 64: ... hear the other party but the other party cannot hear you 1 During a call press MUTE on the handset or telephone base The screen displays Muted until the mute function is turned off 2 Press MUTE again to resume the conversation The screen briely displays Microphone ON Call waITINg When you subscribe to call waiting service from your telephone service provider you hear an alert tone if there is an ...

Страница 65: ...y lead to handset deregistration ReDIal lIST The base and each handset store the last 10 telephone numbers dialed When there are already 10 entries the oldest entry is deleted to make room for the new entry To review and dial a number from the redial list 1 Press REDIAL on the handset or telephone base when idle 2 Press or on the handset or CALLS orPHONEBOOK on the telephone base to scroll or pres...

Страница 66: ...communication 1 Press OTB on the handset or the base when idle 2 Press or on the handset or CALLS orPHONEBOOK on the telephone base to scroll to a desired device or Group and then press SELECT NOTES Only one device can talk at a time Press and hold OTB while you are talking Release OTB to let the other party respond Intercom Use the intercom features for conversations between two devices 1 Press M...

Страница 67: ... base or any dialing key on the destination device You can now have a private conservation before transferring the call 4 To transfer the call press OPTIONS on the initiating device and then press SELECT to select Transfer aNSweR aN INCOmINg Call DURINg aN INTeRCOm Call If you receive an incoming call during an intercom call there is an alert tone To answer a call press or on the handset or press ...

Страница 68: ... handset or telephone base when idle Press or on the handset or CALLS or PHONEBOOK on the telephone base to scroll to Phone setup and then press SELECT Press or on the handset or CALLS or PHONEBOOK on the telephone base to scroll to Reset and then press SELECT The screen displays Reset to default settings Press YES The screen displays Loading followed by Reset default done and then will return to ...

Страница 69: ...ber up to 30 digits and then press NEXT 5 Use the dialing keys to enter the name up to 15 characters Additional key presses show other characters of that particular key 6 Press SAVE to save While entering numbers and names you can Press DELETE to erase a digit or character Press and hold DELETE to erase the entire entry Press or on the handset or CALLS orPHONEBOOK on the telephone base to scroll t...

Страница 70: ...g keys to start a name search 3 When the desired entry appears Press or on the handset or press on the base to dial eDIT a PHONebOOk eNTRY 1 When the desired entry displays press EDIT 2 Use the dialing keys and BACKSP to edit the number and then press NEXT 3 Use the dialing keys to edit the name and then press SAVE to save DeleTe a PHONebOOk eNTRY 1 When the desired entry displays press DELETE 2 W...

Страница 71: ...book the caller s name stored in the phonebook will be displayed with the number The phone deletes the oldest entry when the log is full to make room for new calls This information is common to all handsets so changes made using any handset are relected in all other handsets If you answer a call before the information appears on the screen it does not show in the call log history Missed calls are ...

Страница 72: ...ephone number is not available the handset may display one of the following explanations UNAVAILABLE Thiscaller snumberisunavailable PRIVATE Thecallerisblockingthetelephonenumber When the list is full and a new call is received the oldest entry will be deleted automatically ImPortant To use a Network Calling Number Display you must irst subscribe to the service from your service provider For more ...

Страница 73: ...ired call log entry displays press SAVE 2 Press SELECT to select Phonebook 3 Use the dialing keys and BACKSP to edit the number and then press NEXT 4 Use the dialing keys to edit the name and then press SAVE to save DeleTe a Call lOg eNTRY When the desired call log entry displays press DELETE DeleTe all Call lOg eNTRIeS 1 Press MENU on the handset or telephone base when idle 2 Press or on the hand...

Страница 74: ...e is not in use Press or on the handset or CALLS orPHONEBOOK on the telephone base to scroll to Call guard and then press SELECT Press SELECT to select Block list Press or on the handset or CALLS orPHONEBOOK on the telephone base to scroll to Add new entry and then press SELECT Enter the number Use the dialing keys to enter the number up to 30 digits 6 Press NEXT to move to the name 7 Use the dial...

Страница 75: ...the desired entry displays press EDIT Use the dialing keys to edit the number and then press NEXT Use the dialing keys to edit the name and then press SAVE to save SaVe a Call lOg eNTRY TO blOCk lIST When the desired call log entry displays press SAVE Scroll to Call guard then press SELECT Use the dialing keys and BACKSP to edit the number and then press NEXT 4 Use the dialing keys to edit the nam...

Страница 76: ...base to scroll to Calls w o num and then press SELECT Press or on the handset or CALLS orPHONEBOOK on the telephone base to scroll to Settings and then press SELECT Press or on the handset or CALLS orPHONEBOOK on the telephone base to scroll to choose Block or Unblock and then press SELECT Press or on the handset or CALLS orPHONEBOOK on the telephone base to scroll to choose Private Unavailable or...

Страница 77: ... or CALLS orPHONEBOOK on the telephone base to scroll to Call guard and then press SELECT Press or on the handset or CALLS orPHONEBOOK on the telephone base to scroll to Calls w o num and then press SELECT Press or on the handset or CALLS orPHONEBOOK on the telephone base to scroll to Call guard annc and then press SELECT Press or on the handset or CALLS orPHONEBOOK on the telephone base to scroll...

Страница 78: ...se to scroll to Calls w o num and then press SELECT Press or on the handset or CALLS orPHONEBOOK on the telephone base to scroll to Call guard annc and then press SELECT Press or on the handset or CALLS orPHONEBOOK on the telephone base to scroll to Annoucement and then press SELECT Press SELECT to select Record annc The handset or telephone base announces Record after the tone Press STOP when you...

Страница 79: ... use Press or on the handset or CALLS orPHONEBOOK on the telephone base to scroll to Call guard and then press SELECT Press or on the handset or CALLS orPHONEBOOK on the telephone base to scroll to Calls w o num and then press SELECT Press or on the handset or CALLS orPHONEBOOK on the telephone base to scroll to Call guard annc and then press SELECT Press or on the handset or CALLS orPHONEBOOK on ...

Страница 80: ...o scroll to choose the desired volume or Off and then press SET to save RINgeR TONe You can choose from different ringer tones Press MENU on the handset or telephone base when idle Press or on the handset or CALLS orPHONEBOOK on the telephone base to scroll to Ringers and then press SELECT Press or on the handset or CALLS orPHONEBOOK on the telephone base to scroll to Ringer tone and then press SE...

Страница 81: ...the volume and then press SET to save NOTE If the handset ringer volume is set to off the handset is silenced for all incoming calls except paging tone To adjust the telephone base ringer volume Press VOL on the telephone base when idle TemPORaRY RINgeR SIleNCINg When the telephone is ringing you can temporarily silence the ringer without disconnecting the call The next call rings normally at the ...

Страница 82: ... messages will not be deleted automatically You have to delete your messages manually Your messages may be automatically deleted after a period of time Contact your telephone service provider for more details Method to retrieve messages When you received new messages displays on both the handset and telephone base XX New msgs displays on the handset and XX New messages displays on the telephone ba...

Страница 83: ...ening to set number of rings before pick up to access remotely and to control the recording time NOTE Your answering machine will answer calls after 10 rings This allows the remote access feature to work turn tHe anSwerIng SYStem on or off The answering system must be turned on to answer and record messages Using the telephone base Press ANS ON OFF on the telephone base to turn the built in answer...

Страница 84: ...ncement or replace it with your own ReCORD YOUR OwN aNNOUNCemeNT You can use the preset announcement to answer calls or replace it with your own recorded announcement It can be up to 90 seconds in length Press MENU on the handset or telephone base when idle Press or on the handset or CALLS orPHONEBOOK on the telephone base to scroll to Answering sys and then press SELECT Press SELECT to select Ann...

Страница 85: ...K on the telephone base to scroll to Play annc and then press SELECT ReSeT THe aNNOUNCemeNT Press MENU on the handset or telephone base when idle Press or on the handset or CALLS orPHONEBOOK on the telephone base to scroll to Answering sys and then press SELECT Press SELECT to select Announcement Press or on the handset or CALLS orPHONEBOOK on the telephone base to scroll to Reset annc and then pr...

Страница 86: ...telephone base when idle Press or on the handset or CALLS orPHONEBOOK on the telephone base to scroll to Answering sys and then press SELECT Press or on the handset or CALLS orPHONEBOOK on the telephone base to scroll to Ans sys setup then press SELECT Press or on the handset or CALLS orPHONEBOOK on the telephone base to scroll to of rings then press SELECT Press or on the handset or CALLS orPHONE...

Страница 87: ...EBOOK on the telephone base to scroll to Answering sys and then press SELECT Press or on the handset or CALLS or PHONEBOOK on the telephone base to scroll to Ans sys setup then press SELECT Press or on the handset or CALLS orPHONEBOOK on the telephone base to scroll to Msg alert tone then press SELECT Press or on the handset or CALLS orPHONEBOOK on the telephone base to scroll to choose On or Off ...

Страница 88: ...r 1 minute Press SELECT to save and you hear a conirmation tone VOICe gUIDe This feature is an alternative way for you to do the basic setup of the answering system You can follow the voice guide to record your own announcement set the number of rings and the message alert tone Press MENU when the phone is not in use Press or on the handset or CALLS orPHONEBOOK on the telephone base to scroll to A...

Страница 89: ...e is not in use Options during playback Press VOL to adjust the speaker volume Press SKIP to skip to the next message Press REPEAT to repeat the message currently playing Press REPEAT twice to listen to the previous message Press X DELETE to delete the playing message The system advances to the next message Press STOP to stop Press to call back the caller if the message contains Calling Number Dis...

Страница 90: ...essages Options during playback Press VOLUME or VOLUME to adjust the message playback volume Press SKIP to skip to the next message Press REPEAT to repeat the message Press REPEAT twice to listen to the previous message Press DELETE to delete the message Press to call back the caller if the message contains Calling Number Display information The telephone base screen displays Call back with the Ca...

Страница 91: ...hen the phone is not in use On the handset scroll to Answering sys and then press SELECT OR On the telephone base press SELECT to select Answering sys Scroll to Delete all old and then press SELECT Press YES to conirm You hear a conirmation tone Call INTeRCePT If you want to talk to the person whose message is being recorded press or on the handset or press on the base 1 2 3 4 ...

Страница 92: ... is 19 You can use this preset code or set your own Dial your telephone number from any touch tone telephone When the system plays your announcement enter the two digit security code Enter the one of the remote commands or to listen to message or change the sensor mode Command Description To listen to messages see page 83 To change the sensor mode see page 84 1 2 3 ...

Страница 93: ...e following remote commands to do the answering system operations Command Description 1 Play all messages 2 Play new messages 3 Delete the current message during playback 33 Delete all old messages 4 Repeat the current message during playback 5 Stop 5 Hear a list of remote commands 6 Skip to the next message during playback 7 Record a new announcement 8 End the call 0 Turn the answering system on ...

Страница 94: ...e settings RemOTe aCCeSS CODe A two digit security code is required to access the answering system remotely from any touch tone telephone The preset code is 19 You can set the code from 00 to 99 Press MENU when the phone is not in use Press or on the handset or CALLS orPHONEBOOK on the telephone base to scroll to Answering sys and then press SELECT Press or on the handset or CALLS or PHONEBOOK on ...

Страница 95: ... answering system is busy recording a message and you receive another call the second caller can leave a voicemail message Set your answering system to answer calls at least two rings earlier than your voicemail service is set to answer For example if your voicemail service answers after six rings set your answering system to answer after four rings Some voicemail service providers may program the...

Страница 96: ... to all new voicemail messages the indicators on the handset turn off automatically TURN Off THe New VOICemaIl INDICaTORS If you have retrieved your voicemail while away from home and the handset still displays the new voicemail indicators use this feature to turn off the indicators NOTE This feature turns off the indicators only it does not delete your voicemail messages Press MENU when the hands...

Страница 97: ...d if it gets wet Do not use the handset outdoors in the rain or handle it with wet hands Do not install the telephone base near a sink bathtub or shower Electrical storms Electrical storms can sometimes cause power surges harmful to electronic equipment For your own safety take caution when using electrical appliances during storms Cleaning your telephone Your telephone has a durable plastic casin...

Страница 98: ...ive Try installing a new telephone line cord If changing telephone line cord does not help the wall jack or the wiring to this wall jack may be defective Contact your telephone service provider You may be using a new cable or VoIP service the existing telephone jacks in your home may no longer work Contact your service provider for solutions I get noise static or weak signals even when I m near th...

Страница 99: ...telephone base I cannot receive alerts when the monitored garage door or contact sensor is opened Make sure the sensor alert system is in armed mode and that L or R appears on the display If the icon does not appear on the display press ARM to turn on the sensor alert system For various alerts behavior please check the settings of alert notiications page 40 and individual sensors alert schedule pa...

Страница 100: ...h HOw maNY TelePHONe CaN YOU HaVe All items of telephone equipment have a Ringer Equivalence Number REN which is used to calculate the number of items which may be connected to any other telephone line Your VS150 TWIN has a REN of 0 1 A total REN of 3 is allowed if the total REN of 3 is exceeded the telephone may not ring With different telephone types there is not guaranteed of ringing even when ...

Страница 101: ...rom defects if defects are caused by an accident misuse abuse improper installation or operation vermin infestations lack of reasonable care unauthorised modiication loss of parts tampering or attempted repair by a person not authorised by VTech or where the product has been damaged by lightning or a mains power surge To make a claim under this Voluntary Product Warranty you must call the TecHelp ...

Страница 102: ...Waverley 3149 IMPORTANT NOTE THIS IS NOT A PRODUCT RETURN OR SERVICE ADDRESS PLEASE CONTACT TECHELP BY PHONE OR EMAIL FOR PRODUCT AND WARRANTY SUPPORT NO LIABILITY WILL BE ACCEPTED BY VTECH FOR PRODUCTS RETURNED TO THIS ADDRESS UNDER THIS VOLUNTARY PRODUCT WARRANTY Phone number 1300 369 193 Email address tcpsupport_au vtech com Statutory Rights Our goods come with guarantees that cannot be exclude...

Страница 103: ... Actual operating range may vary according to environment conditions at the time of use Power requirements Handset 2 4V 400mAH Ni MH battery pack Telephone base 6V DC 600mA Charger 6V DC 400mA Sensor 2xAAA alkaline batteries Memory Phonebook 50 memory locations up to 30 digits and 15 characters Call log 50 memory locations up to 24 digits and 15 characters ...

Страница 104: ...poses When properly installed and maintained this product may in some cases reduce the risk of burglary ire robbery or other events occurring without providing an alarm VTech is not responsible for losses injury or damage resulting from the use of this product ...

Страница 105: ...ed trademark of VTech Holdings Limited Copyright 2015 for VTech Telecommunications Australia All rights reserved Printed in China Version A FOR MORE INFORMATION CALL TECHELP ON 1300 369 193 OR EMAIL TCPSUPPORT_AU VTECH COM ...

Отзывы: