background image

Getting Started 


Baby unit installation 


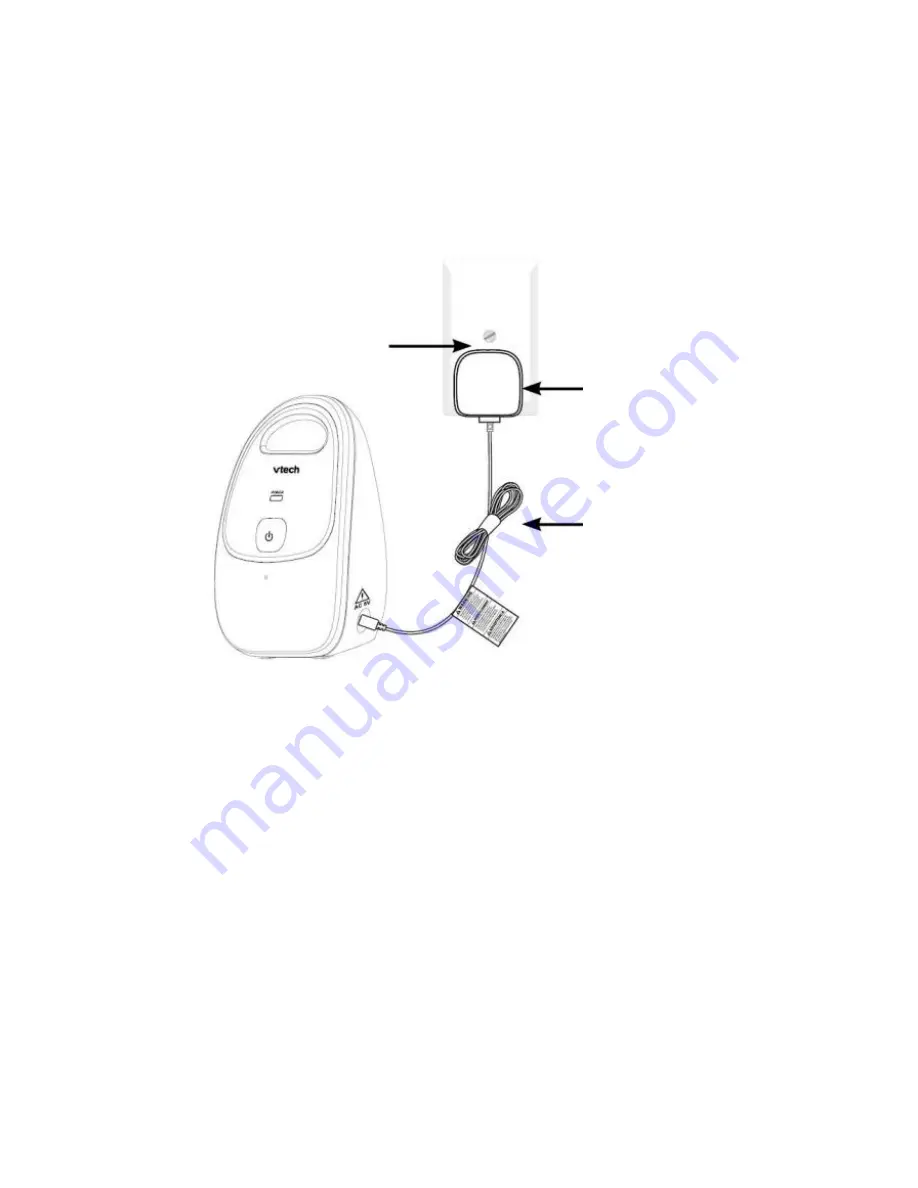
Install the baby unit as shown below. 


Make sure the wall socket is switched on. 


Power outlet 


Baby unit 
power adaptor 


Self-adhesive 
strap 


1.  Choose either power adaptor that comes with the package. 

Insert the DC plug of the power adaptor into the DC socket 
on the side of the baby unit. 

 
2.  Connect the other end of the power adaptor to a suitable 

mains power socket. 

Содержание Safe & Sound BM1000

Страница 1: ...Safe Sound Digital Audio Baby Monitor BM1000 User guide Model BM1000 ...

Страница 2: ... safety instructions on the next page of this manual This manual has all the feature operations and troubleshooting necessary to install and operate your new VTech product Please review this manual thoroughly to ensure proper installation and operation of this innovative and feature rich VTech product ...

Страница 3: ...e product Baby unit power adaptor Input 100 240V AC 50 60 Hz output 6V DC 450 mA Parent unit power adaptor Input 100 240V AC 50 60 Hz output 6V DC 450 mA 8 The power adaptors are intended to be correctly oriented in a vertical or floor mount position The prongs are not designed to hold the plug in place if it is plugged into a ceiling under the table or cabinet outlet 9 Unplug this product from th...

Страница 4: ...cility Opening or removing parts of the product other than specified access doors may expose you to dangerous voltages or other risks Incorrect reassembling can cause electric shock when the product is subsequently used 19 You should test the sound reception every time you turn on the units or move one of the components 20 Periodically examine all components for damage 21 Be aware of possible loss...

Страница 5: ...s out of reach of the baby at least 1 metre away from the baby or cot to avoid a possible strangulation hazard 5 Never place the baby unit inside the baby s cot or playpen 6 Never cover the baby unit or parent unit with anything such as a towel or a blanket 7 Other electronic products may cause interference with your audio monitor Try installing your audio monitor as far away from these electronic...

Страница 6: ...unit lights 6 Positioning and operating range 7 Position the audio monitor 7 Test your audio monitor before use 7 Using your baby monitor 8 Power the baby unit on or off 8 Power the parent unit on or off 8 Adjust speaker volume 8 Appendix 9 Troubleshooting 9 Customer service Product warranty 12 Technical specifications 14 Disposal of batteries and product 15 ...

Страница 7: ... in the event warranty service is necessary Parent unit Parent unit 2 batteries for BM1000 PU battery parent unit compartment cover User guide Baby unit 2 power User guide BM1000 BU adaptors To purchase replacement batteries or power adaptors please call our Consumer Services Department on 01235 546810 from UK or 44 1235 546810 outside UK ...

Страница 8: ...ket is switched on Power outlet Baby unit power adaptor Self adhesive strap 1 Choose either power adaptor that comes with the package Insert the DC plug of the power adaptor into the DC socket on the side of the baby unit 2 Connect the other end of the power adaptor to a suitable mains power socket ...

Страница 9: ...al operation in case of a power outage Power outlet Parent unit power adaptor Self adhesive strap To set up the parent unit 1 Remove the battery compartment cover 2 Install the supplied rechargeable batteries into the battery compartment matching the polarity markings and 3 Replace the battery compartment cover 4 Insert the DC plug of the other power adaptor into the DC socket on the side of the p...

Страница 10: ...tting started Baby unit overview 1 2 3 1 _ Power indicator On when the baby unit is switched on Off when the baby unit is switched off 2 _ On off Press and hold to turn on off the baby unit 3 _ Microphone ...

Страница 11: ... 2 _ Power Indicator Light 3 _ Low Battery Charging Indicator Light 4 _ Volume down Press to decrease the speaker volume 5 _ On off Press and hold to turn on or off 6 _ Speakerphone 7 _ Volume up Press to increase the speaker volume 8 _ Belt Clip 9 _ Battery Compartment Cover ...

Страница 12: ... detected Red lights indicate a higher level of sound is detected More lights turn on when the sound level detected increases Off when the parent unit is off On in green steadily when the parent unit is on and is linked to the baby unit Flashes in green when there is no link between the baby unit and parent unit On in red steadily when the parent unit is charging Flashes in red when the battery is...

Страница 13: ...ore use It is important to test the audio monitor when it is installed initially and at regular times thereafter Test your parent unit and baby unit if they have not been used for a long time or you suspect they are defective To test your audio monitor 1 Place the parent unit and the baby unit in the same room to test the product Make sure the baby unit is at least 1 5 metres away from the parent ...

Страница 14: ...he Power indicator light turns on Press and hold for 2 seconds again to turn off the parent unit The Power indicator light turns off Adjust speaker volume There are five volume levels Level 1 to Level 5 plus volume off on parent unit When adjusting speaker volume the sensitivity indicator LED s light s up briefly to indicate the current volume level To adjust the speaker volume Press to increase a...

Страница 15: ... unit Allow up to one minute for the baby unit and the parent unit to synchronise Charge the batteries in the parent unit for up to 12 hours If the parent unit batteries are completely depleted they may take up to 30 minutes to charge the parent unit before it can be used for a short time Remove the batteries and then install them again If that still does not work it may be necessary to purchase n...

Страница 16: ... unit away from large obstructions such as walls and doors Remove the batteries and then install it again Turn on the baby unit and the parent unit Allow up to one minute for the parent unit and the baby unit to synchronise Other electronic products may cause interference with your audio monitor Try installing your audio monitor as far away from these electronic devices as possible wireless router...

Страница 17: ...eps Move the parent unit closer to the baby unit but not less than 1 5 metres The parent unit may be out of range The batteries may be running low connect the parent unit to the mains power with the supplied power adaptor for recharging The baby unit may be switched off Press and hold key to switch on the baby unit Common cure for electronic equipment If the audio monitor is not responding normall...

Страница 18: ...Appendix Customer service Product warranty IMPORTANT Please retain this booklet with your sales receipt as proof of the date of purchase 12 ...

Страница 19: ...04LB0600045 Input 100 240VAC 50 60Hz 150mA Output 6VDC 450mA Parent unit Ten Pao S004LB0600045 Input 100 240VAC 50 60Hz 150mA Output 6VDC 450mA Use only battery listed below Battery Information Parent unit GPI VTHC043C00 2 x 1 2V AAA size 400mAh NiMH CORUN Ni MHAAAJ400 2 x 1 2V AAA size 400mAh NiMH Transmitting Max 250mW power Operating 10 C to 39 C temperature 14 ...

Страница 20: ...es that can be damaging to the environment and human health The chemical symbols Hg Cd or Pb where marked indicate that the battery contains more than the specified value of mercury Hg cadmium Cd or lead Pn set out in Battery Directive 2006 66 EC The solid bar indicates that the product was placed on the market after 13th August 2005 Help protect the environment by disposing of your product or bat...

Страница 21: ......

Отзывы: