background image

Basic Operation

Phonebook Operation

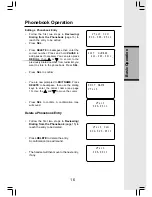
Editing a Phonebook Entry

Follow the first two steps in Reviewing/
Dialing from the Phonebook
 (page 15) to
reach the entry to be edited.

Press  SEL.

Press DELETE to backspace then enter the
correct number. Press and hold PAUSE  to
add pauses if necessary.You can also press

REDIAL, then 

 or 

  to scroll to the

previously dialed number from redial list you
want to store in the phonebook. Press SEL.

Press  SEL  to confirm.

You are now prompted to EDIT NAME. Press
DELETE to backspace, then use the dialing
keys to enter the correct name (see page

15). Use the 

 and 

 to move the cursor.

Press  SEL  to confirm. A confirmation tone
will sound.

Delete a Phonebook Entry

Follow the first two steps in Reviewing/
Dialing from the Phonebook
 (page 15) to
reach the entry to be deleted.

Press DELETE to delete the entry.
A confirmation tone will sound.

The handset will then move to the next entry,
if any.

EDIT NUMBER
 800-595-9511_

VTech Com

800-595-9511

VTech

595-9511

VTech Com

800-595-9511

16

VTech

595-9511

EDIT NAME
VTech

Содержание MI6821 - Cordless Telephone With Caller Id

Страница 1: ...USER S MANUAL ...

Страница 2: ...on 11 Making Calls 11 Answering Calls 11 Speakerphone Operation 11 Flash Function 11 Redial Funtion 11 Temporary ringer adjustments 12 Mute Function 12 Intercom Call 12 Call Forward 13 Call Transfer 13 Conference Call 13 Base Operation 13 Phonebook Operation 14 Storing a New Entry 14 Reviewing Dialing from the Phonebook 15 Editing a Phonebook entry 15 Delete a Phonebook entry 16 Editing a Phoneboo...

Страница 3: ...eset to English 21 Message Waiting 21 Clear Message waiting 21 Dial Type preset to Tone 21 ADVANCED OPERATION 23 HEADSET OPERATION 23 ADDITIONAL INFORMATION 24 Maintenance 24 In Case Of Difficulty 25 Warranty Statement 27 FCC ACTA and IC Regulations 29 Table Of Contents ...

Страница 4: ... HELP Our representatives are here to help you with any questions concerning the operation of this product available accessories or any other related issues Call Toll Free 1 800 595 9511 In Canada Call 1 800 267 7377 or visit our website at www vtechphones com ...

Страница 5: ...voltage points or short out parts that could result in a risk of fire or electric shock Never spill liquid of any kind on the product 10 To reduce the risk of electric shock do not disassemble this product but take it to an authorized service facility Opening or removing parts of the base or handset other than specified access doors may expose you to dangerous voltages or other risks Incorrect rea...

Страница 6: ... designed to familiarize you with this cordless telephone We strongly recommend you read the manual before using your phone VTECH COMMUNICATIONS INC Customer Service 1 800 595 9511 In Canada call VTech Telecommunications Canada Ltd at 1 800 267 7377 BEFORE USING YOUR mi 6821 SYSTEM CAREFULLY PEEL OFF THE PROTECTIVE FILM COVERING THE DISPLAYS 2 ...

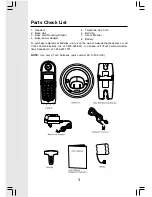
Страница 7: ... VTech Communications Inc at 1 800 595 9511 In Canada call VTech Telecommunica tions Canada Ltd at 1 800 267 7377 NOTE Use only VTech batteries part number 89 1323 00 00 5 Telephone Line Cord 6 Belt Clip 7 User s Manual 8 Battery 1 Handset 2 Base Unit 3 Base Wall Mounting Bracket 4 Base Power Adapter 3 ...

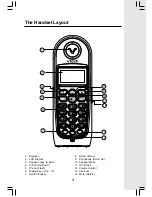
Страница 8: ...ck 2 5mm 4 CID Scroll Down 5 Phone Flash 6 Dialing Keys 0 9 7 Redial Pause The Handset Layout 8 Select Menu 9 Phonebook Scroll Up 10 Speakerphone 11 Off Clear 12 Volume Control 13 Intercom 14 Mute Delete 1 2 4 5 6 8 7 10 12 13 9 11 3 14 4 ...

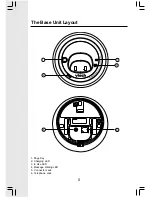
Страница 9: ...1 Page Key 2 Charging LED 3 In Use LED 4 Message Waiting LED 5 Connector Jack 6 Telephone Jack The Base Unit Layout 3 4 1 2 5 6 5 ...

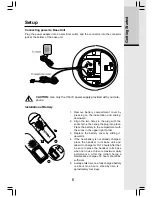
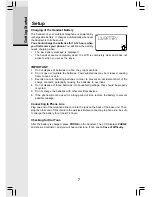
Страница 10: ... in the compartment with the wires in the upper right corner 3 Replace the battery cover by sliding it upwards 4 If the new battery is not already charged place the handset in its base unit and allow it to charge for 10 12 hours After that be sure to place the handset in its base when not in use to insure maximum daily performance After the initial charge a maintenance charge of 8 hours should be ...

Страница 11: ...n handling batteries in order to prevent an accidental short of the charge contacts potentially causing the batteries to overheat 4 Do not dispose of these batteries into household garbage they should be properly recycled 5 Do not charge the batteries with other electrical devices 6 If the phone will not be used for a long period of time remove the battery to prevent possible leakage Connecting to...

Страница 12: ...ension hand sets away from electronic equipment such as personal computers television sets and microwave ovens 3 In locations where there are multiple cordless telephones separate the base units as far away as possible 4 Install your telephone equipment away from heat sources and sunlight 5 Avoid excessive moisture dust or extreme cold Getting Started 8 ...

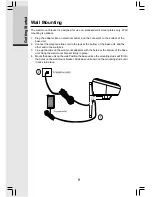
Страница 13: ...ine cord to the jack at the bottom of the base unit and the other end to the wall jack 3 Line up the tabs on the wall mount adapters with the holes at the bottom of the base unit Snap the wall mount bracket firmly in place 4 Mount the base unit on the wall Position the base unit so the mounting studs will fit into the holes on the wall mount bracket Slide base unit down on the mounting studs until...

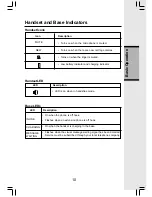
Страница 14: ...On when the phone is off hook Flashes when an extension phone is off hook On when the handset is charging in the base Flashes when the visual message waiting signal has been detected Service must be subscribed through your local telephone company IN USE CHARGING MESSAGE WAITING Base LEDs LED Description Handset Icons Icon Description MUTE NEW LED is on when in handsfree mode Handset LED LED Descri...

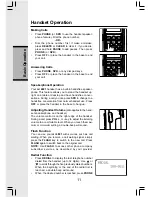
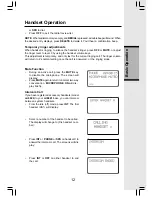
Страница 15: ...FF or place the handset in the base to hang up Adjusting Handset Volume also applies to the hand set speakerphone and headset The volume control is on the right edge of the handset During a call press VOL or key to adjust the listening volume to a comfortable level When you reach the maxi mum or minimum setting a double beep will sound Flash Function You can use your mi 6821 with services such as ...

Страница 16: ...HONE or SPK on handset X to answer the intercom call The screens will dis play Handset Operation or SPK to dial Press OFF to exit the redial review list NOTE When redial memory is empty and REDIAL is pressed a double beep will sound When the desired entry displays press DELETE to delete it You ll hear a confirmation beep Temporary ringer adjustments When handset is ringing to silence the handset s...

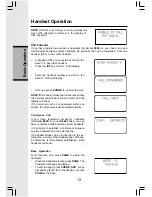
Страница 17: ... at the handset or press PAGE at the base A handset HS1 on an external call can for ward it to any other handset Press the INT key on HS1 it will display Enter the handset number you wish to for ward to HS1 will display HS2 can press PHONE to answer the call NOTE If HS2 does not respond in about one minute the external call will be returned to HS1 and the display will show If the returned call is ...

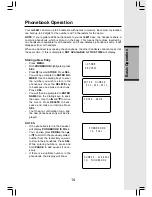
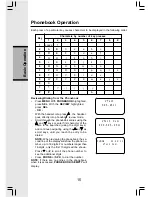
Страница 18: ...elect STORE Press SEL You will be prompted to ENTER NU MBER Use the dialing keys to enter the number you wish to store in the phonebook Press the DELETE key to backspace and make corrections Press SEL You will then be prompted to ENTER NAME Use the dialing keys to spell the name Use the and to move the cursor Press DELETE to back space and make corrections Press SEL You ll hear a confirmation tone...

Страница 19: ...directly into phonebook review mode Scroll through the phonebook entries using the and keys or enter first character of the name to be searched using the digit keys and continue navigating using the or as scroll keys until you reach the entry to be dialed NOTE When reviewing the phonebook the se cond line of the display will show the phone nu mber up to 16 digits For numbers longer than 16 digits ...

Страница 20: ...ok Press SEL Press SEL to confirm You are now prompted to EDIT NAME Press DELETE to backspace then use the dialing keys to enter the correct name see page 15 Use the and to move the cursor Press SEL to confirm A confirmation tone will sound Delete a Phonebook Entry Follow the first two steps in Reviewing Dialing from the Phonebook page 15 to reach the entry to be deleted Press DELETE to delete the...

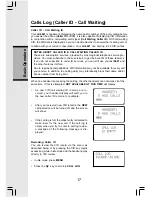
Страница 21: ...to regional incompatibilities CID information may not be available for every call you receive In addition the calling party may intentionally block their name and or phone number from being sent When one handset is accessing the call log the other handsets can not access it at the same time If this is attempted NOT AVAILABLE AT THIS TIME will display As new CID call waiting ID records are re ceive...

Страница 22: ...ou ll hear a confirmation tone and the screen will display If the CID isn t able to detect a name EDIT NAME will be prompted If unable to detect the number EDIT NUMBER will be prompted You will then need to enter the name and or the number If both name and number are missing for example as in a private listing the request will be rejected with the message If the phone number already exists in the ...

Страница 23: ...o the record to be deleted Press the DELETE key A confirmation tone will sound and the previous CID record will be displayed on the screen To delete all the CID records press and hold the DELETE key The screen will ask DELETE ALL CALLS Press SEL to confirm Or press OFF to return to the CID record previously displayed 19 ...

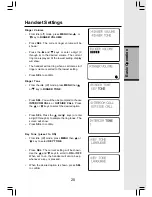
Страница 24: ... Ringer Tone From the idle off mode press MENU then or key to RINGER TONE Press SEL You will then be prompted to choose INTERCOM CALL or OUTSIDE CALL Press the or keys to select the desired option Press SEL Press the and keys or enter a digit 0 through 9 to sample the ring tones The screen will show Press SEL to confirm Key Tone preset to ON From idle off mode press MENU then or key to select KEY ...

Страница 25: ... will display MESSAGE WAITING and the base MESSAGE WAITING light will flash alerting you to new messages Once you have reviewed all new messages the VMWI alert will automatically be turned off Handset Settings Clear Message Waiting If after reviewing all new voice mail messages the VMWI alert still remains on the screen and the MESSSAGE WAITING LED on base is still flashing you can turn it off man...

Страница 26: ...ULSE Press SEL to confirm NOTE When the phone is set for pulse dial mode it is possible to switch to temporary tone mode during an ongoing call by pressing Once pressed tone will be used for rest of the call After you hang up the phone will return to pulse dialing for the next call 22 ...

Страница 27: ...o the jack under a small rubber flap on the cordless handset The plug should fit securely Do not force the connection NOTE Whenever a compatible headset is con nected to the cordless handset the mi crophone on the handset will be muted This is done to limit the effect of back ground noise When a compatible headset is connected to the cordless handset your speaker ph one feature will be disabled To...

Страница 28: ... Electrical storms can sometimes cause power surges harmful to electronic equipment For your own safety use caution when using electric appliances during storms Cleaning your telephone Your telephone has a durable plastic casing that should retain its luster for many years Clean it only with a soft cloth slightly dampened with water or a mild soap Do not use excess water or cleaning solvents of an...

Страница 29: ... appliances plugged into the same circuit as the base unit can sometimes cause interference Try to move the appliance or the base unit to another outlet You Get Noise Static Or A Weak Signal When You re Away From The base unit You may be out of range Either move closer to the base or relocate the base unit The layout of your home may be limiting the range Try to move the base unit to another posit...

Страница 30: ...to be responding normally then try to put the handset in its base If it does not seem to respond do the following in the order listed 1 Disconnect the power to the base 2 Disconnect the handset battery 3 Wait a few minutes 4 Connect power to the base 5 Reinstall the battery 6 Watch for handset to display HANDSET ...

Страница 31: ...iod The limited warranty period for the product extends for ONE 1 YEAR from the date of purchase if we repair or replace a Materially Defective Product under the terms of this limited warranty This limited warranty also applies to repaired or replacement Products for a period of either a 90 days from the date the repaired or replacement Product is shipped to you or b the time remaining on the orig...

Страница 32: ...ceipt identifying the Product purchased Product model and the date of purchase or receipt and 3 Provide your name complete and correct mailing address and telephone number Other Limitations This warranty is the complete and exclusive agreement between you and VTech It supersedes all other written or oral communications related to this Product VTech provides no other warranties for this product The...

Страница 33: ...is equipment generates uses and can radiate radio frequency energy and if not installed and used in accordance with the instructions may cause harmful interference to radio communications However there is no guarantee that interference will not occur in a particular installation If this equipment does cause harmful interference to radio or television reception which can be determined by turning th...

Страница 34: ...ected to a compatible modular jack that is also compliant An RJ11 jack should normally be used for connecting to a single line and an RJ14 jack for two lines See Installation Instructions in the user s manual This equip ment may not be used with Coin Telephone Lines or with Party Lines If you have specially wired alarm dialing equipment connected to your telephone line ensure the connection of thi...

Страница 35: ...istration number The abbreviation IC before the registration number signifies that registration was performed based on a Declaration of Conformity indicating that Industry Canada technical specifications were met It does not imply that Industry Canada approved the equipment Notice The Ringer Equivalence Number REN for this terminal equipment is 0 1 The REN assigned to each terminal equipment provi...

Страница 36: ...ppropriate electrical inspection authority or electrician as appropriate Your cordless phone is designed to operate at the maximum power allowed by the FCC and IC This means your handset and base unit can communicate only over a certain distance which will depend on the location of the base unit and handset weather and the construction and layout of your home or office FCC ACTA and IC Regulations ...

Страница 37: ...according to environmental conditions at the time of use SIZE Handset 136mm x 47mm x 29 5mm including antenna Base 110mm x 108 40mm x 55 6mm WEIGHT Handset 136 grams excluding batteries Base 138 grams POWER REQUIREMENTS Handset 3 6V 600mAh NiMH Base 8 V DC 650mA MEMORY Phonebook 50 Memory locations up to 32 digits for number 16 characters for name per location CID 50 memory locations SPECIFICATION...

Страница 38: ... VTECH GROUP OF COMPANIES Distributed in the U S A by VTech Communications Inc Beaverton Oregon 97008 Distributed in Canada by VTech Telecommunications Canada Ltd 7671 Alderbridge Way Richmond B C V6X 1Z9 Printed in China 91 000159 030 000 ISSUE0 ...

Страница 39: ...USER S MANUAL ...
Страница 40: ...Charging of the Handset Battery 6 IMPORTANT 6 Checking for Dial Tone 6 Registration 7 BASIC OPERATION 8 Handset Indicators 8 Handset Icons 8 Handset LED 8 Charger LED 8 ADVANCED OPERATION 9 Handset Operation 9 Belt Clip 9 ADDITIONAL INFORMATION 10 Maintenance 10 In Case Of Difficulty 11 Warranty Statement 13 FCC ACTA and IC Regulations 15 Table Of Contents ...

Страница 41: ... HELP Our representatives are here to help you with any questions concerning the operation of this product available accessories or any other related issues Call Toll Free 1 800 595 9511 In Canada Call 1 800 267 7377 or visit our website at www vtechphones com ...

Страница 42: ...voltage points or short out parts that could result in a risk of fire or electric shock Never spill liquid of any kind on the product 10 To reduce the risk of electric shock do not disassemble this product but take it to an authorized service facility Opening or removing parts of the base or handset other than specified access doors may expose you to dangerous voltages or other risks Incorrect rea...

Страница 43: ...M COVERING THE DISPLAYS Your mi 6820 is an accessory handset for use with the mi 6821 mi 6822 mi 6861 mi 6862 or mi6872 systems You must have one of these base units in order to use the mi 6820 accessory handset This manual is designed to familiarize you with the mi 6820 accessory handset setup registration and basic functions For detailed instructions please refer to the mi 6821 mi 6822 mi 6861 m...

Страница 44: ... www vtechphones com or call VTech Communications Inc at 1 800 595 9511 In Canada call VTech Telecommunica tions Canada Ltd at 1 800 267 7377 NOTE Use only VTech batteries part number 89 1323 00 00 4 Belt Clip 5 User s Manual 6 Battery 1 Handset 2 Charger Adapter 3 Charger 3 ...

Страница 45: ...ck 2 5mm 4 CID Scroll Down 5 Phone Flash 6 Dialing Keys 0 9 7 Redial Pause The Handset Layout 8 Select Menu 9 Phonebook Scroll Up 10 Speakerphone 11 Off Clear 12 Volume Control 13 Intercom 14 Mute Delete 1 2 4 5 6 8 7 10 12 13 9 11 3 14 4 ...

Страница 46: ...itial charge a maintenance charge of 10 12 hours should be suffi cient Be sure to place the handset in its base or charger when not in use to insure maximum daily performance 6 Average talk time on a fully charged battery is about nine hours standby time is approximately four days Setup Connecting Power to Handset Charger Because the mi 6820 is an accessory handset to the mi 6821 mi 6822 mi 6861 m...

Страница 47: ... return to their normal function IMPORTANT 1 Do not dispose of batteries in a fire they might explode 2 Do not open or mutilate the batteries Toxic substances may be released causing harm to eyes or skin 3 Exercise care in handling batteries in order to prevent an accidental short of the charge contacts potentially causing the batteries to overheat 4 Do not dispose of this battery into household g...

Страница 48: ...space delete cha racters then enter the correct information 4 Press SEL to complete the registration process 5 Once a valid base ID code has been entered the display will blank for a second or two and then show 6 If the base accepts the new handset after several seconds the new handset will show where X is the new handset number assigned se quentially by the base If you do not enter the correct di...

Страница 49: ...ntries Turns on when the ringer is muted Low battery indicator and charging indicator Handset Icons Icon Description MUTE NEW LED is on when in handsfree mode Handset LED LED Description LED is On when the handset is charging in the charger CHARGING Charging LED LED Description Basic Operation 8 ...

Страница 50: ...to the jack under a small rubber flap on the cordless handset The plug should fit securely Do not force the connection NOTE Whenever a compatible headset is conn ected to the cordless handset the micro phone on the handset will be muted This is done to limit the effect of background noise When a compatible headset is connected to the cordless handset your speaker phone feature will be disabled To ...

Страница 51: ...ectrical storms can sometimes cause power surges harmful to electronic equipment For your own safety use caution when using electric appliances during storms Cleaning your telephone Your telephone has a durable plastic casing that should retain its luster for many years Clean it only with a soft cloth slightly dampened with water or a mild soap Do not use excess water or cleaning solvents of any k...

Страница 52: ...ase Unit Household appliances plugged into the same circuit as the base unit can sometimes cause interference Try to move the appliance or the base unit to another outlet You Get Noise Static Or A Weak Signal When You re Away From The Base Unit You may be out of range Either move closer to the base or relocate the base unit The layout of your home may be limiting the range Try to move the base uni...

Страница 53: ...harger If it does not seem to respond follow these steps in order 1 Disconnect the power to the base 2 Disconnect the handset battery 3 Wait a few minutes 4 Connect power to the base 5 Reinstall the battery 6 Wait for the handset to re establish its link with the base To be safe allow up to one minute for this to take place In Case Of Difficulty 12 ...

Страница 54: ...riod The limited warranty period for the product extends for ONE 1 YEAR from the date of purchase if we repair or replace a Materially Defective Product under the terms of this limited warranty This limited warranty also applies to repaired or replacement Products for a period of either a 90 days from the date the repaired or replacement Product is shipped to you or b the time remaining on the ori...

Страница 55: ...ng the Product purchased Product model and the date of purchase or receipt and 3 Provide your name complete and correct mailing address and telephone number Other Limitations This warranty is the complete and exclusive agreement between you and VTech It supersedes all other written or oral communications related to this Product VTech provides no other warranties for this product The warranty exclu...

Страница 56: ...een tested and found to comply with part 15 of the FCC rules These limits are designed to provide reasonable protection against harmful interference in a residential installation This equipment generates uses and can radiate radio frequency energy and if not installed and used in accordance with the instructions may cause harmful interference to radio communications However there is no guarantee t...

Страница 57: ... use with the nationwide telephone network The plug and jack used to connect this equipment to the premises wiring and the telephone network must comply with the applicable Part 68 rules and technical require ments adopted by ACTA A compliant telephone cord and modular plug is provided with this product It is designed to be connected to a compatible modular jack that is also compliant An RJ11 jack...

Страница 58: ...es tend to be less busy IC Industry Canada This telephone is registered for use in Canada The term IC before the radio certification number only signifies that Industry Canada technical specifications were met Notice This equipment meets the applicable Industry Canada Terminal Equipment Technical Specifications This is confirmed by the registration number The abbreviation IC before the registratio...

Страница 59: ...pe system if present are connected together This precaution may be particularly important in rural areas Caution Users should not attempt to make such connections themselves but should contact the appropriate electrical inspection authority or electrician as appropriate Your cordless phone is designed to operate at the maximum power allowed by the FCC and IC This means your handset and base unit c...

Страница 60: ...according to environmental conditions at the time of use SIZE Handset 136mm x 47mm x 29 5mm including antenna Charger 80mm x 80mm x 47mm WEIGHT Handset 136 grams excluding Battery Charger 74 grams POWER REQUIREMENTS Handset 3 6V 600mAh NiMH Charger 8 V DC 200mA MEMORY Phonebook 50 Memory locations up to 32 digits for number 16 characters for name per location CID 50 memory locations SPECIFICATIONS...

Страница 61: ... VTECH GROUP OF COMPANIES Distributed in the U S A by VTech Communications Inc Beaverton Oregon 97008 Distributed in Canada by VTech Telecommunications Canada Ltd 7671 Alderbridge Way Richmond B C V6X 1Z9 Printed in China 91 000160 010 000 ISSUE0 ...

Отзывы: