VTech CD1281 Скачать руководство пользователя страница 9

6

7

Getting started

7

Telephone installation

If you subscribe to high-speed Internet service (digital subscriber line - DSL) 

through your telephone line, you must install a DSL filter between the telephone 

line cord and the telephone wall jack. The filter prevents noise and caller 

ID problems caused by DSL interference. Please contact your DSL service 

provider for more information about DSL filters.
Follow the steps below to install the telephone.

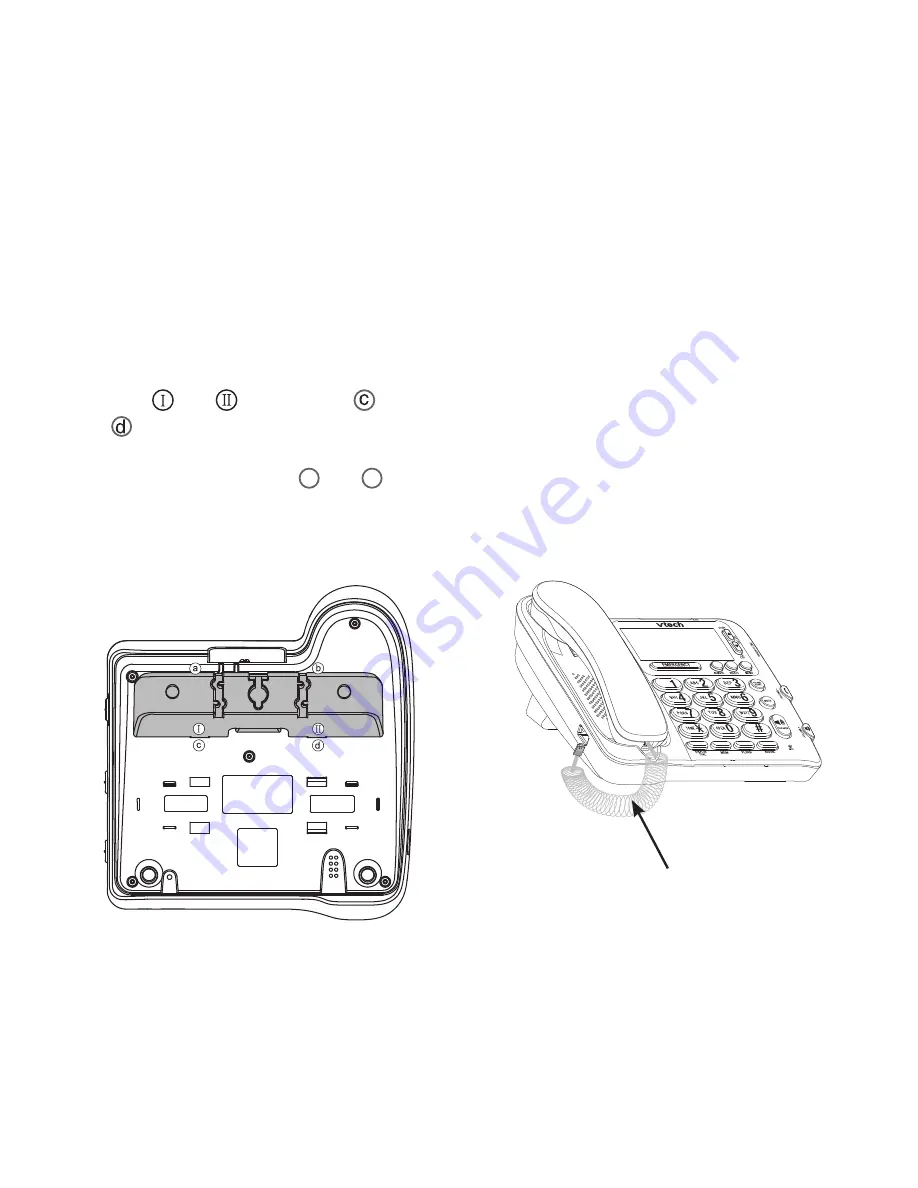
2. Plug one end of the coiled 

handset cord into the handset 

jack. Plug the other end into the 

telephone jack on the left of the 

telephone base and place the 

handset in the telephone base.

Coiled handset cord

1. To install the mounting bracket in the 

desktop position, insert the bracket 
tabs   and   into the slots   and 

 firmly on the upper portion of the 

telephone base. Push the flexible 
bracket tabs into slots  a  and  b  until 
they click into place.

Содержание CD1281

Страница 1: ...User s manual w w w v tec hc anada c om Big Button Big Display Model CD1281 Corded telephone CID DIR...

Страница 2: ...ew this manual thoroughly to ensure proper installation and operation of this innovative and feature rich VTech product For support shopping and everything new at VTech visit our website at www vtechc...

Страница 3: ...e dialing 27 Speed dial memory 28 Speed dial memory overview 28 Create a speed dial number 28 Review the speed dial numbers 29 Dial a speed dial number 29 Remove a speed dial number 29 Directory 30 Di...

Страница 4: ...ging in the event warranty service is necessary Telephone base Long telephone line cord Handset Coiled handset cord Getting started Power adapter DIR CID Short telephone line cord User s manual Mounti...

Страница 5: ...ation page 26 SPEAKER Press to turn the base speakerphone on or off page 22 CALL LIST DIR Press to enter the directory page 30 When in the menu press to scroll up the list of settings page 13 While re...

Страница 6: ...OLUME Slide to adjust the listening volume on the handset page 25 VOLUME Slide to adjust the listening volume on the speakerphone page 25 REDIAL When the telephone is idle press to redial the last num...

Страница 7: ...crophone is muted during a call page 26 SPEAKER On when the speakerphone is in use page 22 DIR CID Screen icons NEW 05 REP No 12 00AM 1 03 ERR 800 267 7377 ERR On steady when this telephone detects an...

Страница 8: ...tory matching the key pressed NO NUMBER There is no telephone number in the call log entry you dialed or saved in the directory There is no number in the speed dial memory location EMERGENCY location...

Страница 9: ...ice provider for more information about DSL filters Follow the steps below to install the telephone 2 Plug one end of the coiled handset cord into the handset jack Plug the other end into the telephon...

Страница 10: ...e plug one end of the long telephone line cord into the jack labeled TEL LINE on the back of the telephone base Plug the other end of the long telephone line cord into a telephone wall jack To connect...

Страница 11: ...the wall mount plate Desktop to wall mount installation To install the telephone base in the wall mount position unplug all cords connected to the telephone base before you begin 1 Lift the handset an...

Страница 12: ...abs and into the slots and on the lower portion of the telephone base and then push the flexible bracket tabs into slots and until they click into place 2 Remove the mounting bracket from desktop posi...

Страница 13: ...modular wall jack To connect the power adapter to the telephone plug the small end of the power adapter into the jack labeled 7 5V DC 100 mA on the back of the telephone base Plug the large end into a...

Страница 14: ...e it aside Hold down the switch hook on the telephone base then slide the handset tab upwards to remove it from the slot Rotate the handset tab 180 degrees Push the handset tab down into the grooves s...

Страница 15: ...telephone base 5 To connect the telephone line cord plug one end of the long telephone line cord into the jack labeled TEL LINE on the telephone base Plug the other end of the long telephone line cord...

Страница 16: ...ress MENU to enter the feature menu Press SELECT repeatedly to scroll through the menu Press DIR or CID until the screen displays the desired setting Press SELECT to save your selection and move to th...

Страница 17: ...EW CALL FIRST LANGUAGE Choose the display screen language ENGLISH ESPANOL FRANCAIS HAC ___ HOME AREA CODE Set the home area code for caller ID service three digits empty LAC 1 ___ LAC 2 ___ LAC 3 ___...

Страница 18: ...one is idle the screen displays the time and date The time and date can be set manually or by incoming caller ID information page 37 To change the time and date manually When the telephone is idle pre...

Страница 19: ...provider When a caller calls more than once since the last time you reviewed the call log you can choose to combine or separate those call log entries If you select COMBINED only the most recent calle...

Страница 20: ...time Select BY TIME to show the caller ID entries starting with the most recent call in the call log Press MENU to enter the feature menu Press SELECT repeatedly until the screen displays CALL LIST O...

Страница 21: ...and telephone number for calls within your area code If this applies to you enter 000 for the home area code and enter your area code as a local area code After setting if you receive a call from wit...

Страница 22: ...ure menu Press SELECT repeatedly until the screen displays HOME AREA CODE Use the dial pad keys 0 through 9 to enter the three digit area code Press DIR to move to the previous digit and press CID to...

Страница 23: ...e in LAC 1 If it is necessary to advance to the next area code press SELECT repeatedly until the screen displays LAC 2 LAC 3 or LAC 4 Use the dial pad keys 0 through 9 to enter the three digit area co...

Страница 24: ...0 through 9 to enter the desired telephone number up to 11 digits Press DIR to backspace and erase a digit Press CID once to insert a space a dash appears on the screen Press CID twice to insert a th...

Страница 25: ...ess SPEAKER again if you are using the speakerphone To answer a call Lift the handset or press SPEAKER Speakerphone During a call press SPEAKER to switch between speakerphone and normal handset use To...

Страница 26: ...one is idle press REDIAL to display the last number dialed Press DISPLAY DIAL to call using the speakerphone or press DISPLAY DIAL and then lift the handset to use the handset To clear the redial memo...

Страница 27: ...ess DIR or CID to select REVIEW Press SELECT Press DIR or CID to scroll or press the dial pad keys to find the desired entry Press DISPLAY DIAL The telephone automatically dials the displayed number T...

Страница 28: ...using the handset adjust the VOLUME switch on the right side of the telephone base to change the listening volume on the handset Speakerphone volume While using the speakerphone adjust the VOLUME swit...

Страница 29: ...off automatically when you end the call DIR CID Mute The mute function enables you to silence the microphone When you are on the line and mute is turned on you can hear the other party but the other...

Страница 30: ...d forth between calls For more information on caller ID with call waiting see page 36 1 2 DIR CID Temporary tone dialing If you have dial pulse rotary dialing service only you can temporarily switch f...

Страница 31: ...d keys 0 through 9 or to enter a telephone number up to 24 digits To backspace and erase a digit press DIR To insert a space between digits press CID A dash appears on the screen To insert a three sec...

Страница 32: ...Dial a speed dial number To dial from the speed dial memory Lift the handset or press SPEAKER Press MEM and then the screen displays ENTER LOCATION Press a dial pad key 0 through 9 to choose the desi...

Страница 33: ...s idle press DIR to enter the directory Press DIR or CID to scroll to STORE Press SELECT The screen shows ENTER NUMBER Use the dial pad keys 0 through 9 or to enter the telephone number up to 24 digit...

Страница 34: ...the name entered has more than 15 characters the screen shows ONLY 15 ALLOWED Directory Press SELECT to save the entry The screen shows STORED Repeat Steps 4 through 6 to store more directory entries...

Страница 35: ...ses the characters to be displayed in the following order Number key Characters by number of key presses 1 2 3 4 5 2 A B C 2 3 D E F 3 4 G H I 4 5 J K L 5 6 M N O 6 7 P Q R S 7 8 T U V 8 9 W X Y Z 9 0...

Страница 36: ...ess 5 JKL once to find JENNY twice to find KRISTEN or three times to find LINDA If there are no name entries matching your search the next closest match in alphabetical order appears If there are no e...

Страница 37: ...R To insert a space between digits press CID A dash appears on the screen To insert a three second dialing pause press CID twice P appears on the screen To insert a flash signal press FLASH F appears...

Страница 38: ...the telephone is idle press DIR to enter the directory Press DIR or CID to scroll to REVIEW Press SELECT Press DIR or CID to scroll through the directory entries OR Use the dial pad keys to enter the...

Страница 39: ...may be called by different names such as caller ID with visual call waiting by different telephone service providers and may not be available in all areas The format of caller ID display depends on th...

Страница 40: ...nnected If you subscribe to caller ID service this telephone will reset the time and date automatically each time new call information is received You can set the time and date manually if desired see...

Страница 41: ...r at one of the speed dial memory locations When the call log is full the oldest entry is deleted to make room for new incoming call information If a call is answered before the information appears on...

Страница 42: ...ephone is idle press CID to enter the call log If NEW CALL FIRST is selected in the CALL LIST ORDER menu page 17 and there are new calls in the call log press CID repeatedly to scroll through the new...

Страница 43: ...e caller ID entries starting with the oldest call Press DIR or CID to scroll through the caller ID entries Press DISPLAY DIAL to call using the speakerphone OR Press DISPLAY DIAL and lift the handset...

Страница 44: ...hen press DIR or CID to scroll through all caller ID entries in chronological order OR If BY TIME is selected in the CALL LIST ORDER menu page 17 the telephone will show the caller ID entries starting...

Страница 45: ...h all caller ID entries in chronological order OR If BY TIME is selected in the CALL LIST ORDER menu page 17 the telephone will show the caller ID entries starting with the oldest call Press DIR or CI...

Страница 46: ...onological order OR If BY TIME is selected in the CALL LIST ORDER menu page 17 the telephone will show the caller ID entries starting with the oldest call Press DIR or CID to scroll through the caller...

Страница 47: ...is probably in the wiring or the local service Call your telephone service provider There is no dial tone First try all the above suggestions The telephone line cord may be malfunctioning Install a n...

Страница 48: ...ters kitchen appliances and cordless telephones Test a working telephone at the same telephone wall jack If another telephone has the same problem the problem is in the telephone jack Contact your tel...

Страница 49: ...and other telephone If your telephone is plugged in with a modem or a surge protector plug the telephone or modem surge protector into a different location If this does not solve the problem relocate...

Страница 50: ...ters The telephone does not receive caller ID or the system does not display caller ID during call waiting Make sure you subscribe to caller ID with call waiting features provided by the telephone ser...

Страница 51: ...s the USB port on your computer may not have enough power In these instances try using a USB hub with its own external power supply If you are using a firewall it may prevent access to your nontraditi...

Страница 52: ...lectrical storms can sometimes cause power surges harmful to electronic equipment For your own safety take caution when using electrical appliances during storms Cleaning your telephone Your telephone...

Страница 53: ...hould be operated only from the type of power source indicated on the marking label If you are not sure of the type of power supply in your home or office consult your dealer or local power company Do...

Страница 54: ...he product exhibits a distinct change in performance Avoid using a telephone other than cordless during an electrical storm There is a remote risk of electric shock from lightning Do not use the telep...

Страница 55: ...let on a circuit different from that to which the receiver is connected Consult the dealer or an experienced radio TV technician for help Changes or modifications to this equipment not expressly appro...

Страница 56: ...less For more information please contact your telephone service provider This equipment may not be used with Party Lines If you have specially wired alarm dialing equipment connected to your telephone...

Страница 57: ...ons 1 this device may not cause harmful interference and 2 this device must accept any interference including interference that may cause undesired operation The term IC before the certification regis...

Страница 58: ...modules or equipment Repair or replacement of the Product at VTech s option is your exclusive remedy VTech will return the repaired or replacement Products to you in working condition You should expe...

Страница 59: ...ring transit and transportation and are responsible for delivery or handling charges incurred in the transport of the Product s to the service location VTech will return repaired or replaced Product u...

Страница 60: ...Implied warranties including those of fitness for a particular purpose and merchantability an unwritten warranty that the Product is fit for ordinary use are limited to one year from the date of purc...

Страница 61: ...8in X 1 634in Telephone base 8 701in X 4 055in X 2 028in Weight Handset 0 661 lb Telephone base 1 389 lb Power requirements Telephone base 7 5V DC 100mA Memory Telephone directory 25 memory locations...

Страница 62: ...mber 29 Directory overview 30 Display screen messages 5 39 E Edit a directory entry 34 Emergency call 21 23 F FCC ACTA and IC regulations 52 54 Feature summary 14 Flash 27 H Handset volume 25 Home are...

Страница 63: ...tory 41 Screen contrast 16 Screen icons 4 Speakerphone 22 Speed dial memory overview 28 T Technical specifications 58 Telephone installation 6 Telephone overview 2 Temporary tone dialing 27 Time and d...

Страница 64: ...ROUP OF COMPANIES Distributed in the U S A by VTech Communications Inc Beaverton Oregon 97008 Distributed in Canada by VTech Technologies Canada Ltd Richmond B C V6W 1L5 Copyright 2010 for VTECH TELEC...

Отзывы: