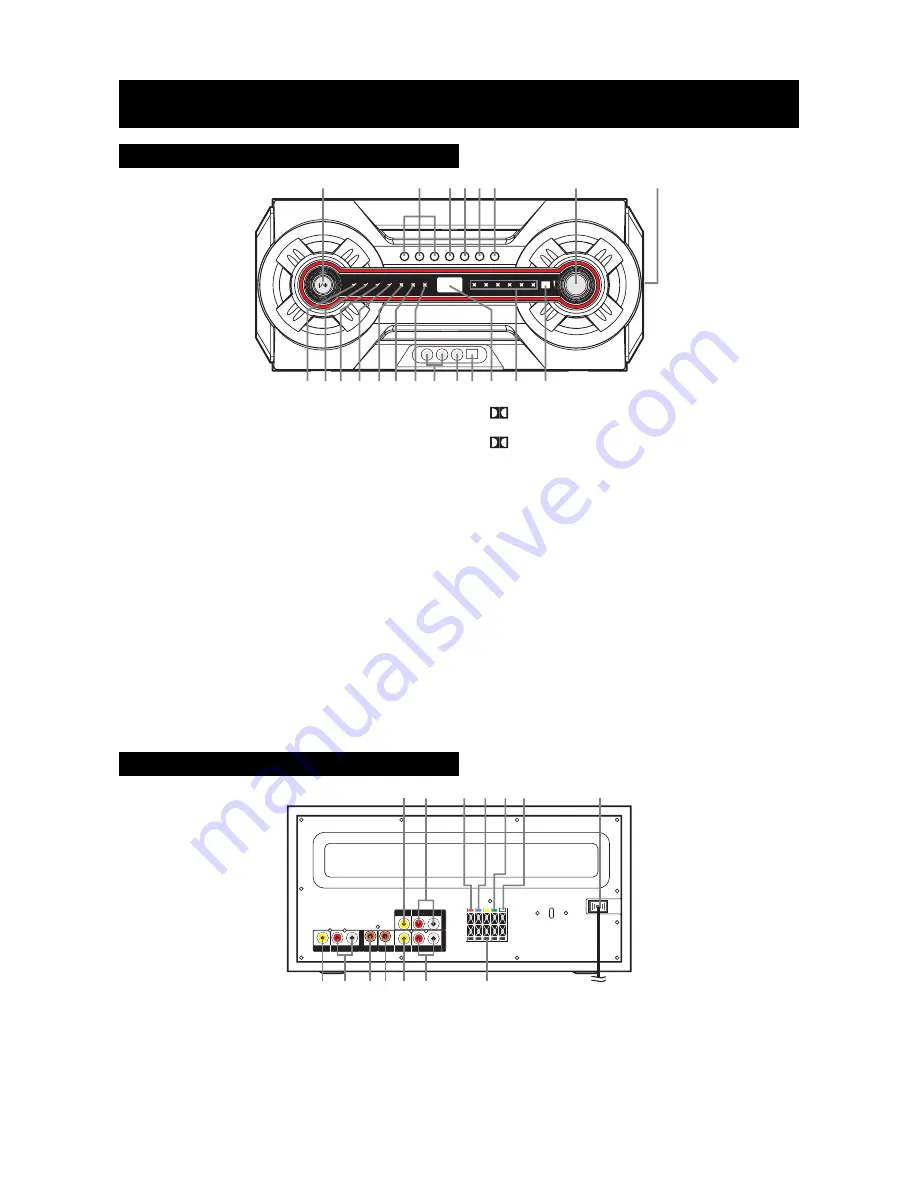
29 30
33
35
34
3132
22 23
24 25
28
2627
VOL
16 18
17
15
14
20
19
21
13
12
11
10
9
1
2 3 4 5 6
7
8
Rear Panel
FUNCTION CONTROL
1. STANDBY/ON button
Turns the unit ON, or puts the unit into STANDBY mode.
2. AV1/2/3 buttons
Press AV1 or AV2 to enter “auto-detected/auto-switching”
mode, press again to switch to “forced analog” mode.
Press AV3 button to select the AV3 input.
3. PL button
Change the output channels or the output sound mode.
4. BASS button
Adjust the bass level.
5. SURROUND DELAY button
Adjust the surround delay time.
6. CENTER DELAY button
Adjust the center delay time.
7. /- button
Adjust the volume or the level of corresponding function.
8. BUILT-IN SUBWOOFER
9. STANDBY/DELAY indicator
Lights when the unit is in standby mode or setting
the surround/center delay.
10.3 STEREO indicator
Lights when 3 STEREO is active.
Front Panel
22. TV VIDEO OUT jack
23. TV AUDIO OUT (R & L) jacks
24. Right Front Speaker terminals
25. Right Rear Speaker terminals
26. Left Rear Speaker terminals
27. Left Front Speaker terminals
28. Power Cord
E - 3
11.
PRO LOGIC indicator
Lights when Dolby Pro Logic is active .
12.
DIGITAL indicator
Lights when Dolby Digital is active.
13.AV1 indicator
Lights when the unit is in AV1 mode.
14.AV2 indicator
Lights when the unit is in AV2 mode.
15.AV3 indicator
Lights when the unit is in AV3 mode.
16.AV3 AUDIO IN (L&R) jacks
Connect to AUDIO outputs on external audio source.
17.AV3 VIDEO IN jack
Connect to VIDEO outputs on external audio source.
18.DIGITAL IN
Connect to DIGITAL (OPTICAL) outputs on external audio
source.
19.Display window
Display the level of corresponding function.
20.Speaker indicators
Lights when the corresponding speaker is active.
21.Remote Control sensor
Accepts the remote control signals.
29. AV1 VIDEO IN Jack
30. AV1 AUDIO IN (R & L) Jacks
31. AV1 DIGITAL AUDIO IN (VCR/SAT)Jack
32. AV2 DIGITAL AUDIO IN (DVD) Jack
33. AV2 VIDEO IN Jack
34. AV2 AUDIO IN (R & L) Jacks
35. Center Speaker terminals


