EN - 15
static “
0
” and the bottom right dots blink.
(If a cooking zone is not selected within 20
seconds, the hob will automatically switch
off).
Switching the Appliance Off
Switch the hob off at any time by pressing
.
The ON/OFF button always has priority
over the switch-off function.
Switching the Cooking Zones On
Press the heater selection button that
corresponds to the heater you wish to use.
A static dot will be shown on the selected
heater display and the blinking dots on
all other heater displays will no longer
illuminate.
For the selected heater, you can set the
heat level by pressing the Sliding Button
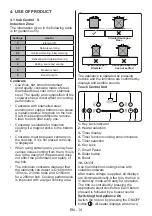
The element is now ready to
use. For fast boil times, select the desired
cooking level, then press the “
P
” button to
activate the Boost function.
Switching the Cooking Zones Off
Select the element you want to switch off
by pressing the heater selection key. Using
the Sliding Button
, turn the
temperature down to “
0
”. (Pressing the right
and left of the slider button simultaneously
also turns the temperature to “
0
”).
If the cooking zone is hot, “
H
” will be
displayed instead of “
0
”.
Switching all Cooking Zones Off
To switch all the cooking zones off at once,
press the
key.
In stand-by mode, a “
H
” will appear on all
cooking zones which are hot.
Residual Heat Indicator
The residual heat indicator indicates that
the glass ceramic area has a temperature
that is dangerous to touch.
After switching off the cooking zone, the
respective display will show “
H
” until the
corresponding cooking zone temperature is
at a safe level.
Smart Pause
Smart Pause, when activated, reduces
the power of all burners that have been
switched on.
If you then deactivate the Smart Pause,
the heaters will automatically return to the
previous temperature level.
If the Smart Pause is not de-activated, the
cooktop will switch off after 30 minutes.
Press
to activate Smart Pause. The
power for the activated heater(s) will reduce
to level 1 and “
II
” will appear at all displays.
Press
again to deactivate Smart
Pause. “
II
” will disappear and the heaters
will now run at the level previously set.
Safety Switch-Off Function
A cooking zone will automatically switch off
if the heat setting has not been modified
for a specified duration of time. A change
in the heat setting of the cooking zone will
reset the time duration to the initial value.
This initial value depends on the selected
temperature level, as shown below.
Heat setting
Safety switch off after
1-2
6 Hours
3-4
5 Hours
5
4 Hours
6-9
1.5 Hours
Child Lock
After switching on the appliance, the child
lock function can be activated. To activate
the child lock, simultaneously press the
left and right side of the Sliding Button
and then press the right side
of the Sliding Button
again. “
L
”
indicating LOCKED will appear on all heater
displays and the controls can not be used.
(If a cooking zone is in the hot condition,
“
L
”and “
H
” will display alternately).
The hob will remain in a locked condition
until it is unlocked, even if the appliance
has been switched off and on.
To deactivate the child lock, first switch on
the hob. Simultaneously press the left and
right side of the Sliding Button
and then press the left side of the Sliding
Button
again. “
L
” will no longer
be displayed and the hob will switch off.
Key Lock
The key lock function is used to set
‘safe mode’ on the appliance during
operation. It will not be possible to make
any adjustments by pressing the buttons
(for example heat settings). It will only be
possible to switch the appliance off.
The lock function is active if the key lock
button is pressed for at least 2 seconds.
This operation is acknowledged by a
buzzer. After successful operation, the key
lock indicator will flash and the heater will
be locked.
Содержание EBI444
Страница 27: ...HR 9...
Страница 37: ...2...
Страница 38: ...1 4 1 1 4 1 2 7 1 3 8 1 4 8 2 10 2 1 10 2 2 10 2 3 12 3 13 4 14 4 1 14 5 17 5 1 17 6 19 6 1 19 6 2 19...
Страница 39: ...4 1 1 1 8 8...
Страница 40: ...5...
Страница 41: ...6...
Страница 42: ...7 1 2 100 C...
Страница 43: ...8 1 3 j 0 1 4...
Страница 44: ...9 oj...
Страница 46: ...11 B T C2 C C1 H F G I J I J F B D T C2 C C1 H G 4...
Страница 47: ...12 2 3 3 mm 4 4 N N PE PE L2 L3 L1 L 5 5 3 3 2 2 1 1...
Страница 48: ...13 3 1 2 booster induction booster induction booster induction booster induction 1 2...
Страница 49: ...14 4 4 1 0 1 3 4 5 6 7 8 9 P Q110mm 160mm 210mm Q160mm 290mm K M 1 2 3 5 4 6 7 8 9 10 1 2 3 4 5 6 7 8 9 10...
Страница 50: ...15 ON OFF 0 20 ON OFF P 0 0 H 0 H H 30 1 II II 1 2 6 3 4 5 5 4 6 9 1 5 L L H...
Страница 51: ...16 L 2 1 99 00 0 99 10 2 1 99 10 00 H 2 10 P P 3...
Страница 52: ...17 E1 E3 H E4 H E5 E6 E7 E8 EA on off on off EC on off on off C1 C8 on off on off 5 5 1...
Страница 53: ...18 1 2 3...
Страница 54: ...19 6 6 1 F LED U 9 9 9 6 2...
Страница 96: ...SL 9 odpadkov ali trgovca pri katerem ste izdelek kupili...
Страница 105: ...SL 18 Kisa kave mleka soli vode limone ali paradi nikovega soka ne pu ajte v stiku z deli iz nerjavnega jekla dlje asa...
Страница 107: ...52289127...

