Installation
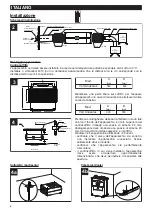
Installation diagram
Mounting the appliance
False ceiling
The device must not be installed in areas where temperatures may fall below 0°C.
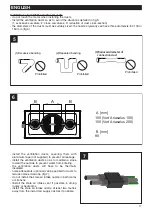
Install 4 M10 screws/bolts (not supplied), ensuring that the distance between the screws matches the distance
of the holes on the suspension kit:
Keep a portion on the ceiling free for access to the
device in case of maintenance (dimensions as in the
following table):
Prepare the length of the bolt on the ceiling so that there
is a gap of at least 25 mm between the bottom of the
device and the upper side of the false ceiling. Similarly,
there must be a space of at least 20 mm between the
top of the device and the ceiling.
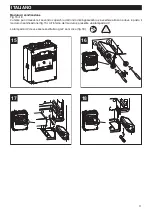
Install the suspension kit using 4 bolts:
- Make sure that the direction of the device is correct;
do not install the appliance upside down. Securely
fasten nuts and washers
- Make sure that the device is perfectly horizontal.
- The device must be easily accessible for maintenance
operations. In particular, the false ceiling into which it
is installed must have a suitably sized opening, which
must allow access to the openings of the device.
Attic (on the floor)
On the wall (vertical)
16
ENGLISH
2
(Outdoor Fresh Air)
Gradient
(1/100~1/50)
Indoor
Outdoor
Fresh Air Supply Duct
S A
Supply Air
nozzle
S A
5'
Supply Air
nozzle
Noise Attenuator (optional)
.*6+
flexible aluminum/PVC tube
Thermal Insulation Material
(Insulation Adaptor and Aluminum Tape)
Noise Attenuator Φ80
Hoop, Scotch tape
Hoop, Scotch tape
Grid with wind and
bird protection
Insulated duct
3
Mod
C
[
mm]
D
[
mm]
Vort Ariasalus
540
440
Mod
A
[
mm]
B
[
mm]
Vort Ariasalus
330
550
4
Access Door
Decorative
Ceiling
Ceiling Suspension
Bolt
Roof
Nut
Washer
Ceiling Suspension
Fixture
4a
4b
Содержание Vort Ariasalus 100
Страница 53: ......


