background image

Chapter 4 MMI Menu 


16 

Note:

  The network icons indicate the type of security required to connect. Refer to the table below: 

Icon 

Description 


WPA passkey is required to connect. 


WEP passkey is required to connect 


No passkey required. 


Select Profile

Select Profile


Use the Select Profile menu to select from existing profiles or delete profiles that are no longer required. 

1.


Select the profile. 

2.


Press the 

Select 

soft key to activate the profile or press the 

Delete 

soft key to delete the profile. 


Information

Information


The Information menu displays phone information including IP, AP, SIP, Firmware version and MAC address information. 
To display the information page, select the 

Information

 option from the main menu.  


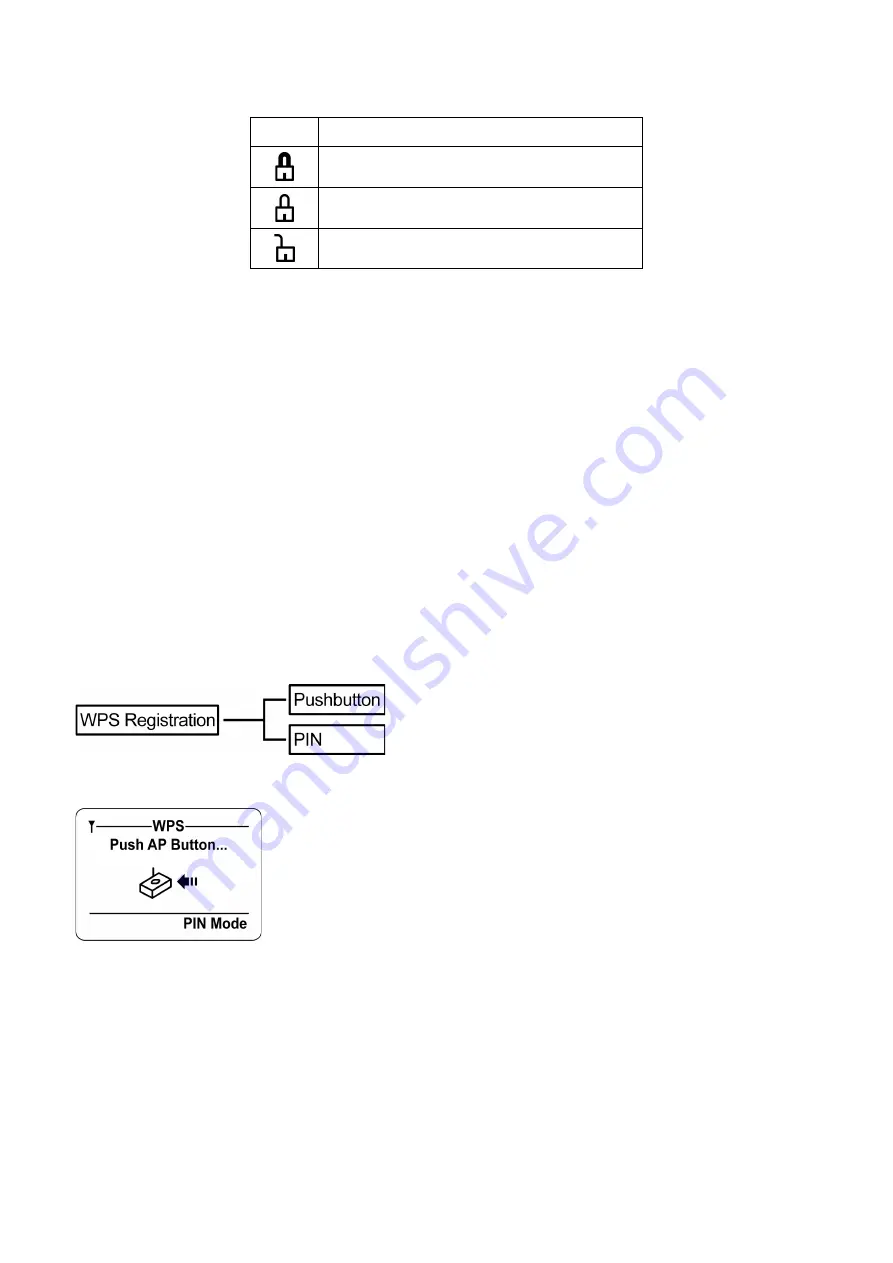
WPS Registration

WPS Registration


This WiFi phone has an easy built-in way for user to connect their wireless AP. It’s known as WiFi Protected Setup (WPS). 
The WPS is used for connecting to a new AP device without knowing various encryption methods that AP may have. The 
WPS feature simplifies various encryption methods into two choices: 


One is by 

PIN Method

, the other one is by 

Push Button

.  


Push button Method 

Enter WPS page, the WiFi phone is entering WPS 

Push button

 standby mode. If the AP supports push button, you may 

hold the AP WPS push button for seconds to start the PBC method. When the AP WPS button has been enabled, in a short 
moment you should see this WiFi phone begin to initial AP setup and enroll stage. 
 

PIN Method 

PIN (Personal Identification Number) can be found by supporting AP WPS PIN CODE setting area. Enter the pin code, the 
WiFi phone will start entering AP setup and enroll stage. 
 

NOTE:

 WPS can only be proceeding with one available WPS wifi phone at the same time, using one wifi phone setups up in 

WPS mode each time. If the wifi phone can not associate to AP successfully for two times, you may consider to reboot both 

Содержание WiFi Phone

Страница 1: ...WiFi Phone User Manual V 1 04 ...

Страница 2: ......

Страница 3: ...been tested in accordance with the measurement methods and procedures specified in OET Bulletin 65 Supplement C 2 European regulation Products with the CE mark comply with the Radio Telecommunication Terminal Equipment Directive 1999 5 EEC the Electromagnetic Compatibility Directive 89 336 EEC and the Low Voltage Directive 73 23 EEC as amended by Directive 93 68 ECC issued by the Commission of the...

Страница 4: ...g Your WiFi Phone 5 3 GETTING STARTED 6 Setting the Access Point AP 6 Setting the SIP Profile 8 Setup Complete 8 4 MMI MENU 9 DISPLAY SCREEN 9 MAIN MENU 10 Phonebook 10 Call Log 11 Phone Settings 11 Select AP 15 AP Find 15 Select Profile 16 Information 16 WPS Registration 16 5 OPERATION 18 MAKING A CALL 18 ANSWERING A CALL 18 CALL OPTIONS 19 6 SPECIFICATION 20 ...

Страница 5: ... phone ensure all the following items are present and undamaged If anything appears to be missing or broken contact your dealer for a replacement WiFi Phone Charging Cradle Belt Clip WiFi phone Handset battery charger optional Can be used to clip the phone after installation Li ion Battery AC Power Adapter Quick Guide For WiFi phone use only rechargeable Can be directly plug into the phone or plug...

Страница 6: ...ough menus Left select Profile decrease volume during a call Right call log increase volume during a call Up show dialed numbers Down Phonebook 5 Right Soft Key Displays the Phonebook Clears input cancel or Mute during a call 6 Power End Key Power on or power off End conversation exit back 7 Numeric Key Enter numbers and text 8 Pound Key Change text output in text mode For example AB ab 12 Ab Pres...

Страница 7: ...r 2 seconds will start WPS search 14 Left Soft Key Select a menu or submenu Confirm menu option 15 Speaker Volume Use to increase or decrease volume during a call 16 Belt Clip Gap Use to hold the belt clip 17 Speaker Transmits voice output hand free mode or plays ring tone 18 Battery Compartment Contains the Li ion battery ...

Страница 8: ...facing up 3 Replace the battery compartment cover until it clicks into place Installing the Belt Clip Installing the Belt Clip 1 Fit the belt clip lock into the gap on one side of the phone 2 Then fit the belt clip lock into the gap on the other side of the phone A click sound will be heard to indicate belt is locked into place Removing the Belt Clip Removing the Belt Clip Gently pull the fitted l...

Страница 9: ...ur WiFi phone using the charging cradle do the following 1 Plug the USB jack of the AC power adapter to the cradle then insert the cable wire to the rib to fix the cable properly 2 Plug the AC power adapter into the mains socket then place your phone on the cradle for charging to begin Note 1 We recommend that you charge the battery for five hours before using your WiFi phone for the first time 2 ...

Страница 10: ... Setting the Access Point AP 1 When the phone is powered on for the first time it guides you to search for a wireless network Press the Ok soft key to start 2 There are three ways to connect to a wireless network Push AP WPS Button Manual PIN Mode Using the AP Button To setup using the AP button when you see the display as illustrated on step 2 push the WPS button on your AP The phone displays the...

Страница 11: ...e See Setting the SIP Profile below Manual Setup To setup manually press the Manual soft key 1 The phone starts searching for AP 2 The phone displays the available network Select the option then press the Select soft key Note The network icons indicate the type of security required to connect Refer to the table below Icon Description WPA passkey is required to connect WEP passkey is required to co...

Страница 12: ... Profile below Setting the SIP Profile Setting the SIP Profile After connecting to a wireless network you can now create an SIP profile 1 Press the Ok soft key to continue 2 Setup the SIP profile To setup SIP Profile see AP Settings Setup Complete Setup Complete When setup is complete press the Ok soft key to start using your phone ...

Страница 13: ... locked 3 Mute mode Indicates the system ring tone is muted 4 Battery charging level The presence of all the four bars indicates that the battery is fully charged or has 100 charge Charging is indicated by a moving charging bar 5 Connection mode Displays the current connection mode P2P or SIP profile name P2P means AP association and gets IP address successfully 6 Standby logo Displays the logo wh...

Страница 14: ...ing on the menu options Phonebook Phonebook Your WiFi Phonebook can hold up to 50 contacts which you can access quickly from the main screen by pressing the right soft key You can search for a specific entry by typing the first letters of the required entry or press the Options soft key to enter the submenu Adding Contacts To add a contact to the Phonebook perform the following steps 1 Press the O...

Страница 15: ...ayed from the newest to the oldest entries The oldest entries are deleted as new entries are added Received Calls The Received Calls list consists of all answered calls Missed Calls The Missed Calls list consists of the calls that are not answered Dialed Calls The Dialed Calls list consists of the most recent numbers dialed To go to desired call entry use the navigation pad then press the Select s...

Страница 16: ...rom the Ring Settings submenu select Volume 2 Use the navigation keys to increase or decrease the volume from 0 to 4 on the sliding scale 3 Press the Save soft key Time Date The Time Date menu allows you to set the date and time of your WiFi phone It has the following submenus Set Time To set the correct time Time Format To select the time format among 24 hours or am pm Set Date To set the correct...

Страница 17: ...ght duration time Handset Name Select this submenu option to enter desired display name 1 Enter the desired display name in Edit display name 2 Press the Save soft key to save Note Press the key to toggle between character text formats Backlight Duration Select this submenu option to set the time duration in seconds for the backlight to remain on after the keypad is turns inactive 1 Select the dur...

Страница 18: ...5 When performing firmware upgrade from a computer for the first time and Windows detects the new USB device it will activate the Hardware Update Wizard 6 Locate and install your USB driver by selecting Install from a list of specific location on the Hardware Update Wizard window if you install on a Windows platform 7 Click Finish to exit the wizard when the window displays information about finis...

Страница 19: ... desired network 3 Press the Connect soft key to connect AP Find AP Find You can scan the local area for WiFi reception With in WiFi reception range you can set the AP as default or connect through the Select AP menu To scan for AP perform the following steps 1 When you select AP Find option the phone starts searching for AP and the display shows Searching 2 The lists of available connection are s...

Страница 20: ...AP It s known as WiFi Protected Setup WPS The WPS is used for connecting to a new AP device without knowing various encryption methods that AP may have The WPS feature simplifies various encryption methods into two choices One is by PIN Method the other one is by Push Button Push button Method Enter WPS page the WiFi phone is entering WPS Push button standby mode If the AP supports push button you...

Страница 21: ...nd wifi phone to give another try NOTE Due to the limitation WPS may have compatibility issue with certain AP chip venders If WPS mode could not connects to wifi phone successfully you could use manually AP search and select AP ...

Страница 22: ...eps below 1 Press the Menu key or the Down key to display the menu options 2 Select Phonebook and press the Right soft key to display your phone book 3 Scroll through the list until you find the contact you want to call 4 Select the entry you want to make the call and press the Call key to make the call Redialing a Phone Number To quickly dial a number that you have dialed recently do one of the f...

Страница 23: ... left soft key Spkr On to activate the speakerphone It can be used for hands free conversation When the speakerphone is activated the display shows a speaker logo Press the soft key Spkr Off again to deactivate the speakerphone Volume While having a conversation use the left or right navigation keys to decrease or increase the volume or use the Speaker Volume on the left side of the phone to adjus...

Страница 24: ...r USB Charging over USB Quick Starting Wizard Mute Key Lock Volume Control Keys Numeric Key 0 9 Two function keys 4 ways navigation key Dial key Hang up key Power key Volume Key Hardware Overview LCD Display 112 64 pixel monochrome graphics display with LED backlight IEEE 802 11b g Headset Receiver Hand free Speaker Microphone Battery 3 7v 1200 mAh Charging by USB adapter or by Cradle Power supply...

Отзывы: