A5P | 01
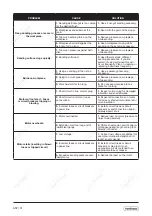
PROBLEM
CAUSE
SOLUTION
Deep sanding grooves or scars in
the workpiece.
1.
Sanding belt/disc grit is too coarse
for the desired finish.
1.
Use a finer-grit sanding accessory.
2. Workpiece sanded across the
grain.
2. Sand with the grain of the wood.
3. Too much sanding force on the
workpiece.
3. Reduce pressure on workpiece
while sanding.
4. Workpiece held still against the
belt-disc for too long.
4. Keep workpiece moving while
sanding on the sanding accessory.
Sanding surface clogs quickly.
1.
Too much pressure against belt/
disc.
1. Reduce pressure on workpiece
while sanding.
2. Sanding softwood.
2.
Use different stock, different
sanding accessories, If you are
certain of using softwood this will
occur frequently. Plan on cleaning or
replacing belts/discs frequently.
Burns on workpiece.
1. Using a sanding grit that is too
fine.
1. Use a coarser-grit sanding
accessory.
2. Using too much pressure.
2. Reduce pressure on workpiece
while sanding.
3. Work held still for too long.
3. Do not keep workpiece in one
place for too long.
Motor will not start - Fuses
or circuit breakers tripping or
blowing.
1. Short circuit in line, cord or plug.
1. Inspect cord or plug for damaged
insulation and shorted wires.
2. Short circuit in motor or loose
connections.
2. Inspect all connections on motor
for loose or shorted terminals and/or
worn insulation.
3. Incorrect fuses or circuit breakers
in power line.
3. Install correct fuses or circuit
breakers or switch tool to an appro-
priately sized circuit.
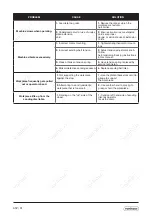
Motor overheats.
1. Motor overloaded.
1. Reduce load on motor (pressure on
object being sanded).
2. Extension cord too long and of
insufficient gauge
2. Utilize an extension cord of appro-
priate gauge and length or plug tool
directly into outlet.
Motor stalls (resulting in blown
fuses or tripped circuit)
1. Low voltage.
1. Correct low voltage conditions (for
example: improper extension cord
length and/or gauge).
2. Incorrect fuses or circuit breakers
in power line.
2. Install correct fuses or circuit
breakers or plug tool into an
appropriate circuit, matched to an
appropriate fuse or breaker.
3. Excessive sanding pressure over-
loads motor.
3. Reduce the load on the motor.
Содержание 3500219
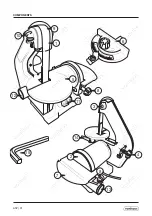
Страница 5: ...A5P 01 COMPONENTS 2 14 7 3 1 9 10 4 13 5 8 15 8 6 11 12...
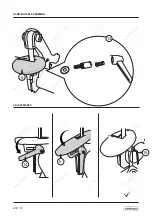
Страница 7: ...A5P 01 ASSEMBLY ASSEMBL E VERSAMMLUNG MONTAJE MONTAGGIO EL MONTAJE 9 10 9...
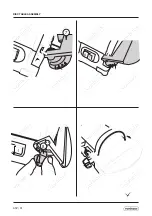
Страница 8: ...A5P 01 SANDING TABLE ASSEMBLY ADJUSTMENTS 5 14 14 5 15...
Страница 9: ...A5P 01 DISC TABLE ASSEMBLY 7 8 x2...
Страница 10: ...A5P 01 OPERATION MITRE GUIDE ADJUSMENTS 1 6m m Max 11 6...
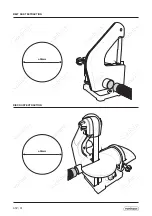
Страница 11: ...A5P 01 BELT DUST EXTRACTION 39mm 39mm DISC DUST EXTRACTION...
Страница 12: ...A5P 01 CHANGING THE SANDING BELT BELT SIZE 760 25MM 860 MIN 1 4...
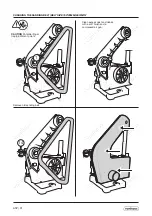
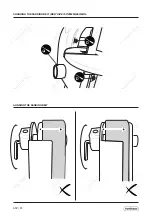
Страница 14: ...A5P 01 ALIGNING THE SANDING BELT CHANGING THE SANDING BELT BELT SIZE 760 25MM 860 MIN 1...
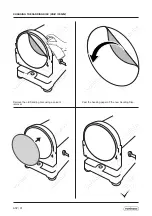
Страница 15: ...A5P 01 Remove the Sanding Disc Table ALIGNING THE SANDING BELT CHANGING THE SANDING DISC DISC 125MM 3 15...
Страница 17: ...A5P 01 Re install the Sanding Disc Table as previously shown CHANGING THE SANDING DISC DISC125MM...
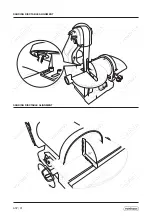
Страница 18: ...A5P 01 SANDING DISCTABLE ALIGNMENT SANDING DISC TABLE ALIGNMENT...
Страница 21: ...A5P 01...

