


This manual contains important information
regarding the operation and maintenance
of the Safe. Please ensure you read and
understand all instructions regarding the
correct operation of the product before
securing items in the Safe.
INTENDED USE.
This Safe is designed and intended for
domestic indoor use only. Do not use for
commercial purposes.
This Safe is not a toy. Keep away from
children. Children should be supervised to
ensure they do not play with the Safe.
ADVICE AND GUIDANCE FOR USE.
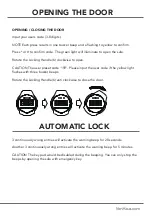
NEVER
store the override keys (or the
manual) in the Safe. Once the batteries have
been exhausted, you will require the keys to
override and open the Safe.
IMPORTANT:
Store the override keys in a
safe place for use in the event of the batteries
becoming exhausted, or should the unlock
code require resetting.
Periodically check the batteries for charge
(every 3 months or as appropriate). If
the batteries are of low charge, replace
immediately. Refer to the
‘Battery Safety’
section for guidance on battery use.
NOTE:
This Safe is
NOT
fireproof or cash
rated. Contact your insurance provider for
guidance before storing any valuables in the
Safe.
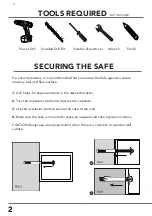
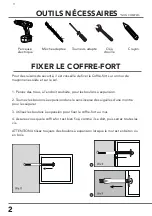
For security purposes, it is recommended that
you secure the Safe to both a suitable wall
and floor surface using appropriate fixings.
Contact your local hardware store or qualified
person for advice and guidance on the most
appropriate fixings to use for your wall/
surface. The Safe should be located out of
sight for extra security.
Fixings supplied are intended for use with
some masonry wall surfaces. If you are unsure
about assembly or the suitability of your wall
or the fixings, do not proceed. Contact a
qualified person for advice and guidance.
NOTE:
These important safeguards and
instructions cannot cover all possible
conditions and situations that may occur. It
must be understood that common sense and
caution are factors which cannot be built into
any product and are the responsibility of the
user.
The Safe contains no user-serviceable parts
with the exception of battery replacement.
Repairs should only be carried out by a
qualified person. Improper repairs may
compromise the integrity or function of the
Safe.
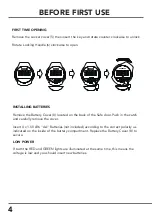
BATTERY SAFETY.
This product requires 4 x 1.5V LR6 “AA” Bat-
teries (not included).
Batteries are to be inserted according to the
correct polarity as indicated on the Safe.
Always recharge a full set of batteries at the
same time. Do not mix old and new batteries.
Only use batteries of the same or equivalent
type (e.g. Alkaline, Lithium-ion etc.)
Do not attempt to recharge non-rechargeable
batteries. Rechargeable batteries should be
removed from the Safe before recharging.
Do not attempt to short-circuit the supply
terminals or batteries for any reason.
Do not dispose of batteries in a fire. Do not
attempt to crush, puncture or in any way dis-
mantle the batteries for any reason.
Do not dispose of batteries in your household
waste. Batteries contain chemicals which are
damaging to the environment. Recycle bat-
teries where appropriate. Contact your local
government offices for advice and guidance
on the correct disposal of batteries or local
recycling centres.
WARNING
PLEASE READ THESE INSTRUCTIONS CAREFULLY AND KEEP FOR FUTURE REFERENCE
Содержание 3500114
Страница 1: ...HOUSEHOLD SAFE 18L 3500114 Instruction Manual...
Страница 11: ...USER NOTES...
Страница 21: ...NOTES DE L UTILISATEUR...
Страница 31: ...BENUTZERANMERKUNGEN...
Страница 41: ...NOTAS DE USUARIO...
Страница 51: ...NOTE DELL UTENTE...


