background image

 Maintenance

31

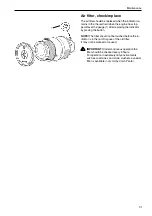
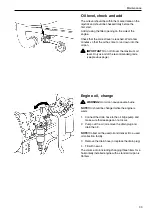
Air filter, check/replace

The air filter should be replaced when the indicator re-
mains in the the red field when the engine has stop-
ped. Reset the gauge (1) after replacing the indicator
by prssing the button.

NOTE! 

The filter should not be touched before the in-

dicator is in the red. Dispose of the old filter.
It may not be cleaned or reused.

IMPORTANT!

 Under continuous operation the

filter should be checked every 8 hours.
For operation in extremely dirty environments
such as coal mines and stone crushers a special
filter is available (not sold by Volvo Penta).

1

Содержание TAD1240GE

Страница 1: ...Generating set and industrial engines 12 liter EDC III OPERATOR SMANUAL ...

Страница 2: ...y applications under some of the most rigorous conditions imaginable This is not by chance After more than 90 years of producing engines the name Volvo Penta has come to symbolize reliability technical ingenuity first class perfor mance and longevity We believe that these characteristics are also ultimately your requirements and expectations for new Volvo Penta industrial engines To make certain t...

Страница 3: ... low load 24 Shutting down the engine 25 Prior to shut down 25 Shut down 25 Aftershut down 25 Extrashut down 25 Contents Maintenanceschedule 26 Maintenanceschedule 26 Newlyrebuiltengine 27 Maintenance 28 Engine general 28 Lubrication system 32 Cooling system 35 Fuel system 41 Electric system 45 Preparationforstorage 49 Preparationforstorage 49 Preparationafterstorage 50 Troubleshooting 51 Symptoms...

Страница 4: ...ta dealer for assistance This symbol is used in the instruction book and on the product to let you know that it con cerns safety information Always read this information very carefully In the instruction book warning texts are handled according to the following priority system WARNING Warns of risk of injury extensive damage to the product or other property or that serious functional problems can ...

Страница 5: ... that the engine be running be assigned to an authorized Volvo Penta repair facility Safety instructions for operation and maintenance Daily checks Make a habit of always visually checking the engine and engine compartment prior to operation before starting the engine and after operation after shut ting down the engine This will help you to quickly notice if fuel coolant or oil leaks or any other ...

Страница 6: ...imity to the filling station or in the engine compart ment Non original parts Components of the fuel and electrical systems on Vol vo Penta engines are designed and manufactured to minimize the risk of explosion or fire according to app licable requirements Use of non original parts can result in explosion or fire Batteries Batteries contain and develop oxyhydrogen gas espe cially while charging O...

Страница 7: ...should be stopped and the electrical power switched off using the main switch breakers External power to the engine heater battery charger or other equipment mounted on the engine must be switched off Batteries Batteries contain a very strong corrosive electrolyte Protect your eyes skin and clothing during charging or other handling of batteries Always use safety glas ses and gloves In case of ski...

Страница 8: ...coolant used batteries etc to an environ mental station for destruction Through our mutual efforts we can make a valuable contribution to the environment Running in The engine should be run in during the first 10 hours of operation according to the following Run the engine as with normal operation Full throttle operation should not occur for more than short peri ods Do not run the engine for long ...

Страница 9: ...ust or intake air systems No seals may be broken by non authorized personnel In all other cases follow the advice in the instruction book regarding operation maintenance and service IMPORTANT In cases of neglected or deficient maintenance service as well as use of non origi nal parts AB Volvo Penta will no longer be able to assure that the engine meets conditions of certification Volvo Penta will ...

Страница 10: ...keystone variety Induction hardened overhead camshaft with roller rocker arms Four valves per cylinder Replaceable valve seats and valve guides Fuel system Microprocessor based control unit for fuel delivery EDCIII Gear driven feeder pump Centrally placed unit injector with electromagnetically controlled fuel valves Fuel filter of spin on type and a water separating filter EDC III Electronic Diese...

Страница 11: ... Turbo A Air to air Charge air cooler W Water to air intercooler D Diesel engine 12 Swept volume liter 4 Generation 0 Version G Gen Set engine V Stationary and mobile operation E Emissions check Location of engine plates The plate below shows 1 Engine designation 2 Serial number 3 Specification number Identification numbers The plate below shows 1 Engine designation 2 Specification number 3 Serial...

Страница 12: ...or 3 Control unit 4 Air filter 5 Starter motor 6 Fuel pre filter with water sensor 7 Fuel filter with fuel pressure sensor 8 Oil dipstick 9 Oil filler 10 Intercooler TAD only Orientation The picture shows TAD1240GE TAD1241GE and TAD1242GE variants ...

Страница 13: ...ly via fuel valves in the unit injectors This means that the engine always receives the cor rect amount of fuel under all operating conditions providing benefits including improved fuel economy and minimized exhaust emissions Diagnostic function The diagnostic system s function is to detect and lo calize disturbances within the EDC III system to pro tect the engine as well as to insure the ability...

Страница 14: ...s diagnostic information for flashing codes etc DU Display Unit The DU is an instrument panel which shows engine working values graphically on an LCD screen It con sists of an computerised unit for permanent installa tion in a control panel The DU is connected between the engine control unit and the CIU or DCU Easy Link instrument only together with a CIU The following Easy Link instruments are av...

Страница 15: ...and in some cases to set a number of different functions in the EMS system NOTE The menus and illustrations shown here are the English version The language can be changed however Please refer to the Setup menu 1 LED display 2 START Starts the engine 3 SPEED Reduces engine speed 4 SPEED Increases engine speed 5 STOP Stops the engine 6 ON OFF Starts and stops the system 7 Scroll downwards in menus 8...

Страница 16: ...gine data n Preheat manual activation of pre heating n Governor mode activation of droop n Diagnostics shows fault codes in plain language n Trip reset resets trip data n Setup parameter setting n Information shows the data for the applicable hardware software data set and engine identifica tion of the engine and DCU Engine data shows relevant engine data Engine speed can be controlled with the SP...

Страница 17: ...EMS 2 Press SEL the text Preheat requested is dis played The display automatically returns to the Engine Data menu Governor mode activates shuts off droop To set the droop level plea se refer to the Setup Governor gradient or Gover nor droop menus Select Isochronous mode or Droop mode with the SEL button Diagnostics shows the error list containing the 10 latest active and inactive faults The fault...

Страница 18: ...nected to voltage to stop the engine Run The stop input must be connected to volt age to run the engine Customer parameter alarm limit setting Please refer to Customer parameter Versatile and Customer parameter Genset Throttle input setting setting of speed control and voltage limits See Throttle input setting Display setting display setting See Display set ting Customer parameter Versatile Idle e...

Страница 19: ... speed alarm is activated Please refer to Overspeed limit to activate the alarm limit for the excess speed alarm Oil temp warning limit C setting the alarm limit for the oil temperature Coolant temp limit C setting the alarm limit for the coolant temperature Throttle input setting speed control setting throttle operation Set throttle mode OFF engine speed is controlled via the DCU panel ext thrott...

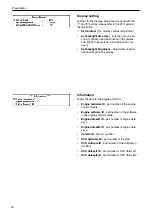
Страница 20: ...htness adjustment of illumi nation strength in the display Information shows the data for the engine and DCU Engine hardware ID part number of the engine control module Engine software ID part number of the software in the engine control module Engine dataset1 ID part number of engine data set 1 Engine dataset2 ID part number of engine data set 2 Vehicle ID chassis number DCU hardware ID part numb...

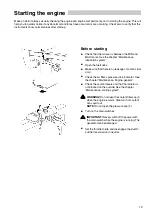
Страница 21: ...cocks Make sure that there is no leakage of coolant fuel or oil Check the air filter s pressure drop indicator See the chapter Maintenance Engine general Check the coolant levels and that the radiator is not blocked on the outside See the chapter Maintenance cooling system WARNING Do not open the coolant filler cap 1 when the engine is warm Steam or hot coolant can squirt out NOTE Do not open the ...

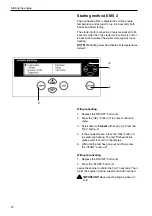
Страница 22: ...ow 0 With pre heating 1 Depress the ON OFF button 6 2 Press the SEL button 7 to come to the main menu 3 Scroll down to Preheat with button 9 Press the SEL button 7 4 In the pre heat menu press the SEL button 7 to select pre heating The text Preheat active please wait is shown in the display 5 Wait until the text has gone out and then press the START button 2 Without pre heating 1 Depress the ON OF...

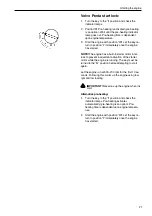
Страница 23: ... to prevent inadvertent activation of the starter motor while the engine is running The key must be turned to the O position before attempting to start again Let the engine run at 500 700 rpm for the first 10 se conds Following this warm up the engine using low rpm and low loading IMPORTANT Never rev up the engine when it is cold Alternative pre heating 1 Turn the key to the I position and check t...

Страница 24: ... synthetic oil of the recommended viscosity for the temperature in question see chapter Maintenan ce lubrication system Synthetic oils retain their lub ricating properties over a wider range of temperatures than mineral oils Pre heat the coolant by using a separately mounted electric engine heater In extreme cases it can be ne cessary to use a diesel powered engine heater Con sult your Volvo Penta...

Страница 25: ...the dead battery Then connect the black booster cable to the booster battery then to a place that is a distance away from the dead battery i e next to the main switch on the negative wiring or at the negative cable s connection to the starter motor 3 Start the engine WARNING Do not disturb the connections while attempting to start the engine risk for creating sparks and do not lean over any of the...

Страница 26: ...Operation at low load Avoid long term operation at idle or at low load since this can lead to increased oil consumption and even tually to oil leakage from the exhaust manifold since oil will seep past the turbocharger seals and accompa ny the induction air into the inlet manifold at low turbo boost pressure One consequence of this is that carbon builds up on valves piston crowns exhaust ports and...

Страница 27: ...e of freezing temperatures liquid in the cooling system must have sufficient anti freeze See the chapter Maintenance cooling system A poorly charged battery can freeze and break Before shut down Allow the engine to run a few minutes with no load be fore it is shut down This permits an evening out of temperatures within the engine which prevents after boiling as well as cooling the turbocharger som...

Страница 28: ...the first 150 operational hours Engine oil change 1 page 33 1 The oil change is recommended the new engine oil should be one that is recommended by Volvo Penta Every 50 600 operational hours at least every 12th month Engine oil change 1 page 33 Oil filter Bypass filter change 2 page 34 1 Oil change intervals will vary depending upon the grade of the oil and the amount of sulfur in the fuel See pag...

Страница 29: ...ange of coolant Every 2000 operational hours Turbocharger check not shown Valve play check adjust not shown Every 12th month EDC system Check with diagnosis tool not shown Engine general check not shown Air filter element change page 31 Engine cleaning painting not shown Air Filter tank ventilation change not shown Air filter air compressor change not shown Every 48th month or every 10 000 operati...

Страница 30: ...tment a visual inspection before starting the engine and after operation when the engine has stopped This will help you to quickly realize if somet hing unusual has happened or is happening Look especially carefully for oil fuel and coolant lea kage loose screws worn or loose drive belts loose connections or damaged hoses and wires The in spection only takes a few minutes but can mean that serious...

Страница 31: ... Loosen the lock screws 2 so that the tightening screws 3 can turn freely Loosen the tightening screws and remove the drive belts TAD TWD Drive belts check adjust Check and adjustments should be done when the drive belts are warm The drive belt to the generator should be able to press in 3 4 mm between the drive belt pulleys The drive belt to the generator must be adjusted manually but the other d...

Страница 32: ... and the outer fan ring around the cooling fan 8 Start the engine and perform a functional check Drive belt replacing 1 Switch the main switch es off and make sure that the engine has no electrical power 2 Remove the protective grill and the outer fan ring from around the cooling fan 3 Remove the protective guards from around the drive belts 4 Place a 1 2 wrench in the belt tensioner Lift up the w...

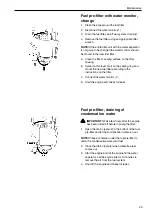
Страница 33: ...g the indicator by prssing the button NOTE The filter should not be touched before the in dicator is in the red Dispose of the old filter It may not be cleaned or reused IMPORTANT Undercontinuousoperationthe filter should be checked every 8 hours For operation in extremely dirty environments such as coal mines and stone crushers a special filter is available not sold by Volvo Penta 1 ...

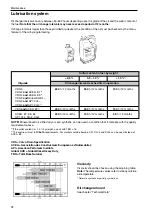
Страница 34: ... can be used on condition that it complies with the quality requirements above 1 If the sulfur content is 1 0 by weight use oil with TBN 15 2 The engine oil must fullfil both requirements For markets outside Europe API CG 4 and CH 4 can be used instead of ACEA E3 VDS Volvo Drain Specification ACEA Association des Constructeurs Européenne d Automobiles API American Petroleum Institute Global DHD Gl...

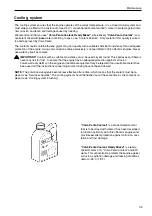
Страница 35: ...use oil of the recommended grade seepreviouspage Engine oil change WARNING Hot oil can cause severe burns NOTE Oil should be changed while the engine is warm 1 Connect the drain hose to the oil bilge pump and make sure that leakage can not occur 2 Pump out the oil or remove the drain plug and drain the oil NOTE Collect all the used oil and deliver it to a used oil collection facility 3 Remove the ...

Страница 36: ...et residue remains 4 Spread a thin layer of engine oil on the new filter s sealing rings 5 Install the new oil filter The two full flow filters should be tightened 1 2 to 3 4 turn following seal contact The bypass filter should be tightened 3 4 to 1 turn following seal contact 6 Fill with oil start the engine and operate it for 20 30 seconds 7 Shut off the engine check the oil level and fill with ...

Страница 37: ...onsistency must be used all year round This applies even if there is never any risk for frost to ensure that the engine has an adequate protection against corrosion Future warranty claims on the engine and additional equipment may be rejected if an unsuitable coolant has been used or if the instructions concerning coolant mixing have not been followed NOTE The anti corrosive agents become less eff...

Страница 38: ...the risk of overheating and will give reduced freezing protection IMPORTANT Coolant must be mixed with pure water use distilled de ionized water The wa ter must fulfill the requirements specified by Volvo Penta see Water quality IMPORTANT It is extremely important that the correct concentration of coolant is added to the system Mix in a separate clean vessel before adding into the cooling system E...

Страница 39: ...xtures 2 Mix the correct amount of coolant ahead of time see the table below so that it can be assured that the system has been filled Filling must not be done so quickly that air pockets form in the system Air must be given the chance to flow out through the filler opening and drain valves When adding coolant the coolant level should be between the MIN and MAX markings 3 Start the engine when the...

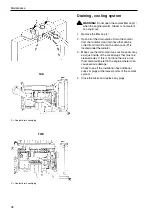
Страница 40: ...Penta the drain cock P is located under the radiator 3 Make sure that all coolant runs out Deposits may exist just inside of the cocks plugs that must be cleaned away If this is not done there is a risk that coolant will be left in the engine where it can cause serious damage Check to see if the installation has additional cocks or plugs at the lowest points of the coolant system 4 Close the cocks...

Страница 41: ...st 2 hours after normal opera ting temperature has been reached NOTE As an alternative the cooling system can be filled with 15 20 concentrated coolant which is drai ned after 1 2 days of operation 4 Empty the cooling system and then rinse out the system with a neutralizing mixture 5 If impurities still exist repeat the cleaning procedure until the system is free from impurities 6 When the cooling...

Страница 42: ...ins on the housing 3 Spread a thin layer of engine oil on the new coolant filter s gasket Tighten the coolant filter by hand until the rubber seal contacts the sealing surface on the filter bracket Tighten the coolant filter 1 2 turn 4 Turn the valve 1 90 to start the flow through the coolant filter again 5 Start the engine and check for leaks 6 Shut off the engine and check the coolant level see ...

Страница 43: ...ity fuel urban diesel in Sweden and citydiesel in Finland can cause a power reduc tion of approximately 5 and a decrease in fuel eco nomy of approximately 2 3 Only use fuel of the recommended grade according to the fuel specification below Always make sure to maintain a high level of cleanliness when fueling and when working with the fuel system All work involving the engine s unit injectors must ...

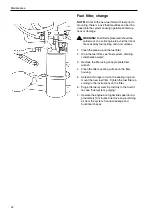
Страница 44: ... fuel filter 2 Drain the fuel filter see Fuel system draining condensation water 3 Remove the filter using an appropriate filter wrench 4 Clean the filter s sealing surface on the filter housing 5 Spread a thin layer of oil on the sealing ring and mount the new fuel filter Tighten the fuel filter ac cording to the instructions on the filter 6 Purge the fuel system in proximity to the fuel fil ter ...

Страница 45: ...the new fuel filter according to the instructions on the filter 7 Connect the water monitor 1 8 Start the engine and check for leaks Fuel pre filter draining of condensation water IMPORTANT Wait a few hours after the engine has been turned off before draining the filter 1 Open the drain nipple 2 in the bottom of the fuel pre filter and let the condensation water run out NOTE Place a container unde...

Страница 46: ...ump with the hand pump until air free fuel flows out Close the bleed nipple while the fuel is flowing out 5 Remove the hose and replace the protective cap on the bleed nipples NOTE When changing the fuel filter no additional bleedingisrequired 6 Move the hose to the cylinder head s bleed nipple 2 and bleed in the same manner as with the fuel filter bracket 7 Run the engine at a higher idle speed f...

Страница 47: ...e battery is broken while the engi ne is running the generator and the electronics can be damaged For the same reason reconnection of the charging circuits must never be carried out while the engine is running IMPORTANT Never switch off the power with the main switch while the engine is running Fuses The engine is equipped with a 10A fuse that shuts off the power in case of an overload in the elec...

Страница 48: ... the cable black to the battery s pole When disconnecting batteries disconnect the cable black first then the cable red Cleaning Keep the batteries dry and clean Contamination and oxidation on the battery and the battery poles can cause current leaks a reduction in voltage and dis charge especially during times of humid weather Cle an oxidation from the battery poles and cable ends using a brass b...

Страница 49: ...ng see the battery manufac turers recommendations A discharged state damages batteries and they can also freeze and break during cold weather IMPORTANT Carefully follow all instructions for the battery charger To avoid risk for electrochemical corrosion when using an external charger when an external charger is used the battery cables should be removed from the battery before the charger is connec...

Страница 50: ...xtra stop 7 Main relay 8 Generator 9 Safety fuse 10A 10 Oil pressure Oil temperature sensor 11 Control unit 12 Fuel pressure alarm 13 8 pin connector 14 23 pin connector 15 Coolant temperature sensor 16 Starter motor 17 Starter motor relay 18 RPM sensor flywheel 19 Water monitor fuel filter 20 Unit injector one for each cylinder 6 4 5 1 2 9 11 12 8 16 19 3 10 18 7 15 13 14 17 20 ...

Страница 51: ...e of preservation and type of preservation oil is provided Cover the air filter exhaust pipe and the engine if called for To prevent the engine and other equipment from suffering damage during periods of storage exceeding two months a preservation procedure should be performed It is important that this be done correctly and that no part of it be forgotten We have therefore created a checklist cove...

Страница 52: ...us page Preservation oil is distributed by oil manufacturers Preparation for use after storage Remove any covers from the engine air filter and exhaust pipe Fill the engine with the proper grade of lubricating oil as needed Mount a new oil filter if a filter change was not performed in conjunction with the preservation process Mount a new fuel filter and purge the fuel system Check the drive belt ...

Страница 53: ...Insufficient lubricating oil pressure 17 Excessive coolant temperature 18 19 20 21 Insufficient coolant temperature 21 Absent or poor charging 2 24 A number of symptoms and possible causes for engine problems are described in the table below Always contact your Volvo Penta dealer if problems occur that you are not able to solve on your own WARNING Read through the safety instructions for maintenan...

Страница 54: ...ns of fault codes fault cause on the instruments Both inactive rectified and active un mended faults are stored in the control unit Please refer to the Operation heading for reading fault codes All fault codes are found in the fault code list with in formation about the reason reaction and measures to be taken Please refer to the Fault codes chapter NOTE All instruments are optional Active faults ...

Страница 55: ...on the display ENGINE WARNING alternated with Press SEL for information NOTE You can choose the language used for the in formation presented on the Read the fault code as follows 1 Press the SEL button to come to the error list The fault list shows Operation hours Fault cause Active inactive 2 Look up the fault code in the Fault Code chapter and take the recommended measures 3 Press the ESC button...

Страница 56: ...1 2 A new fault code is flashed out if more are stored Repeat until the first fault code is repeated 4 Look up the fault code in the Fault Code chapter and take the recommended measures NOTE When the first fault code is repeated all fault codes have been read out If the diagnostic button is pressed after the fault has been mended and the fault codes have been erased code 1 1 No fault will be displ...

Страница 57: ...heck coolant level monitor function Code 2 3 PID SPN 111 Coolant level sensor Cause Short circuit to positive Fault in sensor Reaction None Remedy Check that the coolant level sensor cable is not damaged Check coolant level sensor function Code 2 4 SID21 SPN 637 Flywheelspeedsensor Cause No signal Abnormal frequency Intermittent signal from the sensor Fault in sensor Reaction Engine is very diffic...

Страница 58: ...ID SPN 100 Oil pressure sensor Cause Short circuit to positive or earth ground Open circuit Reaction None Remedy Check that the oil pressure sensor cable is not damaged Check that the oil pressure sensor is correctly connected Code 3 2 PID SPN 105 Chargeairtemperaturesensor Cause Short circuit to positive or earth ground Open circuit Reaction None Remedy Check that the charge air temperature senso...

Страница 59: ...de 3 6 PID SPN 94 Fuel pressure sensor Cause Short circuit to positive or earth ground Open circuit Reaction None Remedy Check that the fuel pressure sensor connector is correctly installed Check that the fuel pressure sensor cable is not damaged Check that the fuel pressure sensor is correctly installed Check fuel pressure sensor function Code 3 7 PID SPN 175 Oil temperature sensor Cause Shorted ...

Страница 60: ...heck that the alarm lamp cable is not damaged Check that the alarm lamp is intact and correctly installed Code 4 4 PPID 264 Overspeed alarm lamp ConnectedtoStand AloneInterface Reason Short circuit to negative Short circuit to positive Open circuit Reaction Alarm lamp gives constant light Alarm lamp does not work If there is an open circuit on start up the diagnosis is de activated Action Check th...

Страница 61: ...an be started but not stopped Remedy Check that the starter switch connections are not damaged Check that the ignition switch cable is not damaged Code 5 4 PID 45 SPN 626 Preheating relay Cause Short circuit to positive or earth ground Open circuit Reaction Preheating can not be activated Preheating is constantly connected Remedy Check that the relay input cable is not damaged Check relay function...

Страница 62: ...arge air temperature sensor function Check the function of the thermostat Code 6 4 PPID 231 SPN 639 Data link CAN CIU Cause Faulty data link CAN CIU Reaction Instruments and warning lamps stop working Remedy Check that the 8 pin connector is not damaged Check that the cables between the CIU and the engine management unit are not damaged Code 6 5 PPID 231 SPN 639 Data link CAN EDC Cause Internal fa...

Страница 63: ...e valve clearance Do a compression test and check cylinder 1 Code 7 2 SID 2 SPN 652 Injector cylinder 2 Cause Electrical fault Faulty compression or injector Reaction Engine runs on 5 cylinders Abnormal sound Reduced performance Remedy Check that the injector cables are not damaged Check that the injector connections are not dam aged Check fuel supply pressure Check the valve clearance Do a compre...

Страница 64: ... injector cables are not damaged Check that the injector connections are not dam aged Check fuel supply pressure Check the valve clearance Do a compression test and check cylinder 5 Code 7 6 SID 6 SPN 656 Injector cylinder 6 Cause Electrical fault Faulty compression or injector Reaction Engine runs on 5 cylinders Abnormal sound Reduced performance Remedy Check that the injector cables are not dama...

Страница 65: ...If the fault re mains change the control module Code 9 8 PPID 254 SPN 629 Fault in control unit CIU Cause Faulty EEPROM CIU Faulty flash memory CIU Fault in control module CIU Reaction CIU returns to factory setting Engine goes to idle Engine can not be started Remedy Re program the unit Change CIU unit Code 9 9 SID 240 SPN 639 Memory fault Cause Memory fault in engine management system Reaction E...

Страница 66: ...00 1200 600 1200 600 900 600 900 High idle adjustable rpm 1500 16201 1500 16201 1800 21001 1800 1920 1800 1920 Highest full load RPM 1500 1800 1500 1800 1800 2100 Dry weight kg 12302 2706 lbs 12302 2706 lbs 12302 2706 lbs 1270 2794 lbs 1 Not adjustable 2 Weight of TAD engines without cooling package and air filter Lubrication system Oil Change volume including change of three filters With horizont...

Страница 67: ... of approximately 2 3 Cooling system General TAD1240 42GE TWD1240VE TAD1241 42VE Type Overpressure closed Pressure valve opens at 75 kPa 11 psi 75 kPa 11 psi Volume engine 20 liters 5 3 US gal 20 liters 5 3 US gal Volume engine radiator and hoses 44 liters 11 6 US gal 44 liters 11 6 US gal Thermostat Type Piston thermostat Piston thermostat Number 1 1 Openingtemperature 82 C 187 F 75 C 167 F Coola...

Страница 68: ...rrent 28 V 60 A powerapprox 1700W Batterycapacity 2 serial connected 12 V max 152 Ah Battery electrolyte density at 25 C fully charged battery 1 28 g cm3 1 24 g cm3 the battery discharges at 1 24 g cm3 1 20 g cm3 Note Applies to batteries with tropical electrolyte ...

Страница 69: ...Notes ...

Страница 70: ...Notes ...

Страница 71: ...als Fax an Document Distribution Center Order Department ARU2 Dept 64620 SE 405 08 Göteborg Schweden Fax 46 31 545 772 Die Bestellung kann auch über das Internet erfolgen http www volvopenta com manual coupon Ja ich will kostenlos eine Betriebsanleitung in deutscher Sprache erhalten Publikationsnummer 7741213 Name Anschrift Land 42200 615001 155099900192 Notez que l offre est valable pendant 12 mo...

Страница 72: ...ción y posteriormente solamente mientras duren las existencias Franquear o enviar fax a Document Distribution Center Order Department ARU2 Dept 64620 SE 405 08 Göteborg Suecia Fax 46 31 545 772 El pedido puede hacerse también por internet http www volvopenta com manual coupon Sí gracias deseo recibir gratuitamente un libro de instrucciones en español Número de publicación 7741215 Nombre Dirección ...

Страница 73: ...tion Center Order Department ARU2 Dept 64620 SE 405 08 Göteborg Ruotsi Fax 46 31 545 772 Tilauksen voi tehdä myös Internetissä http www volvopenta com manual coupon Kyllä kiitos haluan suomenkielisen ohjekirjan veloituksetta Julkaisunumero 7741217 Nimi Osoite Maa 42200 615001 155099900192 Observar que esta oferta é válida durante um período de 12 meses a contar da data de entrega do barco Após est...

Страница 74: ...nual coupon Íáé Èá Þèåëá Ýíá áíôßôõðï ôïõ åã åéñéäßïõ ñÞóçò óôçí áããëéêÞ ãëþóóá ùñßò êáìéÜ ñÝùóç Áñéèìüò Ýêäïóçò 7741221 íïìá Äéåýèõíóç þñá 42200 615001 155099900192 Ïðèìå àíèå Äàííîå ïðåäëîæåíèå äåéñòâèòåëüíî â òå åíèå 12 ìåñÿöåâ ñ ìîìåíòà äîñòàâêè äâèãàòåëÿ Ïî èñòå åíèè ýòîãî ïåðèîäà íàëè èå òîâàðîâ áóäåò çàâèñåòü îò èõ ïîñòóïëåíèÿ Îòïðàâüòå ýòîò òàëîí ïî òîé èëè ôàêñîì íà èìÿ Document Distribut...

Страница 75: ......

Страница 76: ...7745138 English 12 2005 ...

Отзывы: