

TAKING THE CHARGER INTO OPERATION
First make a suitable charging cable. For this,
a prepared cable (12) with two 4 mm banana
plugs (13) is open cable ends (14) is included
with the charger. Attach suitable plug
connectors to the open cable ends. They must
match the high-current plugs used at the
rechargeable batteries. Ensure that the
contacts of the plug connector to the cable are
secure, as well as correct polarity. Red =
plus/+ and black = minus/-!
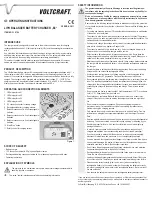
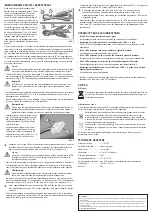
The two connection cables (12 and 16) in
figure 2 are displayed coiled for photo-
technical reasons only. The two cables must
be used uncoiled for taking the charger into
operation.
LiPo rechargeable batteries with more than 1 cell usually have a balancer connection. This
connection is used for monitoring of every single cell by a charger or balancer and protecting it
from over-charging. If the rechargeable battery to be charged has such a balancer connection,
this connection is to be connected to the charger every time the battery is charged.
The charger has an integrated balancer with three JST-XH connection sockets (7, 8 and 9).
Since there are different balancer plug systems depending on rechargeable battery
manufacturer, you will require an adapter cable if the balancer connection of the rechargeable
battery to be charged does not fit.
Attention!
For charging, observe the warning notes of the rechargeable battery manufacturer
regarding maximum charging current and maximum permissible temperature of the
rechargeable battery.
• Connect the DC plug (15) of the included 12 V connection cable to the DC connection socket
of the charger (6). Then connect the alligator clamps (17) of the connection cable to a suitable
12 V/DC voltage source (stabilised mains adapter or car battery).
Important!
Always ensure correct polarity of the connection line! The red clamp must be
connected to the plus pole, the black clamp to the minus pole of the voltage source.
• The charger only emits a brief signal after connection to the voltage source and the four
display LEDs (1, 2, 3 and 4) flash green and red alternatingly. The charger is now ready for
operation.
• Connect the banana plug (13) of the charging cable (12) to the charging sockets of the
charger (6) and connect the rechargeable battery to be charged with the charging cable.
Attention!
Only connect the rechargeable battery to the charging cable after the 4 mm banana
plugs of the charging cable are connected to the charger. Otherwise, loose banana
plugs may come into contact and cause a dangerous short circuit!
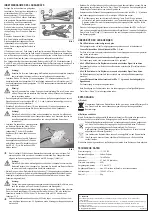
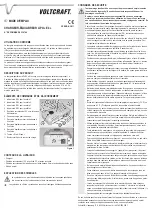
• Then connect the rechargeable battery’s
balancer plug (18), which is protected
against polarity reversal, to the respective
balancer connection of the charger (7, 8 or
9). The two tabs (19) must point upwards.
The charger now recognises the cell
number of the connected rechargeable
battery. As a sign for this, the LEDs (1 – 4)
will flash red, depending on number of cells.
The remaining LEDs remain dark.
¼
Since a single-cell LiPo battery has no balancer connection, in this case, the rechargeable
battery only has to be connected with the charging cable. The charger recognises the
rechargeable battery from the voltage situation and the LED display (1) flashes red.
Attention!
For a multi-cell rechargeable battery, always connect both the charging cable and the
balancer plug to the charger. Never try connecting the balancer plug to a connection
not intended for this.
• Now use the rotary control for the charging current (11) to set the desired charging current.
For this, the rotary control has a red marker arrow. Always observe the technical data and
notes of the rechargeable battery manufacturer to avoid setting the charging current too high.
Attention!
If the maximum permissible charging currents are exceeded, there is a danger of
destroying the rechargeable battery. There also is a danger of fire and explosion!
If you have no rechargeable battery manufacturer information, charge the battery with a
current corresponding to the capacity value (1C). For a rechargeable battery with a charging
current of 1000 mAh, the charging current in this case in 1000 mA or 1A. For a rechargeable
battery with 2100 mAh, the charging current would be 2.1 A.
¼
If the rechargeable battery capacity is above 4500 mAh, the battery can be charged with
the max. possible charging current of 4.5 A. This will, however, extend the charging time.
• After verifying all settings and connections, you can start the charging procedure by pressing
the button „Start / Stop“ (10). The charger confirms pressing of the button with a short signal
sound.
• The LEDs (1 - 4) will light red permanently during charging according to the number of cells in
the connected rechargeable battery. The remaining LEDs remain dark.
¼
The charging process can be interrupted at any time by pressing the button „Start / Stop“
again. Every operation of a button is confirmed by a short signal sound. When the
charging process is interrupted, the LEDs for cell indication will flash red.
• When the charging process is completed, the LEDs will change from red to green and the
charger will emit continuous acoustic signals. Now press the button „Start / Stop“ (10),
disconnect the rechargeable battery and the charger from the voltage source.
LED DISPLAY OVERVIEW
• The LEDs flash red and green alternatingly
The charger was connected to supply voltage and is ready for operation.
• The LEDs 1 - 4 flash red, depending on number of cells of the rechargeable battery
The rechargeable battery is connected to the charger and the charging process was not yet
started or was interrupted.
• All 4 LEDs flash red and an acoustic signal sounds
Charging was started without any rechargeable battery connected.*
• All 4 LEDs flash red in a rhythm of 2 and an acoustic signal sounds
The charging current circuit or the balancer connection was interrupted (loose connection or
broken cable).*
• All 4 LEDs flash red in a rhythm of 3 and an acoustic signal sounds
The operating voltage is above or below the permissible operating voltage range.*
• The LEDs 1 – 4 are lit green, depending on number of cells of the rechargeable battery,
and the charger emits signal sounds
Charging is successfully completed.
* After removing the cause of the error, charging can be resumed by pressing the button „Start /
Stop“ (10) twice.
DISPOSAL
a) Product
Electronic devices are recyclable waste and must not be disposed of in the household
waste! Dispose of the product according to the applicable statutory provisions at the
end of its service life.
b) Batteries and Rechargeable Batteries
You as the end user are required by law (Battery Ordinance) to return all used batteries/
rechargeable batteries. Disposing of them in the household waste is prohibited!
Batteries/rechargeable batteries that contain any hazardous substances are labelled
with the following icons to indicate that disposal in domestic waste is forbidden. The
descriptions for the respective heavy metal are: Cd=cadmium, Hg=mercury, Pb=lead
(the names are indicated on the battery/rechargeable battery, e.g. below the dust bin
icons shown to the left).
You may return used batteries/rechargeable batteries free of charge at the official
collection points of your community, in our stores, or wherever batteries/rechargeable
batteries are sold.
You thus fulfil your statutory obligations and contribute to the protection of the environment.
TECHNICAL DATA
Power supply ...................................... 11 - 15 V/DC
Suitable rechargeable battery types .. Lithium polymer batteries
Number of cells ................................... 1 to 4 cells
Charging current ................................. 0.1 to 4.5 A (infinitely variable)
Maximum charging performance ....... 40 W
Ambient temperature .......................... 0 °C to +35 °C
Ambient air humidity ........................... Max. 90% rel. humidity, non-condensing
Dimensions ......................................... 104 x 62 x 31 mm
Weight ................................................. 94 g
Figure 2
Figure 3
Legal notice
These operating instructions are a publication by Voltcraft®, Lindenweg 15, D-92242 Hirschau/Germany, Phone +49 180/586 582 7
(www.voltcraft.de).
All rights including translation reserved. Reproduction by any method, e.g. photocopy, microfilming, or the capture in electronic data
processing systems require the prior written approval by the editor. Reprinting, also in part, is prohibited.
These operating instructions represent the technical status at the time of printing. Changes in technology and equipment reserved.
© Copyright 2011 by Voltcraft®.


