


8 Display reading
A. Battery symbol
B. Reference value display
C. SCAN mode
D. HOLD mode
E. IR sensor for temperature display
F. Indicator value display
G. °C/°F unit
A
B
C
D
E
F
G
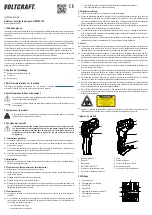
9 Operation
9.1 Installing/Replacing batteries
In case of weak battery (normal/rechargeable) capacity, the
(A)
symbol appears on the
display. You should replace or recharge the normal/rechargeable battery.
1. Open the battery compartment cover
(11)
carefully towards the front.
2. Remove the discharged battery from the battery compartment
(10)
, if necessary, and place
a new battery of the same type (see technical data) on the battery clip with the right poles.
Do not use force.
3. Close the battery compartment cover
(11)
again carefully until you hear a click. The meas-
urement device is ready for operation.
9.2 General
Briefly press button “9” to switch the meter on. Pressing button “9” again starts the measure
-
ment process. The word “SCAN” appears on the LC display. In the measurement process,
the infrared sensor “8” determines the surface temperature of the fixed object. This measured
value is shown on the LC display as temperature value “E”.
The current measured ambient temperature is shown as reference value “B“.
Hold the meter on the object to be measured steady, in order to achieve exact measurement
results.
As soon as you release button “9“, the current measured value is fixed and “HOLD” appears
on the LC display.
A new measurement begins when you press button “9” again.
To save energy, when the meter is in “HOLD” mode, it switches off automatically
after 15 seconds.
9.3 Acoustic signal and indicator light
The product has an acoustic signal and a coloured indicator light
(1)
. The acoustic signal
changes synchronously with the indicator light based on the measured temperature.
This enables rapid measurement when no accurate readings are required.
There are three values that can be used as indicator values (0.5 °C – 2.5 °C – 5 °C). Move the
slide control
(5)
to the desired position. The currently set value “F” appears on the LC display.
If slide control
(5)
is in the “OFF” position, the acoustic signal
and the indicator light
(1)
are switched off.
For a more detailed definition of the indicator values please
observe the section “Indicator values” under settings.
9.4 Target laser
The measurement device features an integrated laser for better fixation of an object.
To activate the laser, briefly press the button “3” once. The
icon appears on the LC display.
Make sure that no persons or animals are in the area of laser radiation.
To deactivate the laser, briefly press the button “3” once again.
9.5 IR spot size (Distance to Spot ratio – DS)
In order to obtain precise measured results, the object to be measured must be larger than the
measuring IR spot (ratio of measurement distance to the measured surface) of the IR thermom-
eter. The temperature recorded is the average temperature of the area measured.
The smaller the object to be measured, the shorter the distance must be to the infrared ther-
mometer. The precise size of the measuring spot is shown in the following diagram.
D:S = 10:1
25mm @ 250mm 50mm @ 500mm 100mm @ 1000mm
1in @ 10in
4in @ 40in
2in @ 20in
9.6 Settings
9.6.1 Temperature units “°C/°F”
The product offers you the opportunity to display the temperature values in °C or °F.
To change the unit, press the “4” key for min. 2 seconds.
The currently set unit
(G)
is displayed on the LC display.
9.6.2 Display light
For better readability the measuring device features an LC display lighting. This lighting can be
switched on or off as required. Briefly press the button “6” to switch it on. The LC display lights
up. To switch off the lighting, briefly press the button “6” once again.
9.6.3 Fixing the reference value
During the measurement the current temperature reference value
(B)
is shown on the LC dis-
play. This value is continuously adapted. To fix the value of this measurement, briefly press
the button “SET/REF/°C/°F” once. The fixed reference value
(B)
is shown on the LC display.
9.6.4 Indicator values
The threshold values of the acoustic signal and the indicator light can be adjusted in three
steps. The indicator values relate to 0.5 °C, 2.5 °C or 5 °C.
For this purpose, move the slide control
(5)
to the desired position.
Display example for a measured reference temperature of 23.1 °C.
Threshold value
Blue light
Green light
Red light
OFF
0.5 °C
… - 22.6 °C
22.7 - 23.5 °C
23.6 - … °C
2.5 °C
… - 20.6 °C
20.7 - 25.5 °C
25.6 - … °C
5 °C
… - 18.1 °C
18.2 - 28 °C
28.1 - … °C
10 Cleaning and care
Important:
– Do not use aggressive cleaning agents, rubbing alcohol or other chemical solutions.
They damage the housing and can cause the product to malfunction.
– Do not immerse the product in water.
Apart from the occasional normal/rechargeable battery change, the measurement device
is maintenance-free.
Never clean the product when it is turned on.
Clean the product with a dry, fibre-free cloth.
Clean the sensor disc
(8)
as required with only a soft, clean cloth.
11 Disposal
11.1 Product
Electronic devices are recyclable waste and must not be disposed of in the house-
hold waste. At the end of its service life, dispose of the product in accordance with
applicable regulatory guidelines.
11.2 (Rechargeable) batteries
Remove any inserted (rechargeable) batteries and dispose of them separately from the prod-
uct. You as the end user are required by law (Battery Ordinance) to return all used (recharge-
able) batteries. Disposing of them in the household waste is prohibited.
Contaminated (rechargeable) batteries are labeled with this symbol to indicate that
disposal in the domestic waste is forbidden. The designations for the heavy metals
involved are: Cd = Cadmium, Hg = Mercury, Pb = Lead (name on (rechargeable)
batteries, e.g. below the trash icon on the left).
Used (rechargeable) batteries can be returned to collection points in your municipality, our
stores or wherever (rechargeable) batteries are sold. You thus fulfill your statutory obligations
and contribute to the protection of the environment.
Before disposal, the exposed contacts of batteries must be fully covered with a piece of ad-
hesive tape to prevent short-circuits. Even if batteries are depleted, the remaining energy can
become dangerous in the event of a short-circuit (bursting, severe heating, fire, explosion).
12 Technical data
Input voltage ................................. 9 V block battery
Measuring range ........................... -50 to +260 °C/-58 to +500 °F
Resolution ..................................... Temperature 0.1 °C
Response time .............................. < 0.5 ms
Emission level ............................... 0.95
Optics ........................................... 10:1
Accuracy ....................................... ±(3 % + 3 °C/5 °F)
Dimensions ................................... 131.3 x 37 x 183.4 mm (L x W x H)
Weight .......................................... 220 g
This is a publication by Conrad Electronic SE, Klaus-Conrad-Str. 1, D-92240 Hirschau (www.conrad.com). All rights in-
cluding translation reserved. Reproduction by any method, e.g. photocopy, microfilming, or the capture in electronic data
processing systems require the prior written approval by the editor. Reprinting, also in part, is prohibited. This publication
represents the technical status at the time of printing.
Copyright 2021 by Conrad Electronic SE.
*631768_V4_1221_02_mxs_m_en


