background image

24


Page

11.  PC Connection .................................................................................................................................................... 41
12.  Using the video output ........................................................................................................................................ 41
13.  Resetting to the factory settings ......................................................................................................................... 42
14.  Troubleshooting .................................................................................................................................................. 42
15.  Maintenance and care ........................................................................................................................................ 43
16.  Disposal .............................................................................................................................................................. 43
 

a)  General information ...................................................................................................................................... 43


b)  Rechargeable battery ................................................................................................................................... 43

17.  Technical data ..................................................................................................................................................... 44
 

a)  Endoscope basic device ............................................................................................................................... 44


b)  Mains unit ..................................................................................................................................................... 44

Содержание BS-1500T

Страница 1: ...22 BS 1500T ENDOSCOPE BASIC UNIT G OPERATING INSTRUCTIONS page 23 44 Appareil de base endoscope BS 1500T F MODE D EMPLOI page 45 66 BS 1500T Endoscoop Basisapparaat O GEBRUIKSAANWIJZING pagINA 67 89 B...

Страница 2: ...herkarte 12 d Anschluss einer Endoskop Kamera 12 e Ger t Ein und Ausschalten 13 f Einstellen der Kamerabeleuchtung 13 9 Konfiguration 14 a Sprache einstellen 14 b Datum und Uhrzeit einstellen 14 c Aut...

Страница 3: ...enutzung des Video Ausgangs 19 13 Zur cksetzen auf die Werkseinstellung 20 14 Behebung von St rungen 20 15 Wartung und Pflege 21 16 Entsorgung 21 a Allgemein 21 b Akku 21 17 Technische Daten 22 a Endo...

Страница 4: ...male L sung zur Hand Und das Besondere Die ausgereifte Technik und die zuverl ssige Qualit t unserer Voltcraft Produkte bieten wir Ihnen mit einem fast unschlagbar g nstigen Preis Leistungsverh ltnis...

Страница 5: ...gang bertragen werden Die Beleuchtung an der Spitze einer passenden Endoskop Kamera kann mit diesem Endoskop Grundger t stufen los geregelt werden Das Produkt darf keiner Feuchtigkeit ausgesetzt bzw n...

Страница 6: ...olgenden Sicherheitshinweise dienen nicht nur zum Schutz Ihrer Gesundheit sondern auch zum Schutz des Produkts Lesen Sie sich deshalb dieses Kapitel sehr aufmerksam durch bevor Sie das Produkt in Betr...

Страница 7: ...des Produkts ffnen Sie es deshalb niemals Sch tzen Sie das Produkt vor direkter Sonneneinstrahlung starker Hitze 60 C K lte 20 C Vibrationen oder mechanischen Beanspruchungen Das Produkt ist kein Spi...

Страница 8: ...all aufgeladen wer den In diesem Fall besteht akute Brand und Explosionsgefahr Laden Sie den mitgelieferten Akku ausschlie lich im Endoskop Grundger t verwenden Sie niemals andere Ladeger te Wenn Sie...

Страница 9: ...ch die aufgenommenen Bilder und Videos zu scrollen aufw rts A9 ffnen des Men s Auswahl Best tigen im Men A10 Mikrofon A11 Helligkeit der LED Kamerabeleuchtung erh hen Lautst rke im Wiedergabemodus erh...

Страница 10: ...Display Anzeige D1 Datum D2 Uhrzeit D3 Bisherige Distanz welche mit der Kamera betrachtet wurde D4 Momentan eingestellter Zoom Faktor D5 Akkuanzeige D6 Anzeige des belegten Speicherplatzes auf der SD...

Страница 11: ...n Deckel zu bis er einrastet Damit ist das Einlegen des Akkus abgeschlossen Sollten Sie den LiPo Akku wechseln wollen nehmen Sie den alten Akku bevor Sie den neuen einlegen vorsichtig aus dem Geh use...

Страница 12: ...einer Endoskop Kamera Schlie en Sie jetzt eine kompatible Endoskop Kamera z B die 1214310 am BS 1500T an Es kann durchaus sein dass f r den Anschluss einer Kamera an das Grundger t ein Adapter bzw Ada...

Страница 13: ...A15 Um das Endoskop Grundger t wieder aus zu schalten dr cken Sie wieder f r 3 bis 5 Sekunden die Ein Aus Taste A16 Sobald das Display erlischt ist das Ger t ausgeschaltet Wenn eine gewisse Zeit keine...

Страница 14: ...ufnehmen Das Datum und die Uhrzeit k nnen auf Wunsch im Bild oder Video eingeblendet werden Navigieren Sie A7 A8 zum Men punkt Datum Zeit Setup und ffnen Sie ihn A9 Legen Sie zuerst das Format des Dat...

Страница 15: ...en TV Ger t ab e L schen aller Bilder und Videos Um alle aufgenommenen Bilder und Videos von der eingelegten Speicherkarte zu l schen gehen Sie wie folgt vor Navigieren Sie A7 A8 zum Men punkt Alles l...

Страница 16: ...werden im JPG Format im Unterordner 100DCSCIM gespeichert Die 100 am Anfang des Ordners kann sich auch ver ndern Der Aufnahmeordner befindet sich im Ordner DCIM auf der Speicherkarte Die Dateinamen w...

Страница 17: ...e die Taste A6 erneut Wenn das Video pausiert k nnen Sie auch wieder mit den beiden Pfeiltasten A7 und A8 zum n chsten Foto oder Video weiterschalten Die Lautst rke f r die Wiedergabe eines Videos k n...

Страница 18: ...cken Sie die Taste A14 Zum Verlassen der Dualanzeige dr cken Sie die Taste Esc A15 f Digitaler Zoom Im Vorschau Modus haben Sie die M glichkeit das Bild digital zu vergr ern Zum Vergr ern dr cken Sie...

Страница 19: ...e den Video Ausgang benutzen k nnen m ssen Sie auf jeden Fall das korrekte Videoformat wie unter Kapitel 9 d beschrieben eingestellt haben Beachten Sie au erdem die Bedienungsanleitung von Ihrem Ferns...

Страница 20: ...er Akku leer Laden Sie ihn wie unter Kapitel 8 b beschrieben auf berpr fen Sie ob der Akku am Ger t angeschlossen ist Setzen Sie das Ger t auf die Werkseinstellung zur ck wie es unter Kapitel 13 besch...

Страница 21: ...berfl che des Geh uses besch digt werden k nnte Verf rbungen 16 Entsorgung a Allgemein Das Produkt geh rt nicht in den Hausm ll Entsorgen Sie das Produkt am Ende seiner Lebensdauer gem den geltenden g...

Страница 22: ...arte im Lieferumfang max 32 GB Geschwindigkeit min Class 4 Video Ausgang AV PAL NTSC Bildformat JPG max 640 x 480 Pixel Video Aufnahme Format ASF max 640 x 480 Pixel Video Kompressions Format MPEG4 Ab...

Страница 23: ...erting the SDHC memory card 34 d Connection of an endoscope camera 34 e Switching the device on and off 35 f Setting the camera lighting 35 9 Configuration 36 a Setting the language 36 b Setting of da...

Страница 24: ...he video output 41 13 Resetting to the factory settings 42 14 Troubleshooting 42 15 Maintenance and care 43 16 Disposal 43 a General information 43 b Rechargeable battery 43 17 Technical data 44 a End...

Страница 25: ...ution for even the most sophisticated of tasks Special features We offer the sophisticated technology and reliable quality of our Voltcraft products at a near unbeatable price performance ratio We lay...

Страница 26: ...mory card USB or the video output The lighting at the tip of a matching endoscope camera can be controlled smoothly with this endoscope basic device The product must not be exposed to humidity or subm...

Страница 27: ...ation is intended not only for the protection of your health but also for the protection of the product Therefore read this chapter very carefully before taking the product into operation a General in...

Страница 28: ...d rechargeable batteries Do not leave packaging material unattended It may become a dangerous toy for children Handle the product with care It can be damaged by impact blows or when dropped even from...

Страница 29: ...vice never use any other chargers If you are not using the endoscope for an extended period e g during storage charge the battery at the latest every 3 months to avoid deep discharge Deep discharge wi...

Страница 30: ...30 6 Operating Elements...

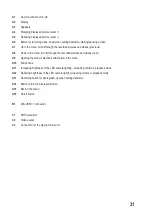
Страница 31: ...e recorded pictures and videos next A9 Opening the menu selection confirmation in the menu A10 Microphone A11 Increasing brightness of the LED camera lighting increasing volume in playback mode A12 Re...

Страница 32: ...32 7 Display D1 Date D2 Time D3 Distance inspected with the camera so far D4 Currently set zoom factor D5 Rechargeable battery display D6 Display of the occupied memory on the SD card...

Страница 33: ...until it latches The rechargeable batteries are now inserted If you want to replace the LiPo rechargeable battery take out the old rechargeable battery carefully before you insert the new one Pull the...

Страница 34: ...ndoscope camera Now connect a compatible endoscope camera e g the 1214310 to the BS 1500T It is possible that an adapter or adapter cable is needed to connect the camera to the basics device If this i...

Страница 35: ...card To show the bar again push the button Esc A15 To switch off the endoscope basic device push the on off button A16 again for 3 to 5 seconds Once the display goes out the device is off If no input...

Страница 36: ...d pictures or videos You can display the date and time in the picture or video as desired Navigate A7 A8 to the menu item DATE TIME SETUP and open it A9 Specify the date format first For this open the...

Страница 37: ...pictures and videos To delete all recorded pictures and videos from the inserted memory card proceed as follows Navigate A7 A8 to the menu item DELETE ALL and open it A9 Select YES A7 A8 and confirm w...

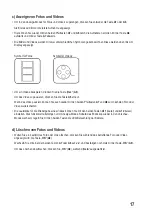
Страница 38: ...in JPG format in the sub folder 100DCSCIM The 100 at the beginning of the folder may also change The recording folder is in the folder DCIM on the memory card The file names are numbered consecutively...

Страница 39: ...A6 To pause the video push the button A6 again When the video is paused you can also switch to the next photograph or video with the arrows A7 and A8 The volume for playback of a video can be set wit...

Страница 40: ...lay push the button A14 To leave dual display push the button Esc A15 f Digital zoom In preview mode you can digitally enlarge the pictures To enlarge them push the button A4 to reduce their size push...

Страница 41: ...ng the Video Output Before you can use the video output you always must have set the proper video format as described in chapter 9 d Also observe the operating instructions for your TV First connect t...

Страница 42: ...hargeable battery may be flat Charge it as described in chapter 8 b Check if the rechargeable battery is connected to the device Reset the device to factory settings as described in chapter 13 The pre...

Страница 43: ...Disposal a General information The product does not belong in the household waste At the end of its service life dispose of the product according to the relevant statutory regulations Remove the inse...

Страница 44: ...medium 4 GB SDHC memory card enclosed max 32 GB speed min class 4 Video output AV PAL NTSC Picture format JPG max 640 x 480 Pixel Video recording format ASF max 640 x 480 Pixel Video compression forma...

Страница 45: ...rdement d une cam ra endoscopique 56 e Mise en marche et arr t de l appareil 57 f R glage de l clairage de la cam ra 57 9 Configuration 58 a S lection de la langue 58 b R glage de la date et de l heur...

Страница 46: ...de la sortie vid o 63 13 R initialisation avec les r glages d usine 64 14 D pannage 64 15 Entretien et nettoyage 65 16 limination 65 a G n ralit s 65 b Batterie 65 17 Caract ristiques techniques 66 a...

Страница 47: ...s plus exigeantes Et le clou la technologie sophistiqu e et la fiabilit de nos produits Voltcraft combin es avec un rapport qualit prix avantageux et presque imbattable Nous cr ons ainsi la base pour...

Страница 48: ...rt USB ou de la sortie vid o Avec cet appareil endoscopique de base l clairage sur la pointe de la cam ra peut tre r gul en continu Le produit ne doit pas tre expos l humidit ni mouill L alimentation...

Страница 49: ...la garantie ou garantie l gale Ch re cliente cher client Les consignes de s curit ci dessous ne sont pas uniquement destin es pr server votre sant mais aussi le bon fonctionnement du produit Veuillez...

Страница 50: ...jamais l appareil il ne contient aucun composant n cessitant un entretien Prot gez le produit contre le rayonnement solaire direct les temp ratures lev es 60 C et les basses temp ratures 20 C les vib...

Страница 51: ...lument interdit de la charger En tel cas il y a un danger extr me d incendie et d explosion Rechargez uniquement la batterie fournie dans l appareil endoscopique de base n employez jamais d autres cha...

Страница 52: ...52 6 l ments de commande...

Страница 53: ...t les photos et vid os enregistr es A9 Affichage du menu s lection validation dans le menu A10 Microphone A11 Augmenter la luminosit de l clairage de la cam ra DEL augmenter le volume en mode Lecture...

Страница 54: ...7 Affichage sur l cran D1 Jour D2 Heure D3 Distance actuellement observ e avec la cam ra D4 Facteur de zoom actuel D5 Affichage du niveau de la batterie D6 Affichage de la m moire occup e sur la carte...

Страница 55: ...rcle jusqu ce qu il s enclenche L insertion des batteries est termin e Si vous souhaitez remplacer la batterie LiPo retirez avec pr caution l ancienne batterie du bo tier avant d ins rer la batterie n...

Страница 56: ...cam ra endoscopique Raccordez maintenant une cam ra endoscopique compatible par ex le mod le 1214310 l appareil BS 1500T Il peut s av rer n cessaire d employer un adaptateur ou un c ble adaptateur pou...

Страница 57: ...ouche Esc A15 Pour teindre nouveau l appareil endoscopique de base appuyez encore une fois pendant 3 5 secondes sur le bouton marche arr t A16 D s que l cran est d sactiv l appareil est teint En l abs...

Страница 58: ...l heure peuvent tre enregistr es avec la photo ou la vid o Naviguez A7 A8 jusqu la rubrique du menu Date Temps puis s lectionnez la A9 D finissez d abord le format de la date Pour ce faire s lectionn...

Страница 59: ...es les photos et vid os Pour effacer toutes les photos et vid os enregistr es de la carte m moire ins r e proc dez de la mani re suivante Naviguez A7 A8 jusqu la rubrique du menu Tout Supprimer puis s...

Страница 60: ...us dossier 100DCSCIM Le nom du dossier ne commence pas forc ment par la valeur 100 Le dossier d enregistrement est le dossier DCIM sur la carte m moire Les noms des fichiers sont num rot s dans l ordr...

Страница 61: ...e fois sur la touche A6 Lorsque la vid o est en pause vous pouvez galement nouveau passer la photo ou la vid o suivante l aide des deux touches fl ch es A7 et A8 Le volume pendant la lecture d une vid...

Страница 62: ...4 Pour quitter le double affichage appuyez sur la touche Esc A15 f Zoom num rique En mode Aper u vous pouvez utiliser la fonction du zoom num rique Pour agrandir l image appuyez sur la touche A4 pour...

Страница 63: ...2 Utilisation de la sortie vid o Avant de pouvoir utiliser la sortie vid o vous devez imp rativement configurer le format vid o appropri en proc dant de la mani re d crite dans le chapitre 9 d Observe...

Страница 64: ...dans le chapitre 8 b Assurez vous que la batterie est raccord e l appareil Restaurez les r glages d usine de l appareil en proc dant de la mani re d crite dans le chapitre 13 Apr s la mise en marche...

Страница 65: ...d colorations 16 limination a G n ralit s Il est interdit de jeter le produit avec les ordures m nag res Il convient de proc der l limination du produit au terme de sa dur e de vie conform ment aux pr...

Страница 66: ...rnie max 32 Go vitesse min classe 4 Sortie vid o AV PAL et NTSC Format des photos JPG max 640 x 480 pixels Format d enregistrement vid o ASF max 640 x 480 pixels Format de compression vid o MPEG4 Dime...

Страница 67: ...genkaart installeren 78 d Endoscoopcamera aansluiten 78 e Apparaat in en uitschakelen 79 f Cameraverlichting instellen 79 9 Configuratie 80 a Taal instellen 80 b Datum en tijd instellen 80 c Automatis...

Страница 68: ...bruik van de video uitgang 85 13 Herstellen van de fabrieksinstellingen 86 14 Verhelpen van storingen 86 15 Onderhoud en verzorging 87 16 Afvoer 87 a Algemeen 87 b Accu 87 17 Technische gegevens 88 a...

Страница 69: ...e altijd de perfecte oplossing binnen handbereik Bovendien Bieden wij u de geavanceerde techniek en betrouwbare kwaliteit van onze Voltcraft producten tegen een nagenoeg niet te evenaren verhouding va...

Страница 70: ...n via de geheugenkaart USB of video uitgang worden overgezet De verlichting aan de punt van een passende endoscoopcamera kan met dit endoscoop basisapparaat traploos worden geregeld Het product mag ni...

Страница 71: ...eachte klant De volgende veiligheidsvoorschriften dienen niet alleen ter bescherming van uw eigen gezondheid maar ook ter bescherming van het product Lees daarom dit hoofdstuk zeer aandachtig door voo...

Страница 72: ...ud het apparaat uit de zon en bescherm het tegen overmatige hitte 60 C kou 20 C stof en vuil trillingen of mechanische belasting Dit product is geen speelgoed houd het daarom buiten bereik van kindere...

Страница 73: ...ies Laad de meegeleverde accu uitsluitend in het endoscoop basisapparaat op gebruik nooit andere laadapparaten Wanneer u de endoscoop langere tijd niet gebruikt vb bij opslag laadt u de accu ten laats...

Страница 74: ...74 6 Bedieningselementen...

Страница 75: ...m door de opgenomen beelden en video s te scrollen vooruit A9 Menu openen Kiezen Bevestigen in het menu A10 Microfoon A11 Helderheid van de LED cameraverlichting verhogen Volume verhogen in de weergav...

Страница 76: ...76 7 Schermweergave D1 Datum D2 Tijd D3 Afstand die door de camera werd afgelegd D4 Huidig ingestelde zoomfactor D5 Accu indicator D6 Weergave van het gebruikte geheugen op de SD kaart...

Страница 77: ...ring en druk het deksel dicht tot het vastklikt Zo is het plaatsen van de accu voltooid Als u de LiPo accu wilt vervangen neemt u de oude accu voorzichtig uit de behuizing voor u de nieuwe accu instal...

Страница 78: ...nu een compatibele endoscoopcamera vb de 1214310 aan de BS 1500T aan Het is daarbij mogelijk dat er voor de aansluiting van de camera aan het basisapparaat een adapter of adapterkabel nodig is Wanneer...

Страница 79: ...Om het endoscoop basisapparaat opnieuw uit te schakelen drukt u gedurende 3 tot 5 seconden op aan uitknop A16 Van zodra het scherm uitdooft is het apparaat uitgeschakeld Wanneer er gedurende zekere t...

Страница 80: ...en tijd in te stellen voor u beelden en video s opneemt De datum en tijd kunnen naar wens in de afbeelding of video worden weergegeven Navigeer A7 A8 naar het menupunt Datum Tijd instellingen en open...

Страница 81: ...af van het gebruikte TV toestel e Alle beelden en video s wissen Om alle opgenomen beelden en video s van de ge nstalleerde geheugenkaart te wissen gaat u als volgt te werk Navigeer A7 A8 naar het me...

Страница 82: ...PG formaat in de submap 100DCSCIM opgeslagen De 100 aan het be gin van de map kan ook gewijzigd worden De opnamemap bevindt zich in de map DCIM op de geheugenkaart De bestandsnamen worden voortdurend...

Страница 83: ...uw op knop A6 Wanneer de video gepauzeerd is kunt u ook opnieuw met beide pijltoetsen A7 en A8 naar de volgende foto of video doorschakelen Het volume voor het afspelen van een video kunt u met beide...

Страница 84: ...4 Om de dubbele weergave te verlaten drukt u op knop Esc A15 f Digitale zoom In de voorbeeldmodus hebt u de mogelijkheid om het beeld digitaal te vergroten Om te vergroten drukt u op knop A4 om te ver...

Страница 85: ...r u de video uitgang kan gebruiken moet u in elk geval het juiste videoformaat ingesteld hebben zoals beschre ven in hoofdstuk 9 d Raadpleeg bovendien de gebruiksaanwijzing van uw televisietoestel Slu...

Страница 86: ...de accu leeg Laad de accu op zoals beschreven in hoofdstuk 8 b Controleer of de accu aan het apparaat is aangesloten Herstel de fabrieksinstellingen op het apparaat zoals beschreven in hoofdstuk 13 Na...

Страница 87: ...ak van de behuizing kunnen beschadigen verkleuringen 16 Afvoer a Algemeen Het product hoort niet thuis in het huishoudelijk afval Verwijder het product aan het einde van de levensduur volgens de gelde...

Страница 88: ...SDHC geheugenkaart inbegrepen max 32 GB snelheid min Class 4 Video uitgang AV PAL NTSC Beeldformaat JPG max 640 x 480 pixels Video opnameformaat ASF max 640 x 480 pixels Videocompressieformaat MPEG4 A...

Страница 89: ...89...

Страница 90: ...90...

Страница 91: ...91...

Страница 92: ...t the time of printing Copyright 2015 by Conrad Electronic SE F Information l gales Ceci est une publication de Conrad Electronic SE Klaus Conrad Str 1 D 92240 Hirschau www conrad com Tous droits r se...

Отзывы: